Upgrading your motherboard’s BIOS can be a scary and daunting process for most. Cryptic version strings, DOS bootdisks, flashing and other words can scare away lots of people. Do you want to be one of them? If not, check out this simple article on how to upgrade your computer/motherboard’s BIOS.
What’s a BIOS and Why do You Need One?
A computer’s BIOS (Basic Input/Output System) is the most common piece of code present on almost every home computer being used today. Excluding Macs which use EFI, a normal IBM-compatible computer will have a small piece of code called the firmware - BIOS. This firmware is the first code which is run when you start up your computer. It boots up your computer’s hardware and identifies and tests it before handing over control to software next in the chain. It runs a set of tests called POST (Power On Self Test) which make sure that your computer is in a working condition. In case of any errors (bad memory, broken hard-disks, or missing hardware), it spits out an error message and/or plays a set of beeps to inform the user about the same.
In older operating systems like MS-DOS, the BIOS provided various functions so that the memory used by the operating system would be less. In today’s modern operating systems, the role of the BIOS is to just initialize the hardware and pass control to the operating system. But make no mistake - it’s still an incredibly important piece of software on your computer. Without a functioning BIOS, there is no way to run anything on your computer. And upgrading the BIOS could be a risky proposition if the power goes out during the upgrade process. This is the reason why BIOS upgrades aren’t very popular.
The upside of a BIOS upgrade could be the addition of new features, bug fixes to the original BIOS, or new revisions which add support for new hardware. Manufacturers routinely release BIOS upgrades for motherboards when a new breed of processors comes out. Without these updates, you wouldn’t be able to upgrade to that shiny new dual-core processor in your computer. Sometimes, certain quirky bugs can pass through and cause problems on computers. These can also be fixed through BIOS updates.
Who Releases These Updates?
Although there are only a handful of companies (American Megatrends, Phoenix Technologies, Insyde Software) which provide BIOS software for all the motherboards being sold, this software is customized by motherboard manufacturers to suit their particular motherboards. Therefore, you will never see a company like American Megatrends release an update for its BIOS to the general public. These companies release upgrades and additions to the BIOS and send them off to the motherboard manufacturers.
These manufacturers then work with the BIOS to configure it for their motherboards in the market. A normal person like you or me would therefore have to go to their respective motherboard manufacturer’s site and obtain the updated version from there. For those with laptops, you would have to go to the laptop manufacturer’s site and search for an updated BIOS in their downloads section.
Finding The Correct BIOS For Your Motherboard
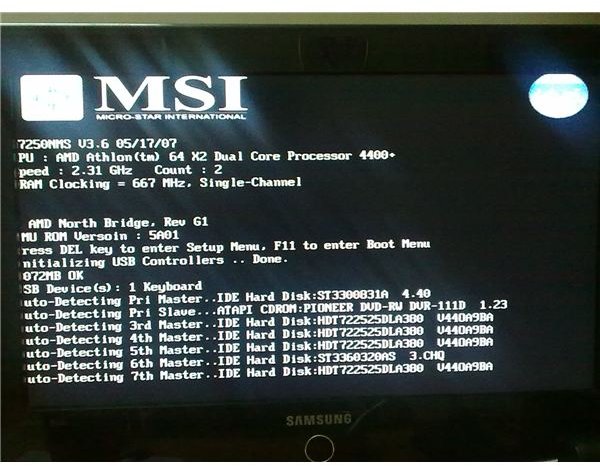
The first step is to find out if there is an update available for your BIOS. To do this, when your computer boots up, try to look at the information presented to you. You should get a list of drives detected, your computer’s processor identification, the amount of RAM in your computer, and most importantly, the version of your computer’s BIOS. You might have to restart a couple of times before you can find the version of your BIOS. If you see a fancy graphic coming up during bootup instead, you should try pressing the “Delete”, “F2”, “F10” or “Tab” on your keyboard during bootup. Chances are, one of these keys will show you the real information string instead of that fancy logo.
If you’re too lazy to do this, download an application called EVEREST by Lavalys. This software will present you with a goldmine of information about the innards of your computer, including the BIOS version you’re running on your computer.
Setting Up The BIOS Update Process
Once you have the relevant information, head to your motherboard manufacturer’s site (also available in EVEREST) and find the Support/Downloads section. The website should present you with a page specifically for your motherboard model with a list of software/updates available for it. Download an updated BIOS version if it’s available. In my case, an update was available for the BIOS (3.10 to my current 3.6).
Once you have the files, check through them. You will have a README file included which details how you should go about the process. Some manufacturers have graphical updaters these days which will upgrade your BIOS from Windows itself. Others will require you to boot to an MS-DOS environment from a boot-disk and upgrade from there. It all depends on your motherboard manufacturer and should be detailed in the included readme file. Read through it. Even if your manufacturer requires you to use a boot disk to upgrade, they will bundle a flasher which will do the actual work of flashing the updated BIOS to your motherboard. Keep these files handy.
Flashing the BIOS From MS-DOS
If you require a boot disk, you will find the files at Bootdisk.Com . Download the boot disk creator for MS-DOS 6.22 and run it on your computer. The utility will ask for a blank floppy to write the files, so insert one. Once done, copy over the upgrade files to the floppy. In case you don’t have enough space for the extra files, use another floppy for those files. Now, restart your computer and boot from your computer’s floppy drive. Make sure the MS-DOS boot disk is in the floppy drive when you do this. The computer will boot and you will have the DOS command prompt to yourself. Here, the instructions in the readme file will come in handy.
Typically, you will have to type the name of the flasher followed by the name of the updated BIOS file. In my case, it was typing “Afud408.exe A7250NMS.3A0”. The Afud408.exe is the flasher program and A7250NMS.3A0 is the updated BIOS. As soon as you run this command, it will ask you if you want to save a backup of the current BIOS. It is up to you if you want to save it or not. Once past that stage, it will flash the updated BIOS file and reboot your computer.
Flashing a BIOS From Windows
Since many motherboard manufacturers bundle the BIOS updates with Windows BIOS flashers, it becomes easy to upgrade your BIOS. Once you download the updated BIOS, extract all files from the archive. Again, following the readme file should get you on your way.
Generally, you will have to run the flasher program which will ask for a BIOS update file. Select the new version BIOS which you’ve just downloaded. Save a backup if you want and if it asks you to. Once it’s done flashing the new BIOS, it will ask you for a reboot. You should have an updated BIOS after rebooting.
Final Steps
At this point, you will have an updated BIOS but without your old settings. You will have to press “F1” or “Delete” to go into the BIOS configuration menu where you will be able to change various settings. Selecting the Default Settings option should be good enough for almost everyone.
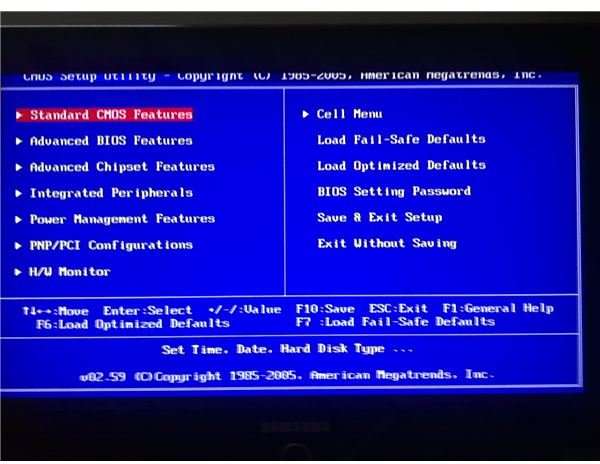
After selecting the default settings, you can navigate through each menu and change anything if you desire. Once they are set, save and exit the BIOS configuration menu. That’s it!


