
With Microsoft Excel you can create lists, databases, and eye-catching charts. You may not realize that you can save these and other Excel objects as images.You can then insert these images into your email messages, PowerPoint presentations, and Word documents.
Saving Excel Objects as Images
You are probably well aware that with Microsoft Excel you can create lists and databases that will contain and allow you to sort, organize and display detailed information. You are likely aware that you can use Excel to make eye-catching charts of all kinds that present data at a glance. However, you may not realize that you can save these and other Excel objects as images.
Once you have saved an Excel object as an image, you can then insert it into your email messages, PowerPoint presentations, Word documents, or any other location where you might want to display a graphic without having to present the entire spreadsheet.
Start with a worksheet that has a chart, range of cells or other object you want to save as an image. The first thing you may
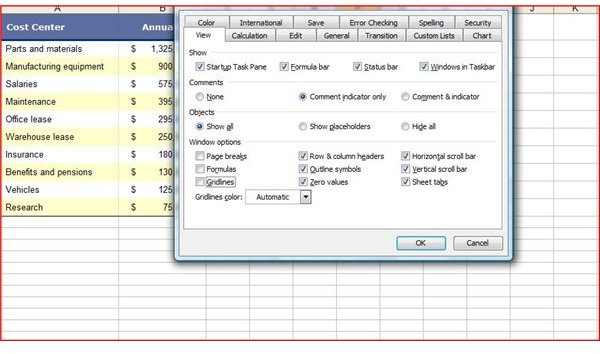
want to do is to hide the gridlines. While this is not an essential step, it simply makes the image look better. To hide the gridlines in Excel 2003 or a previous version, go to the Tools menu and select Options. On the View tab, deselect the Gridlines checkbox under Window Options and then click OK. In Excel 2007, hide the gridlines by clicking on the View tab and deselecting the Gridlines checkbox in the Show/Hide group.
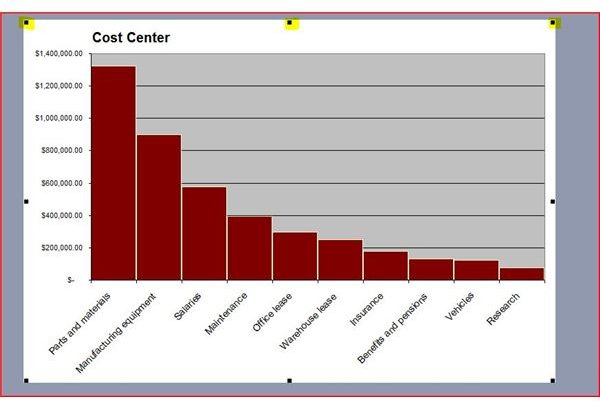
Select the Excel object you want to save as an image using your mouse. If you want to save a chart, click on the outer edge of the area surrounding the chart. There will be little black squares at intervals around the chart, showing you it is active and selected. If you want to save a range of cells or any other object as an image, drag your mouse over the area you want to save.
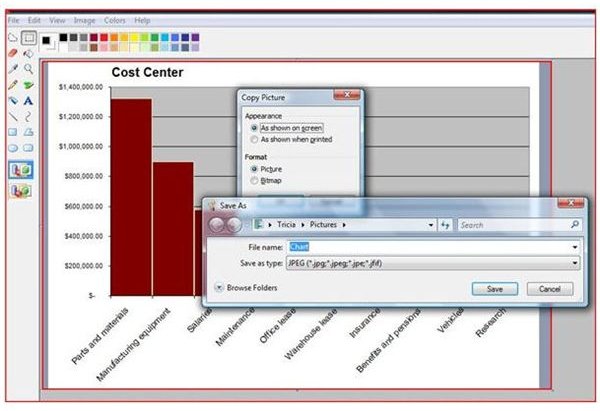
Next you will copy the object. Don’t copy it as you normally would, though, as this is the key to saving the object as an
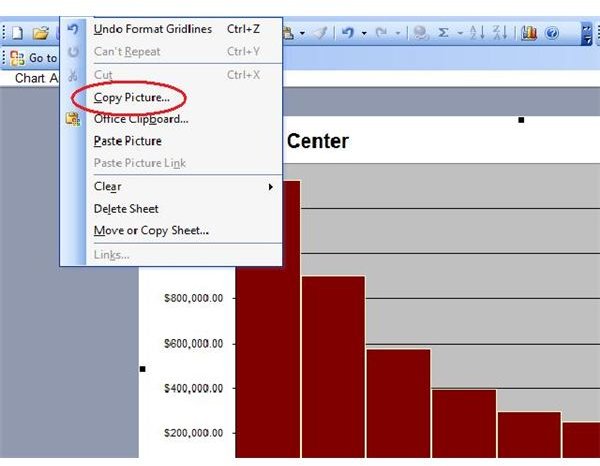
image. In Excel 2003, press and hold the Shift key. While holding it, click Edit on the toolbar. You will notice that the Copy option on the Edit toolbar has become Copy Picture. Click on it and the Copy Picture dialog box will appear.
In Excel 2007, the steps are a bit different. Go to the Home tab of the ribbon and click the Paste dropdown arrow. Point to As Picture and then choose Copy as Picture for the Copy Picture dialog box to open.
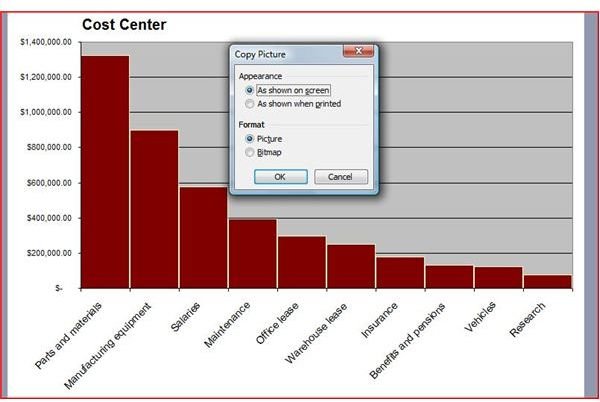
Under Appearance, choose As Shown on Screen. Under Format, choose Picture. Click OK. Your Excel object is now saved as an image to your clipboard. If you want to paste it directly into an email, Word document, PowerPoint slide or other location, just click on that location, right click and choose Paste.
If you wish to save the object as an image to use at a later time or several times in the future, open Paint or a similar application, paste the image and save it as a .jpg or other image file format.
If you’re looking for more tips and tricks, make sure to browse through Bright Hub’s collection of Microsoft Excel user guides and tutorials. Learn how to protect your shared work with a Creative Commons license, how to convert Excel files to text , and more.


