How to Make Flyers in Word
Making Flyers in Microsoft Word
A flyer is an affordable way to advertise, promote, or announce something to numerous people. Creating a flyer can help you let customers know about a sale. You can make a flyer to spread the word about your theater group’s upcoming performance. You might need to create a flyer to aid in the search for your lost pet or to publicize your house-sitting services. This article will walk you through step by step how to make flyers in Word.
[caption id="" align=“aligncenter” width=“600”]
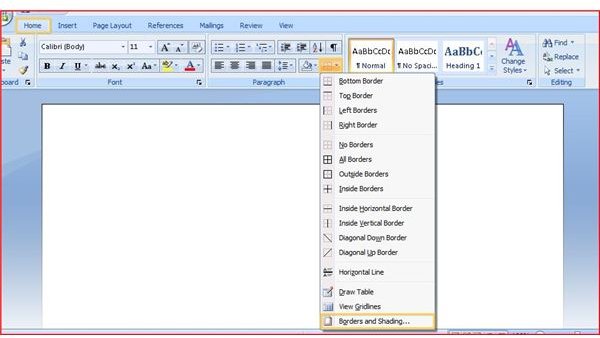
Start with a nice, clean slate by opening a new, blank Microsoft Word document. Even if you have already typed up the information you want on it, your best bet will be creating a flyer from scratch. The first part of the flyer you will want to make will be the page border. You want something that draws immediate attention to your flyer, so choose something bold and colorful. To create a page border in MS Word 2007 and newer, go to the Paragraph section of the Home tab on the ribbon. Click on the Border dropdown and then click Borders and Shading.
[caption id="" align=“aligncenter” width=“600”]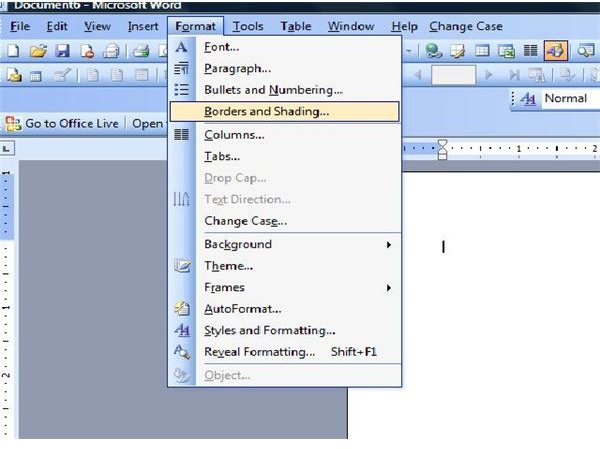 Word 2003 - Borders[/caption]
If you are using MS Word 2003 or an earlier version, go to the Format menu and click on Borders and Shading.
[caption id="" align=“aligncenter” width=“600”]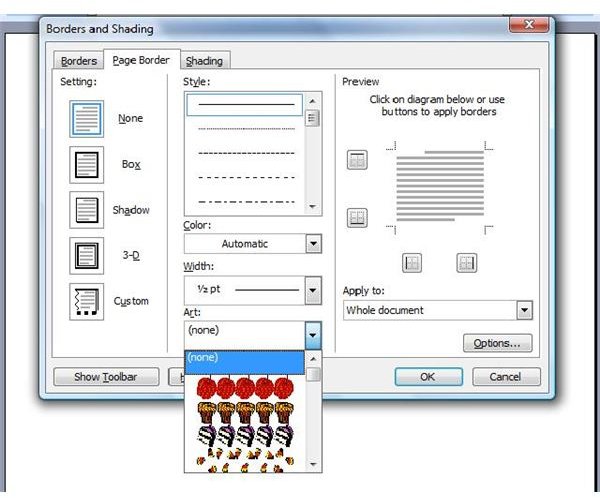 Choosing a border[/caption]
In any version of MS Word, click the Page Border tab of the Borders and Shading dialog box. Click the dropdown menu in the Art box and choose a border to apply around the entire page of the flyer you are creating. Do not worry if the art is black and white, or if you are not crazy about its color.
[caption id="" align=“aligncenter” width=“600”]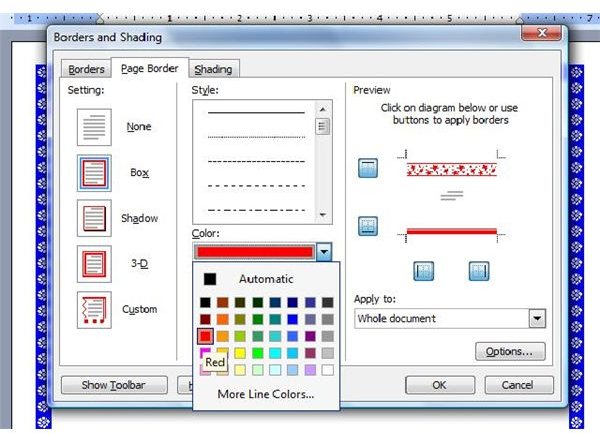 Choosing a border color[/caption]
You can change the color of your flyer’s border by clicking the dropdown under Color and choosing the hue you prefer. You can also make the border thicker or thinner by adjusting the number in the Width box.
[caption id="" align=“aligncenter” width=“600”]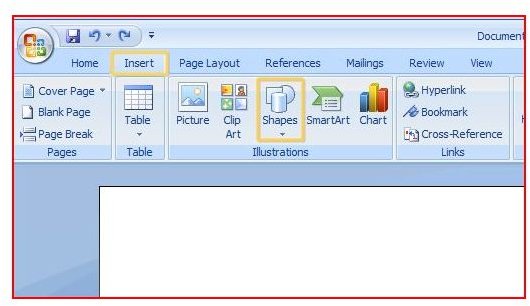 Adding shapes[/caption]
Think of a catchy heading for your flyer. By creating this document, you are hoping to call attention to something. Determine whose attention you want to catch with the flyer to help you choose an appropriate caption. Once you have it, place it inside a banner at the top of your flyer. Use an AutoShape and a large font to capture more attention. In MS Word 2007 and newer, go to the Insert tab of the ribbon and click the Shapes dropdown.
[caption id="" align=“aligncenter” width=“600”]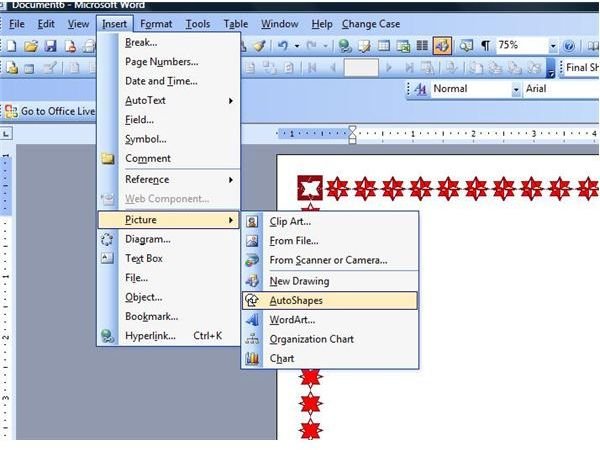 Word 2003 - Adding shapes[/caption]
In MS Word 2003 or previous versions, you can find AutoShapes on the Drawing toolbar. If the Drawing toolbar is not present, go to the View menu, point to Toolbars and click on Drawing. You can also get to the AutoShapes toolbar in Word 2003 from the Insert menu. Point to Pictures and then choose AutoShapes.
[caption id="" align=“aligncenter” width=“600”]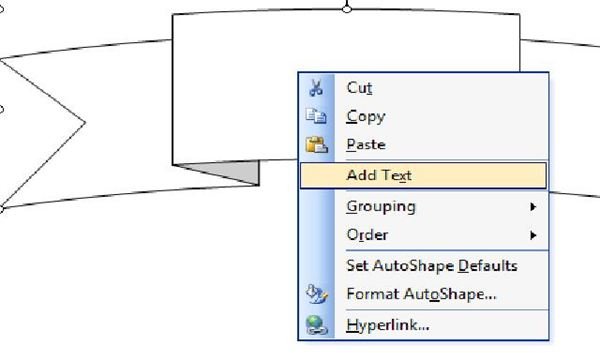 Adding a callout[/caption]
Choose a shape from the Stars and Banners, Callouts or other AutoShapes section and place it at the top of the flyer you are creating by dragging it into place with your mouse. Right click the shape and click on Add Text. In MS Word 2007 and newer, choose a font from the Font section of the Home tab on the ribbon. Pick something that is both noticeable and easy to read. [caption id="" align=“aligncenter” width=“600”] Choosing a font[/caption] Choose a font from the Formatting toolbar in MS Word 2003 or earlier, or by choosing Font from the Format menu.
[caption id="" align=“aligncenter” width=“600”]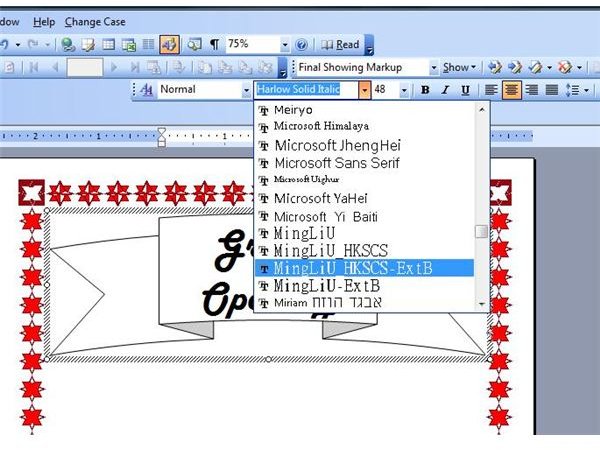 Word 2003 fonts[/caption]
Insert a text box into the flyer you are creating. In MS Word 2007 and newer, go to the Insert tab of the ribbon and click on Text Box. In earlier versions of MS Word, click Text Box on the Insert menu. Stick with a simple font, such as Arial, here and do not put too much information. You want people to gain interest and basic details, not get bored and stop reading. Center your text using the keyboard shortcut Ctrl+e or by clicking the Center button. Make sure you include basic information such relevant dates, times, and contact information.
Insert a graphic into the bottom of the text box to draw more attention to the flyer you are creating. In MS Word 2007 and newer, go to the Insert tab and choose either Picture or Clip Art from the Illustrations section. In previous versions of MS Word, point to Picture from the Insert menu and click on either From File or Clip Art.
[caption id="" align=“aligncenter” width=“600”] Adding clipart[/caption]
Make any final changes you wish, and your flyer is complete. Print it out, send it off or post it up around town. Then sit back and wait for business to start rolling in!
[caption id="" align=“aligncenter” width=“600”] A captivating flyer easily made in Word[/caption]
Don’t forget to take a look at the other Microsoft Word tutorials and user guides in Bright Hub’s growing collection. Learn about where to find templates, how to use shortcuts for tasks like adding an accent mark, how to insert and modify graphics, and more. Check back often because more MS Word tips and tricks are being added all the time.