The use of a border or line within a page(s), text, tables (and cells), graphic objects, and pictures can increase interest to your presentation and emphasize information within your document.
Borders: Frame and Define
The use of a border on a page(s), text, tables (and cells), graphic objects, and pictures adds distinct interest to your presentation and can emphasize specific sections of information within your document. There are many instances where the use of a border presents a great addition to your document. For example, if you are a student that is preparing a research paper; the use of page borders on the coversheet will add color and eye-catching design to your presentation. Another example would be if you were creating your own business cards through the Word template tool. The use of a border would draw immediate attention to your business card and would add distinction and focus.
Page Borders
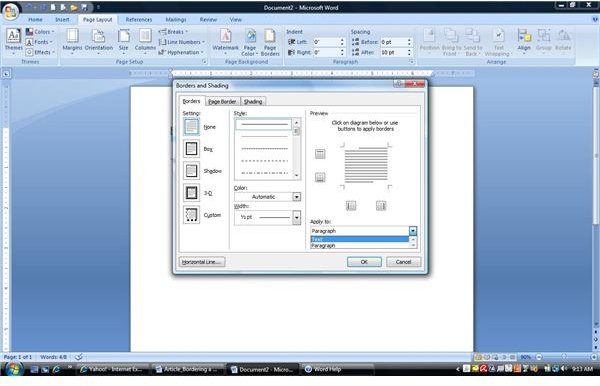
To add a border to your page, you would click on the Page Layout tab in Microsoft Word 2007 and click on “Page Borders.” This will open a window where you can select a predetermined border or design a border to your specifications.
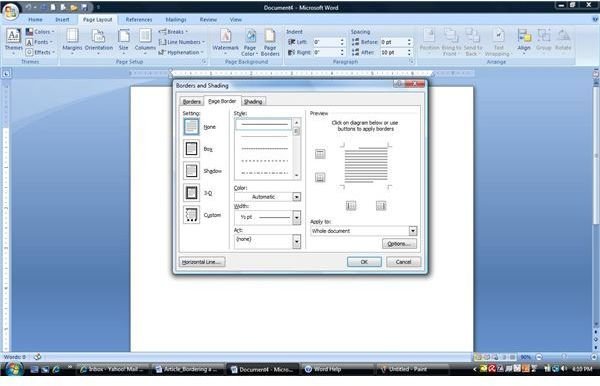
Within the Borders and Shading window, select the Page Border tab. From this window you can select a setting, style, color, or an art-based border. Microsoft Word has a nice preview feature on the right hand side of this window that will allow you to see the effect of your chosen design. In addition, you can select whether to include the border on all sides of the page or perhaps on one side only. This is a great way to customize your page border.
Once you have selected your border, you can then specify on what page or pages you wish to have the border appear by clicking on “Apply To.” You have the choice to have the border display throughout the whole document, section (first page only), and section (all except the first page). Microsoft Word 2007 also gives you further options to adjust your border by clicking on the Options button within the Borders and Shading window. This helpful tool allows you to adjust margins, alignment, and display (whether to display the border in front, surround a header, or footer).
Word Page Borders
Text and Paragraph Borders
Placing a border around text or a paragraph is a great way to highlight something special within your document. You can select and design a border that will place emphasis where you need it to be.
To place a border around your text, you would select the text within your document and then follow the same steps as you would for inserting a page border from the Borders and Shading window. From this point, you would click on the tab for Borders and select the appropriate border to surround your text. The same process would be applied if you wish to place a border around a paragraph. It is important to note that from the Borders tab, you should review the section within the window “Apply To” to be sure you have the border properly placed either around text or a paragraph.
Word Text-Paragraph Borders
Use of Shading with your Border
Another nice feature that you can use, in addition with a border, is shading. Within the Borders and Shading window, you can click on the Shading tab to add color fill or a pattern within the border.
With the Fill feature, you can select from a rainbow of colors or choose your own color palate. This is a helpful tool if you are displaying your document electronically or if you are using a color. If you decide that a color fill isn’t suitable within your border, you have the option to select a type of pattern/style. Microsoft Word provides numerous choices to choose from which include various opaque black to gray shades, to the use of vertical and horizontal lines and designs.
It is important to note that this feature is only applicable to text or paragraphs. Because of this scope, you will need to be careful on the type of fill and style you choose to apply. Shading and Fill can look quite differently and have a profound effect upon your audience whether it is being displayed electronically or in paper format. The most important thing to consider is that the fill/style should emphasize the text or paragraph; not hide it. So be sure to apply texturally appropriate shading that compliments your document and will elicit a positive response from your readers.
Word Shading
Is a Border too much? Try a Horizontal Line
Let’s say that you want to add some flair to your Word document but you find that the addition of a border is a bit too much – or not enough. Microsoft Word 2007 also gives you the ability to add a horizontal line in addition with a border or by itself. The use of horizontal lines in lieu of a border can have tasteful effect on your document while still gaining a visual response by your audience. This type of graphic insertion can be used in the construction of resumes, business cards, essays, etc.
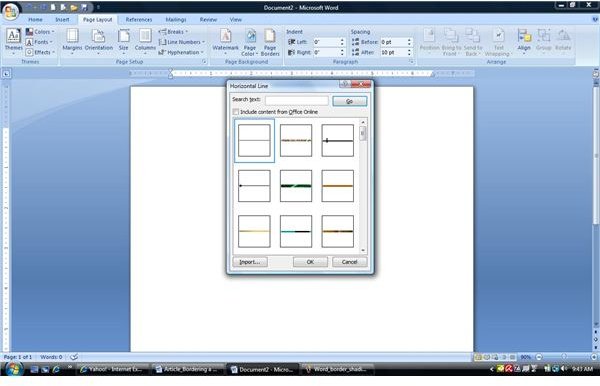
Within the Borders and Shading window, there is a button in the lower left-hand side of the screen titled “Horizontal Line…” From the Horizontal Line window, you will see a variety of lines in which to insert into your document. You can also check the box to expand your selection choices to include content from Office Online. Another great function in Word is the ability to import a graphic or clipart as a horizontal line. By clicking on “Import” you can select any saved graphic to place within your document.
It is important to remember that before you select your horizontal line, make sure your cursor is placed at the appropriate place within your document where you wish the graphic insert to appear.
Once you have inserted the horizontal line, you will have the opportunity to readjust the size and length to your specifications.
Word Horizontal Lines
Conclusion
Microsoft Word 2007 offers a variety of borders that you can apply to your entire document or just to selected text and/or paragraphs within your document. This is a great tool to apply graphics without taking away from the context of your presentation.


