
Skype can be a convenient answer to your telecommunication woes, but it won’t do you much good if you don’t know your way around the audio controls. Read on for some basic guidance on controlling your Skype audio settings.
Why Skype?
Skype arrived on the scene and gave people the ability to send files, instant messages and talk in real-time wi
th friends all over the world, and they did it for free.
With the right settings and service subscriptions, Skype gives the mobile user the ability to carry their desk phone with them anywhere they take their laptops. In addition to their desk phone, they can also have video calls with their friends and family when they’re not working.
With all this functionality though, comes the need for some configuration. Configuring your Skype audio settings may seem a bit daunting at first, but if taken one step at a time, you should be able to work your way through it easily.
First, bring up the Skype interface, and click on “Tools” and then “Options.” Along the left side of the menu bar, scroll down to “Audio settings.” In the microphone settings drop down menu, click the arrow pointing down on the right end of the box.
Configuring Skype: Testing, Testing… Is This Thing On?
In this box, you are able to chose the device that you want
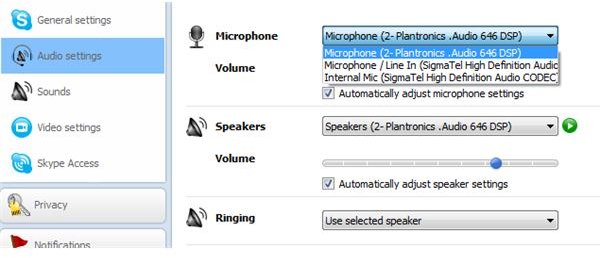
to pick up your voice. You’ll see in the list (in the picture to the right - click it for a larger view of it) that I have 3 options available to me:
- a Plantronics headset
- a Microphone / Line In
- an internal Mic.
I have it set to the Plantronics headset.
If the people you’re talking to complain that your voice sounds funny, and you’re certain your microphone is connected, this is the place to check. If you’re not talking into the right microphone you may sound far away, or the person on the other end may not even hear you at all.
You’ll notice the “Automatically adjust your microphone settings” check box. This is an equalizer that will turn you down if you’re too loud, or up if you’re whispering.
Speaker Settings: Who Can Hear Me Now?
Just below the microphone settings are the speaker settings. Just like with the microphone, I have three
available options:
- a Plantronics headset
- a digital output device
- speakers / headphones
I have this set also to my headset. With my headset on, I know that I’m the only one hearing the person who is talking to me, and I know that I’m not accidentally moving away from the mic.
You don’t have to use the same device, obviously. If you have a microphone built into your laptop, but don’t want other folks to hear the person who is talking to you, you can use your internal mic, and your headset speakers. You could also use the headset mic, but let everyone around you listen to the person talking by using your computer speakers.
Whatever combination you chose to go with, remember that if your speakers are too loud, your microphone may pick up the sound and broadcast it back, causing the person who is talking to you to hear an echo of themselves while they talk. This can be very distracting.
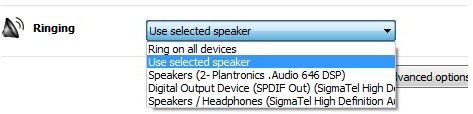
Ringer Settings - Was That My Phone, Or Your Laptop?
In the drop down for the ringer settings, you’ll see that I have 5 options available. The last three of these options
are the same as the speaker options I listed above. The first two however, are “ring on all devices” and “use selected speaker.”
For someone like me who sits at the computer for the majority of the day, I tend to just leave my headset on, and don’t want to bother the folks around me, so I set the ringer to “use selected speaker,” which as you saw above was my headset speakers.
However, if I wanted to get up and walk around a bit, I could set it to use my computer speakers to make sure I don’t miss a call.
This is the area of Skype you go to if you can’t hear a Skype call ring.
You’ll noticed just below this area is a button that says “show advanced options”.
Advanced Settings Save Relationships!
Imagine you’re talking to your special someone on Skype through your headset. You’ve been talking a while, and now it’s time to wrap it up. As he or she is saying goodbye you stand up to stretch your legs. You forget how long (or short!) your
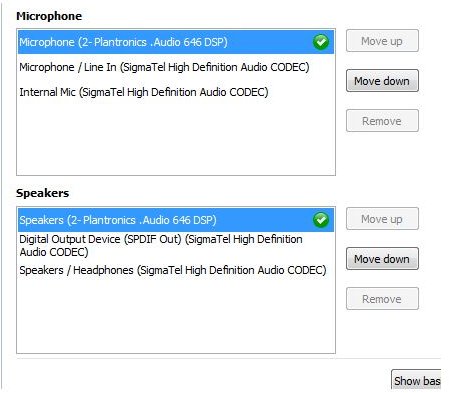
headset wire is, and it pulls out of the headset jack. Now all of a sudden he or she can’t hear you, and you can’t hear him or her. Stunned by your lack of response to “Goodnight, I’ll miss you.”, your special someone disconnects the call, and blocks your username.
Had you clicked on the advanced options, you would have been able to prevent this problem. As you can see in my settings, at the top of both the microphone and the speaker list is my headset. It’s got a check mark because it’s the active device.
With the settings in the picture, if I yank my headset cord out of my laptop, Skype will automatically go to the next device in the list. In my case, it will go to the “Line in” and “Line out” devices. I don’t have anything plugged into line in or line out, so the above scenario would happen to me. However, if I highlight internal mic and hit “move up” on the right, when my headset becomes disconnected, the person to whom I’m speaking will definitely notice a sudden difference in the call, but my speakers will kick in and I’ll hear him or her asking what was going on. I can then tell them through my internal mic to hold on while I plug my headset back in.
Once the system recognizes the headset again, it will go back to using that, because it’s at the top of the priority list.
Sound Options
In the sound options section, you can choose what sorts of events make what sorts of noises. By default,
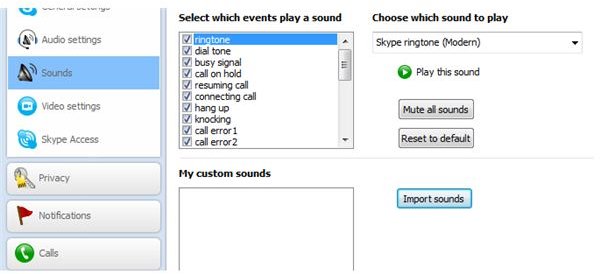
anything that happens within Skype produces some kind of sound. Incoming calls create ringtones, incoming instant messages chirp, outgoing calls make noises, etc.
Perhaps you don’t need Skype to make a funky sound when you start a call, or maybe you’re on your friend’s laptop and you’d like to play a prank on them and set their ringtone to something else. You can even import your own ringtones or sounds by clicking “Import” and browsing to the Skype sound file, or a .wav.
Of course, once your friend finds out you’ve goofed with Skype, undoing your mischief is as simple as hitting the “reset to default” button.
Skype Hotkeys
The last section you should check out before diving into Skype, is the key bindings.
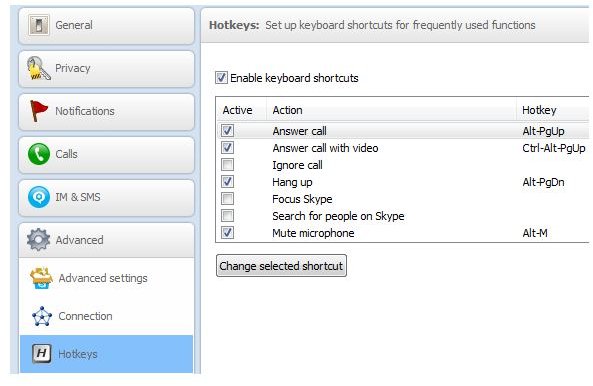
In this area you can set some of the simple Skype functions to happen when you hit a particular key sequence. You’ll see in the picture that I have “Alt+m” configured to mute my microphone, for example. I’ve also got “alt+page dn” set to hang up. I don’t have a key binding set up to ignore a call, but that’s where I’d go if I need a quick way to stop a Skype telephone ring if it was someone I didn’t want to speak with.
I use mine for work though, and I’m in technical support. Ignoring calls is frowned upon by management, so I never found the need to stop a Skype telephone ring by any means other than answering it.
References
All of the information and pictures displayed in this article are from the author’s own experience.
The web comic “Stick I.T.” is written and drawn by this author, Matt Conlon.
For more information on Skype, have a look through Brighthub’s many Skype related articles here .


