Have you received junk mail and want to find a way to prevent it from cluttering up your Outlook inbox? Microsoft Outlook provides many options for blocking spam, including predefined spam filters and customized restrictions. Read on to learn how to use the MIcrosoft Outlook spam blocker.
Using the Predefined Spam Filters
Microsoft Outlook lets you select a spam filter for each of your accounts, which is useful if you want to filter one account more than others. The easiest way to set up spam filtering is to begin with one of Outlook’s predefined options. There are four predefined options that are as follows:
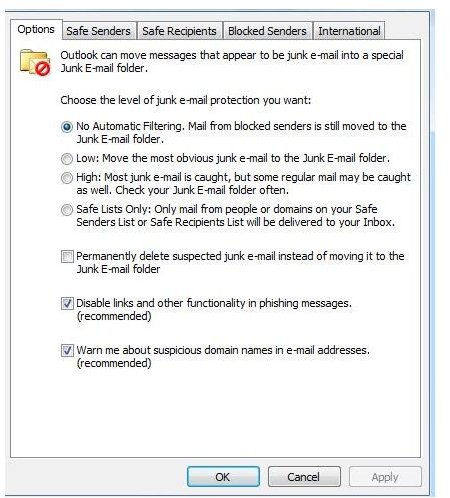
- No Automatic Filtering - All of your email goes in the inbox.
- Low - Outlook sends obvious spam to its spam folder.
- High - Outlook sends suspected spam and possibly non-spam mail to the spam folder.
- Safe Lists Only - Outlook blocks all mail except from senders you allow.
To configure your settings using one of these filters, open Outlook and click on the inbox of the account whose spam settings you’re configuring. On the “Home” tab, click “Junk” in the “Delete” section, and then click “Junk E-mail Options.” You’ll see a window like this one:
Click on any of the levels to apply it to the selected account. Below the levels are three options that can help protect you further, including options for permanently deleting spam, disabling links and warning you about suspicious emails. The last two options are enabled by default, but feel free to clear the check boxes to change these settings. If you select any of the options except for “Safe Lists Only,” you can simply click “OK” to apply the settings. However, if you selected the safe lists option or want to block certain email addresses, you’ll need to set these up as well.
Restricting Email From Specific Senders
The process for adding safe and blocked senders is relatively the same except for the tab in the “Junk E-mail Options ” window. If you chose “Safe Lists Only,” you’ll need to add safe senders or else you won’t receive email from anybody. To do so, click the “Safe Senders” tab, then click the “Add” button on the window’s right side as below:
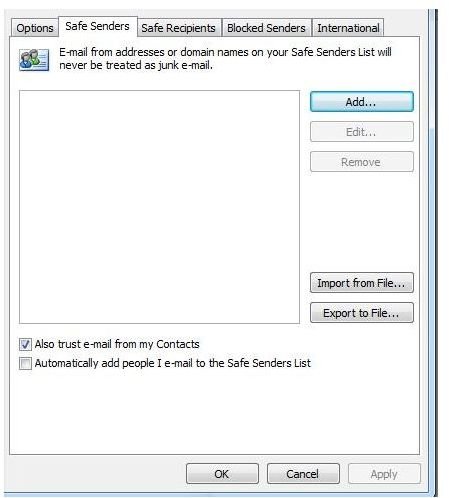
When you click “Add,” you’ll get a message box that asks you to input the email address or domain you want to add to the list. Type the full email address for a single sender or a domain name (for example, @website.com) to allow email from a particular domain, such as @yahoo.com or @gmail.com. This is a useful way to block email from commercial senders and to allow messages from personal email accounts. Another helpful tip is to check the box beside “Automatically add people I e-mail to the Safe Senders list.” This ensures that you can receive email from those you send mail to.
The process to add blocked senders is the same, except you’ll need to click the “Blocked Senders” tab. Click the “Add” button and type the email address or domain to block. After you finish configuring safe and blocked senders, click “OK” to apply your changes.
References
All screenshots made by author and all references taken from Microsoft Outlook 2010
Outlook 2010’s official website: https://office.microsoft.com/en-us/outlook/


