How to uninstall Windows Live Messenger? You want to remove Windows Live Messenger from your computer because you don’t like it or it’s not working, but you really do not know how you can do this? Don’t worry! If you want to remove the program from your computer, follow the steps below to do that.
Removing Windows Live Messenger
You may want to uninstall Windows Live Messenger from your computer. Though uninstalling Windows Live Messenger is easy, many people find it tricky. It is because they cannot find the Windows Live Messenger entry in the list of installed programs in Windows Control Panel.
If this is your predicament, despair not. The Windows Live Messenger can easily be uninstalled. If you want to remove Windows Live Messenger from your computer because it is giving you bugs or you don’t want to use an instant messaging program, follow the simple methods below to uninstall the program from your computer.
Remove Windows Live Messenger from Windows XP
You can remove Windows Live Messenger from Windows XP with at least the following two methods:
Method 1:
1. In the taskbar notification area, right-click on Messenger’s icon, and click Exit.
2. Open Windows Start menu and click on Control Panel.
3. In the Control Panel Window, double-click on Add/Remove Programs.
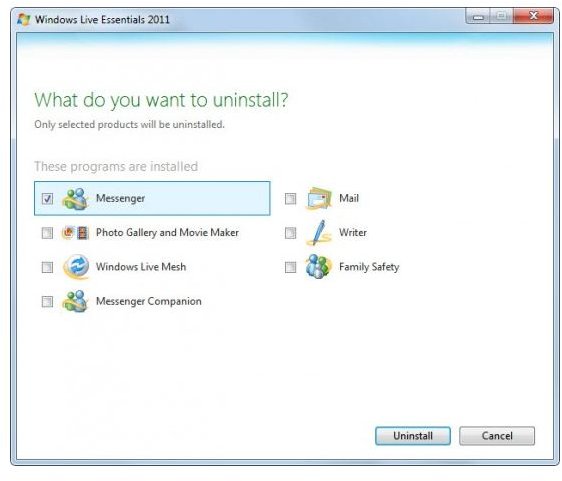
4. You will see a huge list of programs. Find Windows Live Essentials, and click Remove.
5. In the new window that opens, click the Uninstall radio button, and then click Continue.
6. Select Messenger and then click Continue to uninstall the software from your computer.
Method 2:
This method will disable Windows Live Messenger from opening in Windows. Instead of uninstall, you could also disable the program. This way you will prevent the installed Windows Live Messenger from opening each time when you will start Windows.
1. Click Windows Key + R to open Windows RUN window.
2. Type services.msc, and hit Enter.
3. In the Services window that appears, find Windows Live Messenger and double-click on it.
4. Select Disabled from the startup type options, and then click Stop.
Remove Windows Live Messenger from Windows Vista
Method 1:
1. In the taskbar notification area, right-click on Messenger’s icon, and click Exit.
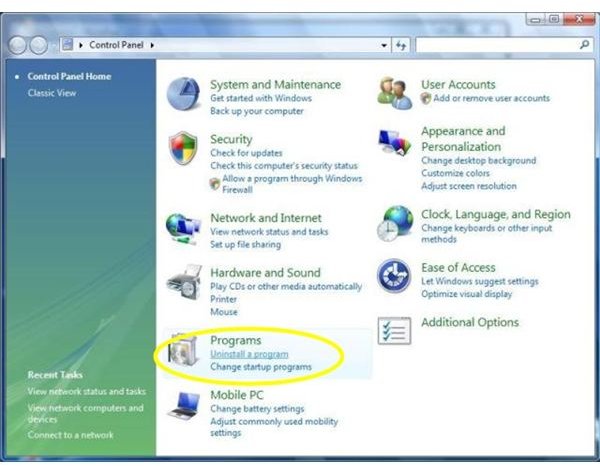
2. Open Windows Start menu, locate and click Control Panel.
3. In the Control Panel Window, find and click Uninstall a program.
4. Now double-click on Windows Live Messenger, and when prompted, click Yes.
This will remove Windows Live Messenger from Windows Vista.
Method 2:
This method will disable Windows Live Messenger on your computer
1. Click Windows Key + R to open Windows RUN window.
2. Type services.msc, and hit Enter.
3. In the Services window that opens, locate Windows Live Messenger and double-click on it.
Remove Windows Live Messenger from Windows 7
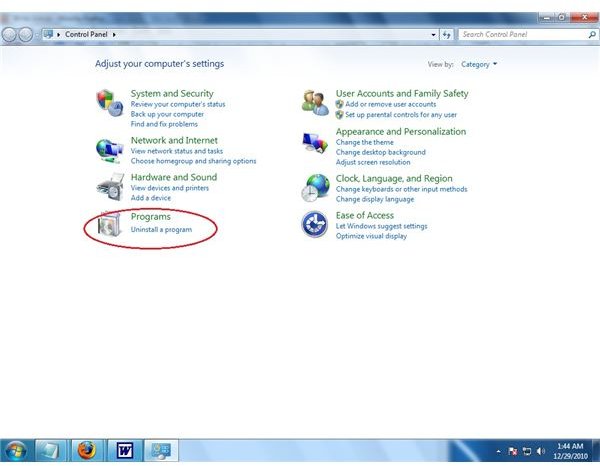
1. Open Windows Start Menu and click Control Panel.
2. Under Programs, click Uninstall a Program.
3. Go through the list of programs, and locate and select Windows Live Essentials.
4. Click Uninstall/Change at the top of the list.
5. In the new window that opens, click the Uninstall radio button and then click Continue.
6. Select Messenger and then click Continue.
Windows Live Messenger will be uninstalled.
Remove Windows Live Messenger With Third-Party Software
The above uninstall methods should work for you, but if the uninstall fails you can do one more thing. You can use uninstallation software to do the complete uninstall job for you. There are many great uninstall programs available, and Revo Uninstaller is one of them. This software can uninstall any program, and from any version of Windows. Revo Uninstaller not only uninstalls the program from your computer, but also ensures that every single file of the program and the Registry entries have also been removed from your computer.
Conclusion
This was how to uninstall Windows Live Messenger from your computer. The Windows Live Messenger is a great communication tool but if you didn’t want to use Windows Live Messenger, and wondered how do you remove Windows Live Messenger from your computer, this article helped you do that. If you followed the above-mentioned methods correctly, the program will successfully uninstall from your computer and won’t bother you when the next time you will start Windows again.
Reference
Author’s own experience


