A Guide on How to Turn Off Windows Defender in XP, Vista and Windows 7
Windows Defender in XP, Vista and Windows 7
The free anti-spyware by Microsoft is installed and enabled by default in Windows 7 and Vista. Windows Defender provides on-access protection against spyware, adware and other malware. XP users may also take advantage of free anti-spyware by manually installing the program. A validation for genuine Windows software is the only requirement before you can install Windows Defender in XP computers. If you have a problem using Windows Defender, you can disable the real-time protection without removing or turning off the anti-spyware.
How to Turn Off Windows Defender’s Real-time Protection
Windows 7 users can disable the real-time protection of Windows Defender using these steps:
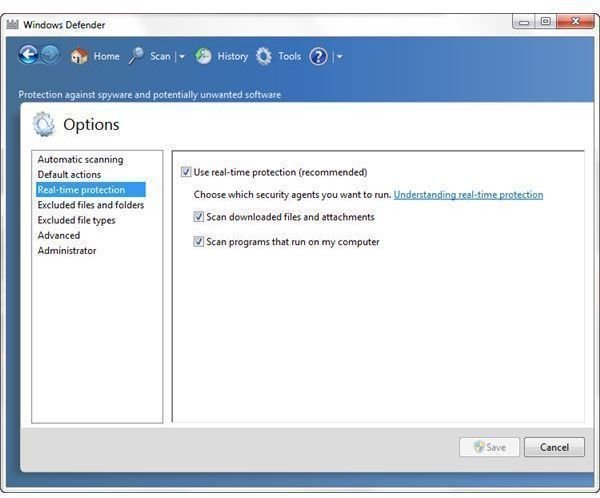
- Open Windows Defender. Click the “Tools” menu.
- In the left pane, select “Real-time protection”
- In the right pane, uncheck the box before “Use real-time protection (recommended)”
- Click “Save changes” button. The UAC prompt will be displayed, if enabled in Windows 7. Simply click “Yes” to allow the changes to the program.
For XP and Vista users, disabling Windows Defender is done by using these steps:
- Open Windows Defender. Click the “Tools” menu.
- Scroll down to find “Real-time protection options”
- Uncheck the box before “Use real-time protection (recommended)”
- Click “Save changes” button. The UAC prompt will be displayed, if enabled in Windows Vista. Simply click “Yes” to allow the changes to the program.
Using the above step will only disable the real-time or on-access protection of Windows Defender, which means the user will not receive prompts when malware is found. Also, no more scans will be scheduled to run using Windows Defender. You can still use Windows Defender to run an on-demand scan.
Turn off Windows Defender Program
If you want to turn off Windows Defender completely in Windows 7, use the steps below:
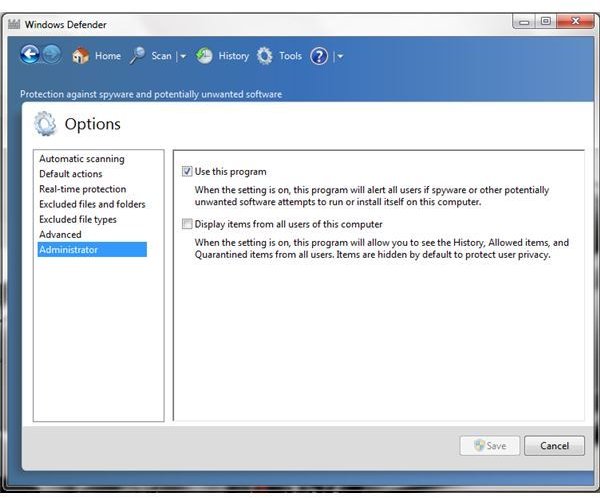
- Open Windows Defender. Click the “Tools” menu.
- In the left pane, select “Administrator”
- In the right pane, uncheck the box before “Use this program”. Proceed by saving the settings.
Vista and XP users may turn off Windows Defender as well:
- Open Windows Defender. Click the “Tools” menu.
- Scroll down to find “Administrator options”
- Uncheck the box before “Use Windows Defender”. Save the new settings.
When you turn off the Windows Defender program, the program will display confirmation that the program is now turned off:
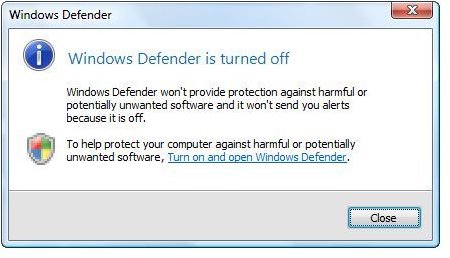
By turning off Windows Defender’s real-time protection, no more scans are scheduled to run and you can no longer run an on-demand scan using Windows Defender. The program is not going to receive updates since it’s turned off.
Some antivirus or antispyware programs will turn off Windows Defender, such as Microsoft Security Essentials, CounterSpy or VIPRE by Sunbelt. Other antivirus program will recommend you that you turn off Windows Defender; e.g. AntiVir by Avira.
Using Local Group Policy to Turn off Windows Defender
Windows 7 and Vista users with access to the Group Policy Editor may also manage Windows Defender.
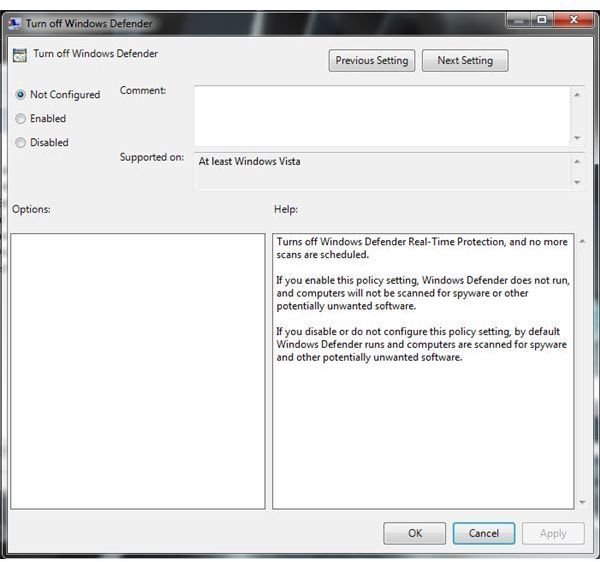
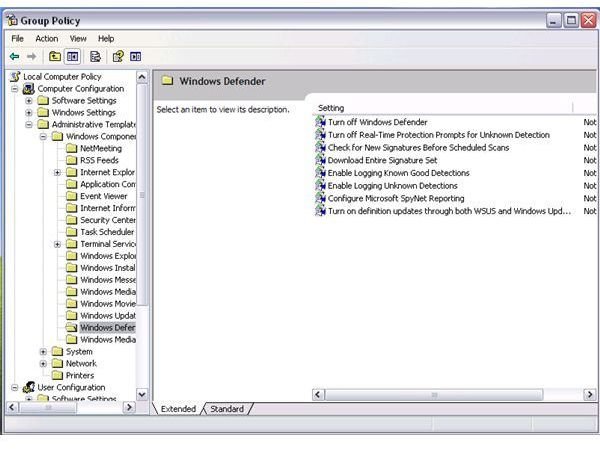
Type gpedit.msc in run or search box in Windows then hit the enter key on your keyboard. Navigate to Local Group Policy Editor > Local Computer Policy > Computer Configuration > Administrative Template > Windows Components > Windows Defender. In the right pane, double-click “Turn off Windows Defender” and select “Enabled” to enable the policy.
Windows XP users will not see the administrative template for Windows Defender because the program is not included in XP, but you can install the administrative template so you can manage it as well. Simply type gpedit.msc in run command in XP and click OK. Navigate to Local Group Policy Editor > Local Computer Policy > Computer Configuration. Select “Administrative Template”, click “Action” in the menu bar and hover the mouse to “All tasks” and then click “Add/Remove Templates”. Click “Add” button then browse for windowsdefender.adm in C:\Windows\inf directory. Select windowsdefender.adm and then click “Open”. Close the “Add/Remove Template” window.
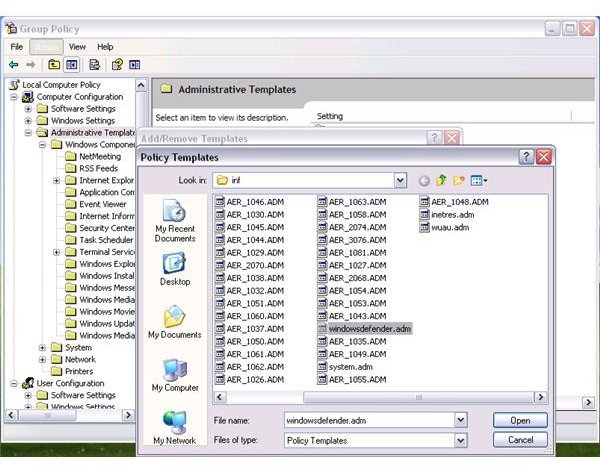
You should now see the administrative template of Windows Defender in XP and can start managing the program.
Note that home editions of Windows do not have access to the Group Policy Editor. You may only turn off the Windows Defender program or its real-time protection via the programs option.
Image credit: Screenshots taken by the author.