The Exchange Server 2003 offered plenty of settings including spam filtering. However, you cannot directly transfer these settings to the new version. The Anti Spam Migration Tool helps you setup Exchange 2007 using settings from 2003 version.
Exchange 2007 Anti Spam Migration Tool – An Overview
Exchange Server 2003 has several features that help system administrators filter and reduce unwanted emails. The Server 2003 also contains settings for identification and removal of spyware, worms, and virus etc. The most popular features of the Exchange 2003 include the following:
- Exchange Intelligent Message Filter (bundled with SP2);
- Inbound recipient filtering;
- Mail sender filtering;
- Real-time block list support;
- Global accept and deny lists;
- SMTP Virtual Servers to restrict unwanted emails ;
- Integration with Outlook 2003 ; and
- Integration with Outlook Web Access Block and Safe lists .
These are the main features that take time to setup on the Exchange Servers. Once you have setup these features on the Exchange 2003, you will want the configurations and settings to be directly transferred to Exchange 2007 when you implement the latter, instead of reconfiguring each and everything again. Unfortunately, as the Exchange Server 2007 has several more features for added safety and enhanced performance, compatibility issues arise when you attempt to transfer these settings to the new version.
This is where the Anti Spam Migration Tool comes handy. It helps you in transferring the settings from your old Exchange Server 2003 to the new Exchange 2007. Reading the settings from the Exchange 2003’s Active Directory (a component of Exchange Servers ), it converts the settings into a script (the Windows PowerShell script) that can be used to transfer the settings from Server 2003 to Server 2007. In the following sections, we will take a detailed look on using the Anti Spam Migration Tool to setup the Exchange 2007 without much effort.
Anti Spam Migration Tool - Downloading and Installation
The pre-requisites for using the Anti Spam Migration Tool are:
1. Supported environment (Windows Server 2003 or Windows Server 2000);
2. .NET framework 1.1 (or higher versions); and,
3. “Full Access” to AD Configuration Container and at least “Read Access” to MSExchange.UCEContentFilter.xml.
IMPORTANT: In case you do not have the “Read Access” to the MSExchange.UCEContentFilter.xml, you will get an error indicating “ACCESS DENIED” while transferring the 2003 settings to Exchange 2007.
Downloading the tool is simple. Once downloaded, double click on the .msi file. This action extracts all files to a default folder. The path to this default folder is C:\Program Files\Exchange2007AntiSpamMigration.
This folder will include the tool Exchange2007AntiSpamMigration.exe as well as documentation that details what all settings will be imported to the Exchange 2007.
Using the Anti Spam Migration Tool
All you need to do for transferring the 2003 settings to Exchange 2007 is to run the Exchange2007AntiSpamMigration.exe. However, as there is no corresponding startup folder, you need to run the tool from the command prompt. The format of the command is given below:
Exchange2007AntiSpamMigration [/f:<full path to custom_words_file>] [/o:<output_file_name>]
- /f: is optional and is used to specify the file that contains the custom words used in Exchange 2003. If the option is not used, the custom words are not transferred to Server 2007.
- /o: is also optional. You can specify the output file name and destination as per your wish. If you do not use the option, a default file created in the current directory and is named MigratedSettings.ps1.
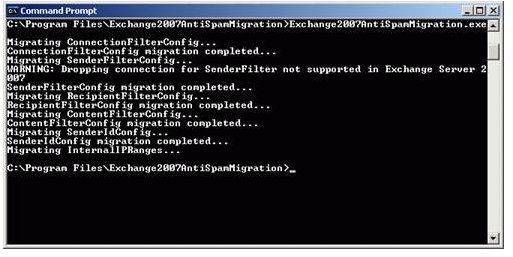
When you run the command (see Fig 1 in next section), the Anti Spam Migration Tool does the following:
1. Reads the settings stored in the Active Directory section of Server 2003;
2. Converts the settings to equivalent tasks for Exchange 2007; and,
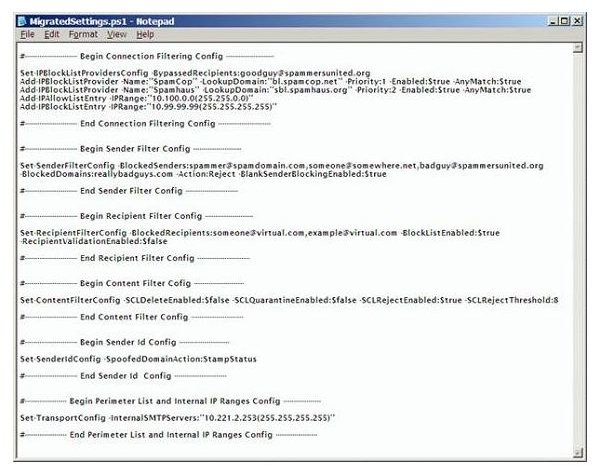
3. Writes them as a PowerShell script to the file you specified with the option “/o:” or to “MigratedSettings.ps1” in case you did not specify any filename. You can view the settings on Notepad (see fig 2 in the next section).
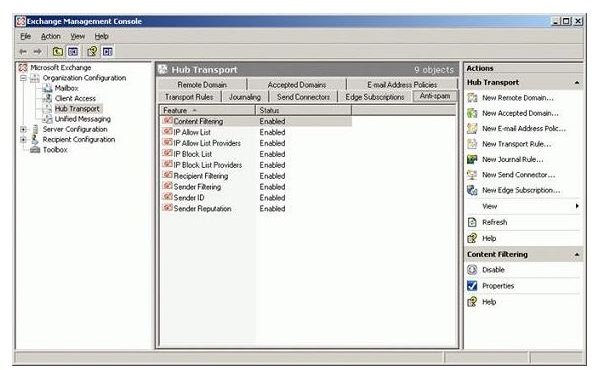
At this stage, the Anti Spam Agents are not installed in the Exchange Management Console as the Edge Transport turns it off by default. Though you can run the script without the Anti Spam Agents installed, I would recommend you add the Anti Spam Agent before proceeding. To add the agent, run the file AntispamAgents.ps1 located in C:\Program Files\Microsoft\Exchange Server\Scripts. Once you run the script, the Anti Spam Agents are installed (see fig 3 in the next section).
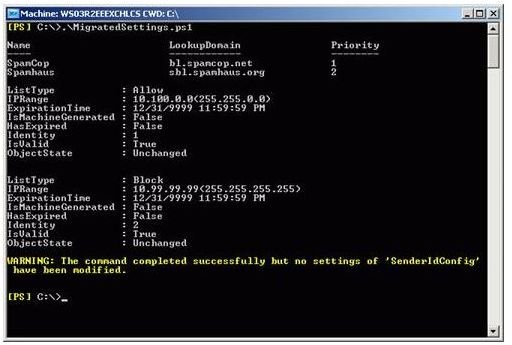
The final step is to run the PowerShell script generated from the Anti Spam Migration Tool (see fig 4 in the next section). This will automatically configure the Exchange 2007 based on the configuration of your Server 2003.
The process of transferring the settings from Exchange 2003 to Exchange 2007 becomes very easy when you use the Anti Spam Migration Tool. During the transfer process, the Anti Spam Migration Tool matches the records in Exchange 2003 to create new records in Exchange 2007. These new records may have some different names. For details on how the Anti Spam Migration Tool matches the records between 2003 and 2007 Servers, please consult the documentation available in the folder where the tool is installed.
Reference Images