If you’re looking for a way to improve the security of the files and folders on your Mac, this guide explains a few free methods of preventing prying eyes from perusing your particulars.
Don’t Ignore Security!
Security can never be ignored, especially when we’re talking about keeping important files and folders out sight of prying eyes.
There is no real native function to add passwords to files or folders on an individual basis in Mac OS X, however depending upon the files or folders you are attempting to password protect, you might well find that the software you are using to create and edit the files will also allow you to password protect them.
Alternatively, you can instruct individual files to behave in a specific way, preventing them from being seen by anyone who might gain access to your Mac.
Password Protect Files in Microsoft Office
If you’re using Microsoft Word or Microsoft Excel for Mac, you will be able to apply a password to your files.
To password-protect documents and spreadsheet files, follow these instructions:
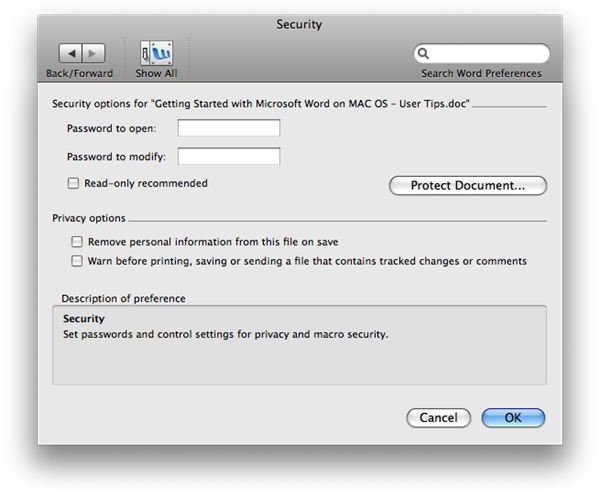
In Microsoft Word: Mac 2008, go to File > Save as… and click the Options button. Next, click the Show All switch in order to display the Personal Settings section, and click the Security icon. Here you can setup a password that will be required before opening, as well as a second password that will be required to modify the document.
Meanwhile, in Microsoft Excel: Mac 2008, in the File > Save as… screen, go to the Options button. This takes you straight into a box within which you can set a password to open and a second password to modify.
Similar settings are also available in Neo Office.
Password Protect Files with the Keychain
Using the Keychain, it is possible to password protect Notes.
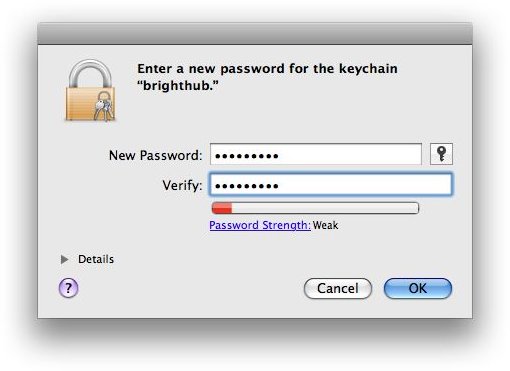
Open Utilities (either via the Finder or SHIFT+COMMAND+U) and launch Keychain Access.
In the File menu, choose New Keychain…, give it a name and click Create. You will then need to give the new keychain a password. This should be different to your login password, and known only to you.
The new Keychain will appear in the left-side menu – CTRL+CLICK the item, and go to Change Settings. Here you can set the lock options.
Finally, go to File > New Secure Note Item… .The resulting note will be created with the password you have just setup, and protected from unauthorized third parties.
Other Ways to Password Protect Files in Mac OS X
By changing the system information of the file you are attempting to protect, you can remove it from view. While this isn’t password protecting the file as such, it still prevents access from unauthorised parties.
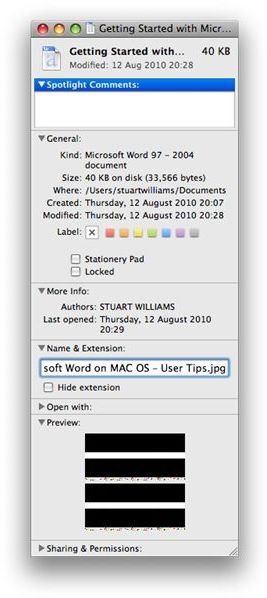
One such way of doing this is to browse to the file in Finder, and Get Info (CTRL+CLICK). In the Name & Extension section, make sure that the Hide extension checkbox is cleared. Then, rename the file, changing the extension to something different. For instance you might change a .doc extension to .jpg. Mac OS X will ask you to confirm the change. You should agree to this, and then return to the Name & Extension section to hide the file extension
While there is no actual password involved, no one will be able to open the file until the file extension is correctly reset.


