Ever wished to have your own Web Server? The procedure to make your Mac OS X system into a Web Server is easy. Read on to find out the simple steps to set up your own Web Server.
What You Need
- An always-on Mac computer.
- 24-hour Internet connectivity.
- MAMP (acronym for Mac, Apache, MySQL, PHP). Downloadable from www.mamp.info .
- A router to forward ports.
- Optional CMS (WordPress, Drupal or any other).
- Optional Dynamic DNS account (DynDns @ www.dyndns.com ).
Install MAMP
MAMP is an open-source program that lets you host a website on a Mac computer. Download and install MAMP then navigate to the /Applications/MAMP folder. The website you create and all the server configuration files will go here.
Configure MAMP
There is a file in the /Applications/MAMP folder named as MAMP.app. Double-click on this file to start the HTTP server. Now click on Preferences and unselect “Check for MAMP PRO when starting MAMP” and “Stop Servers when quitting MAMP”. Unselecting these options will allow you to keep the server on without keeping the application running.
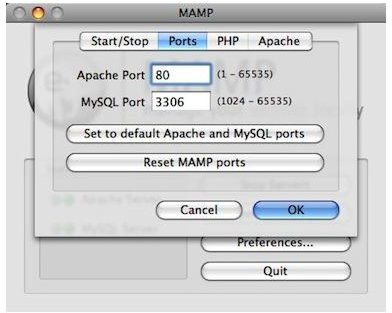
Next, open the Ports tab and click on “Set to default Apache and MySQL ports”. This will set the default port 80 for Apache and MySQL servers.
Sharing with FTP
Go to the System Preferences and click on the Sharing tab. Select the option “File Sharing” then click the Options button and select “Share files and folders using FTP”. Click on Done.
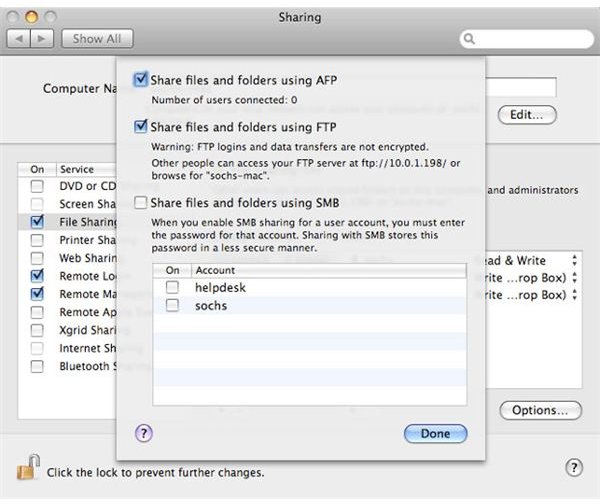
Next, unselect the “Web Sharing” option if already selected. In the end, select the “Remote Login” option to control your computer through SSH remotely.
Port Forwarding
If you wish to access your website from a computer other than that which is hosting it, you will need to have a router to forward the HTTP ports to your computer. The procedure to do this varies for different routers but he basic steps are the same.
To configure port forwarding, go to the System Preferences –> Network. Note down the IP address that is shown under Status.
Next, go to https://www.portforward.com and scroll down to find your router’s model. Click on your router’s model and you will be taken to the next page where you will see the external IP of your router, write it down. Find Apache in the big list given below and click on it. Enter your local IP address in the small box shown on the next page then follow the shown instructions to forward the ports on your router.
Use The DynDNS Updater
You can optionally download DynDNS software that will keep pointing to your IP address whenever it changes.
Go to www.dyndns.com , create your account and download DynDNS Updater. Install and launch it and then enter your login, password. Click the right arrow to view your website then select it. Select the option “Enable updating for this host” . Now whenever your router’s ports are forwarded, you can open your website without a problem.
Note:
1. DynDNS is not designed for handling high-traffic websites. So do not use it if your website is likely to get massive visitors.
2. Using DynDNS can expose your IP address to wrong people. So do not use it if you do not want to risk your website.
Install a Content Management System (CMS)
CMS helps you create, review, edit and publish documents. There are many free CMS available; the most popular ones include Drupal, Joomla and WordPress. In this guide, we will see how to setup WordPress. First, download the ZIP file of WordPress from here , unzip it then drag the “wordpres” folder to /Applications/MAMP/htdocs.
Next, go to the copied WordPress folder and open wp-config-sample.php in any text editor. Replace ‘usernamehere’ and ‘yourpasswordhere’ with ‘root’. You also need to replace ‘putyourdbnamehere’ with your database name. Leave it for now, once you have created a database in the next step, come back here to fill in the name.
Once WordPress is completely configured, it will guide you in creating your web pages through easy steps.
Create a Database
Open up the MAMP.app application then click on “Open Start Page”. This will launch the start page of MAMP in your web browser. Once it opens, click on “phpMyAdmin” on the toolbar that is at the top of the page.
Next, under “Create new database”, type in a name for your database then click Create. In the wp-config-sample.php file that is open in the text editor, replace “putyourdbnamehere” with the database name you created. In the end, save the file as wp-config.php.
That’s It! You can now browse to your website by entering https://localhost/wordpress in your browser’s address bar.


