If you are new to Mac, I would recommend these useful tips that can really help you become comfortable with the Mac platform.
Screen Capture
Screen capture is something that is a need of every computer user. Windows lets you capture the screen with the Print Screen button but it is not capable of capturing a part of the screen of your choice. Now let us see how we can capture the screen in Mac. You press Cmd+Shift+4 and a crosshair pointer will appear. This lets you select a region on screen with just a click and drag. The captured area will be saved as Picture1.png on your desktop. This will be the exact screen capture you wanted, so no need to do any editing.
Installing Applications
Many people get confused when they switch to Mac as to how to install an application. New Mac users often struggle to get it at first but actually it is very simple and easy. There are a few methods to install an application but the most common is with a disk image/.dmg file. For example you have an application called myApplication.dmg; double-click on it. This will mount the disk image and an icon on your desktop will appear. You need to double-click on the icon to view its contents. Once you have double-clicked on it, you will see the application icon in a new window. Now, drag and drop this icon into your Application folder. Done! Your application is installed and ready to be run.
Closing Stubborn Applications
Everyone encounters unresponsive applications and if you have come from Windows, you probably have used the Ctrl+Alt+Del key combination to open Task Manager for force quitting such applications. The Mac equivalent of this shortcut to open up the system tasks profiler is Cmd+Options+Esc and Windows+Alt+Esc on a PC keyboard. Once the window opens, just select the frozen application from the list and click on the Force Quit button.
Keybaord Shortcuts
Using keyboard shortcuts saves you time and makes your tasks complete much faster. These are a few handy keyboard shortcuts that you can start using today:
Cmnd+M Minimizes the Finder
Cmn****d+H Hides current application
Cmnd+K Connects to server
Cmnd+I Opens Get Info window for selected item
Cmnd+Shift+Del Empties Trash
Cmnd+N New Finder window
Cmnd+Q Quits active application
Cmnd+Shift+N Creates a new folder.
C****mnd+O Opens selected item
Cmnd+Shift+A Opens the applications folder
Cmnd+F Find
Cmnd+Option+W Closes all Finder folders
Cmnd+X Cut
Cmnd+C Copy
Cmnd+Z Undo
Cmnd+V Paste
Cmnd+A Select All
Cmnd+Del Deletes item(s)
Cmnd+Tab – Rotate through and toggle to open applications
Cmnd+E Ejects volume, server or media
Cmnd+? Mac Help
Image Credit: bliw.ch
Screen Zooming
Mac comes with a great feature that lets you zoom in the screen. To use the feature, just hold down the Control key and scroll your mouse up. You will see your screen growing in and if you want to zoom out then scroll the wheel down. This feature works on Mac Notebooks as well, to achieve this, scroll the trackpad with two fingers.
Switching Windows And Applications
Mac users can switch between open applications by pressing Cmnd+ ~ (tilde) but the problem with this is that you have to have an application running in the foreground. Another option is to use a program called Witch, which lets you switch between all the opened windows by pressing a shortcut and choosing from an arranged list of windows titles. You can also use the Expose feature by pressing F9 to see thumbnails of all of your open windows, and you can then just click on the one you want you to be in the forefront, and the Spaces feature allows for multiple desktops of different windows. Spaces is configured under the System Preferences > Expose and Spaces.
Accessing Menus
New Mac users who have come from Windows might get disappointed because they can not use shortcuts to open the menus like they could do in Windows. For example in Windows, Alt+F gets you to the File menu, Alt-T to tools menu and so on. There is no such thing in Mac but there is something different that too lets you open menus using keyboard. It is Control + F2 and when you press it, the Apple menu gets highlighted and you can navigate through other menus with the arrow keys on your keyboard.
Slideshows In Finder
Mac provides a very easy and quick way to create a slideshow on your Mac, without needing to go to iPhoto, you can do it straight from Finder instead. To do this, simply navigate to the folder containing pictures and select the pictures (press Cmnd-A to select all pictures or to select individual pictures, hold down Cmnd and select the pictures you want to view) you want to view in the slideshow. Now right-click then select Slideshow from the contextual menu and the slideshow opens in full screen mode with photos changing photos every 3 seconds
Changing Icons
There are tons of cool icons available for Mac out there, like at here . You can replace the default icons of your files, folders and applications in a few simple steps
1- Download the icons of your choice from any website.
2- Open Finder then go to Applications and locate the file, folder or application where you want to change the icon.
3- If you want to change the icon of Firefox, for example, then right-click on its icon and select Get Info
4- A window will open; leave it open and go back the desktop and right-click on the icon you downloaded and select Copy.
5- Go back to the opened window and select the Firefox icon with a single left-click.
6- Finally, paste your new icon by simply pressing Cmnd-V together
7- Your Firefox icon is now changed.
Also, find out how to change Mac default icons very easily and quickly with CandyBar in “How to change or revert to Mac default icons ”.
Undim Your Display
In Mac OS X, the energy-saving options are enabled by default. This is not always a problem but if you get tired of your display dimming
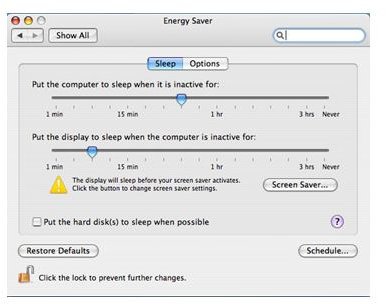
every few minutes, you can change the energy settings. To do this, select System Preferences from the Apple menu then click on Energy Saver. Drag the pointer under “put display to sleep when the computer is inactive” to whatever time that you will be comfortable with. Now go the Options tab and uncheck the “Automatically reduce brightness of the display before display sleep” box.
-- This was my list of Mac tips. If you know any other tip that will be helpful to a new Mac user, please do share it with us in the comments box below.


