Lining up labels isn’t easy on any platform or with any printer, but these tips should help you to get the best out of your selected label stock in Microsoft Word for Mac.
Face Facts: Lining Up Labels is Tough
One common task in all versions of Microsoft Word is the printing of mailing labels. These are useful as they are clearer to read than handwritten labels and also look a lot more professional.
As first impressions count, many people and businesses spend money on purchasing printable labels from companies such as Avery (although there are many other) whose labels are so popular that formatting for them is included in Microsoft Word.
However regardless of how popular the labels are, you would be hard-pressed to find anyone who hasn’t at some point had difficulty in lining up the labels correctly so that the printed content sits within the label outlines.
There are various reasons why Apple Mac users might find that their Word mailing labels are not lining up – let’s sort them out forever right now!
Creating Mailing Labels in Mac Word
If you find that your mail labels are not lining up, it could be that you’re not quite following the correct procedure for creating mailing labels. Word for Mac users should start the label making process by going to Tools > Labels… and entering an address. Next, click Options to select the correct mailing label format, which you will find on the top of your sheet of labels, or on the packet.
Here you can also use the Details… button to nudge your labels, perhaps affording some extra space between the edge of the label and the print area, while the New Label… button can be used to create a new label format from scratch.
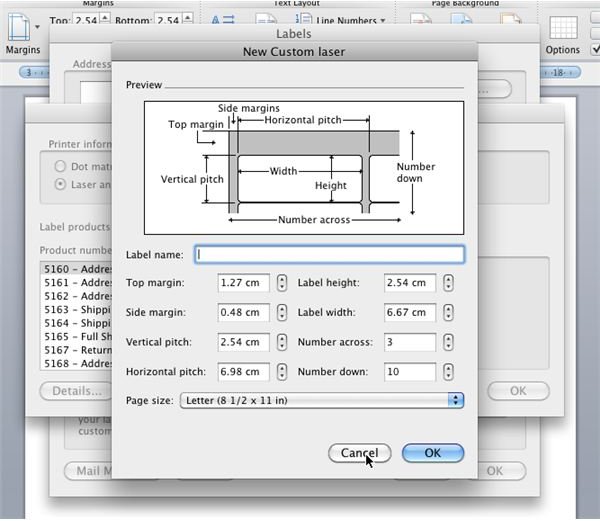
With this option, set a Label name, a Page size and then adjust the margins, pitch and width and height settings as appropriate to your label format. Don’t forget to specify the number of labels across and down the label sheet either!
Click OK to save the new label – you will find your custom labels at the top of the labels list whenever you use the Labels… function.
Note: do not use labels that are unsuitable for printers, i.e. those that come rolled up in a small box. As well as being unsuitable for a printer used to dealing with A4 and Letter format paper, they will peel off on the rollers, rendering your printer useless.
Screenshot by author
Test Printing Your Mailing Labels
By now you should be back in the Labels… screen, with your label format selected. In the Number of Labels section, select Full page of the same label option and perform a test print on a blank sheet of paper the same size as the label sheet.
Once this has completed, hold the blank label sheet and your printed paper up to the light or a window, and place the printed paper in front of the labels; you should be able to see how much adjusting needs to be done to get your Word for Mac labels lined up correctly.
Return to Tools > Labels… and use the Customize… button to select the correct feed method for you labels sheet and specify the exact sheet size. Click OK and again print to plain paper (unless you have plenty of label sheets to spare).
By now one of two things should be happening:
- You will have completed the correct alignment of the labels
- The labels are still refusing correct alignment
If you have continuing problems, return to Tools > Labels… and confirm your label format selection. If you originally used a format included in Word, it might be an idea to use the New Label… option as explained above.
This can prove to be a drawn-out and frustrating process, however when you’re able to correctly set up your labels, the same label formats will be available should you use mail merge.
References
- Author’s own experience.


