How to Transfer iTunes Music From Windows to Mac
Migrating From Windows to Mac
Migrating from Windows to Mac can be a big pain, especially when you have all your music set up nicely on your Windows machine. However, when you are an iTunes user on Windows and you want to switch to iTunes on your Mac machine without losing your library and library settings, this is guide will help you achieve this.
Preparing Your Library Before Transfer
The easiest method to keeping your music collection on your Mac is by just copying it over. However in the case of iTunes this is a bit different as the library itself carries metadata and playlist data that you will want to transfer as well. Luckily iTunes does allow for this, although the process needs preparation:
- Make sure your music collection is organized. Go to Edit – Preferences and chose the ‘Advanced’ Tab.
- Make sure that both the options ‘Keep iTunes Media Folder Organized’ and ‘Copy Files to iTunes Media Folder When Adding To Library’ are selected. Change if needed the destination folder for your iTunes music (by default this should be C:\Users\Your Name\Music\iTunes\iTunes Music).
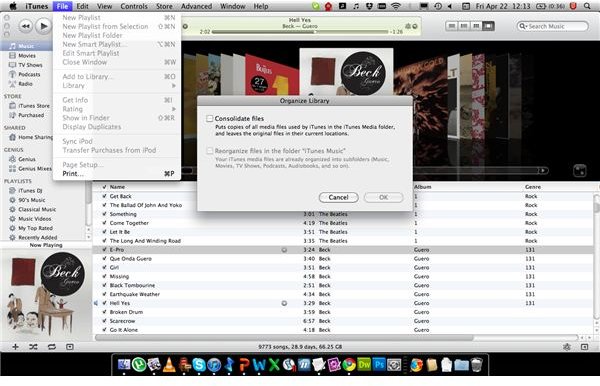
- The next step is to consolidate files, i.e. making sure all the files are in their proper folder. It also makes sure the Library File itself (which contains the meta and playlist data) is not corrupted. This step properly organizes your library and prepares it for transferring it to the Mac machine.
Assuming the default file path as described in step 2, all the necessary files for transfer are now contained in the ‘C:\Users\Your Name\Music\iTunes’ folder. You are now ready to transfer your iTunes Music from Windows to Mac.
Transfer Your iTunes Music From Windows to Mac
Now the iTunes folder is adequately prepared you are ready to transfer iTunes music from Windows to Mac. However, also note that the preparation as described above also applies when transferring iTunes from one computer to another, whether it is Mac or Windows.
The method of transferring the iTunes folder is probably the most time-consuming, depending on the size of your library. You can use a variety of media carriers, from external HDD’s and USB sticks to the SD card of your mobile phone. The only thing that matters is that the files fit. Obviously, transferring the files over a local network is perfectly fine as well. The most important thing to note is to copy the entire folder (the folder called ‘iTunes’) in your Music folder on your Mac.
Finalizing The Move
Once the iTunes folder is copied over to the Mac machine, the last thing to do is to open the iTunes application. As iTunes will by default look in the Music\iTunes folder for media, it should load up as normal with all your music, metadata and playlists intact. All that is left to do is to pick up where you left off!
Note. Feel free to use the comments section to share your experience in migrating iTunes from computer to another!
References
- The article is based on the Author’s own experience.
- Screenshot by the Author. Note that the screenshot shows a Mac version of iTunes. The shown Dialog box does not differ from a Windows version of the app.