Basic scanning capabilities are already built-in to Mac OS X. Using the image capture application you can easily scan, crop and do some basic color enhancements without installing any additional software.
There are a couple things you will have to do before you can scan in Mac OS X using image capture. If you already have your scanner hooked up to your Mac, the scanner drivers installed and the scanner is recognized by Mac OS X you can skip to the next section. The first thing you will have to do to make sure you are able to scan in Mac OS X is ensure your scanner is supported by the OS (Operating System). To do this you please make sure your scanner is listed in Apple’s list of supported scanners for Mac OS X.
Once you are sure your scanner is supported in Mac OS X you can go ahead and connect your scanner to an available USB port and use software update to install/update any required third-party scanner software. Once this has completed your scanner should be recognized by Mac OS X and be available under printers and scanners.
Basic Scanning with Image Capture
Once your pre-scan checklist is complete and your scanner is active in Mac OS X you can then open the image capture application found, conveniently enough, in the applications folder. Image capture has two scanning modes, simplified and advanced, lets take a look at the steps to scan with the simplified interface first.
Simplified Scanning Using Image Capture
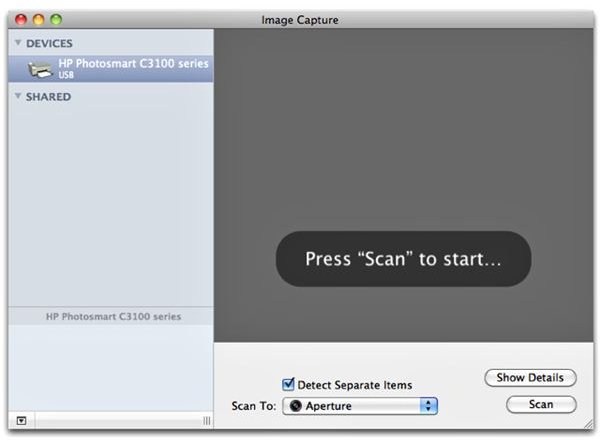
- Place the documents you want to scan in your scanner.
- Open the image capture application.
- Check “Detect Separate Items” so your scanned items will be automatically selected and straightened.
- Select the “Scan To” drop-down box and choose a destination.
- Click scan to initiate your scan.
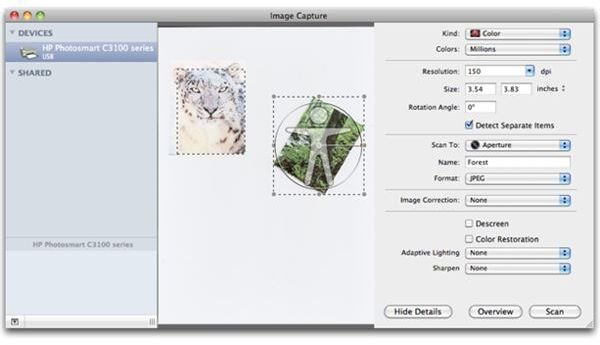
If you would like to have more control over your scans you will want to click the “Show Details” button in the image capture interface. This will expand the scanning interface to include many advanced options that can manually be set for your scans. These options include:
Advanced Scanning Options Using Image Capture
- Kind: Lets you select whether the document you are scanning is color, black and white or text.
- Resolution: Lets you select the target DPI (Dots Per Inch) for your document. The higher the DPI the better your scan will look but will also result in a larger image file and, if set too high, can cause your scan speed to slow to a crawl.
- Size: Lets you select the size of the destination image file.
- Rotation Angle: Lets you manually rotate the scanned image.
- Name: Lets you choose a custom name for your image file.
- Format: Lets you choose the format of the destination image file (JPEG, TIFF, PNG, JPEG 2000, GIF, BMP, or PDF).
- Image Correction: This is where you can fine-tune your scan. Adjust the brightness, tint, saturatoin and temperature to achieve the best possible results.
*This advanced scanning options pane will also include any scanner specific options that your scanner supports.
Other Mac OS X Scanning Options
The image capture application in Mac OS X is currently the best free scanner software for Mac OS X. The options for free scanner software for Mac is limited, mostly due to the fact that the default tools included with Mac OS X do such an excellent job of scanning. One Mac OS X scanner software title that has become rather popular in the past few years is VueScan from Hamrick Software but does cost $39.95 for a license. They do offer a free trial of their software but all your scans will have a watermark on them until you upgrade to the full version. I will take a look at VueScan and a couple other non-free scanning options for Mac OS X in the near future so keep an eye out for that!
Image Credits and References
- Apple Inc.: https://support.apple.com/kb/HT4505
- VueScan 9, Hamrick Software: https://www.hamrick.com/


