Have you purchased a new computer or just want to have your iTunes music on two computers? Thankfully, iTunes makes this process relatively simple. Read on to learn how to back up your music and import it to your new computer.
Using the Backup Feature to Transfer iTunes Music to a New Computer
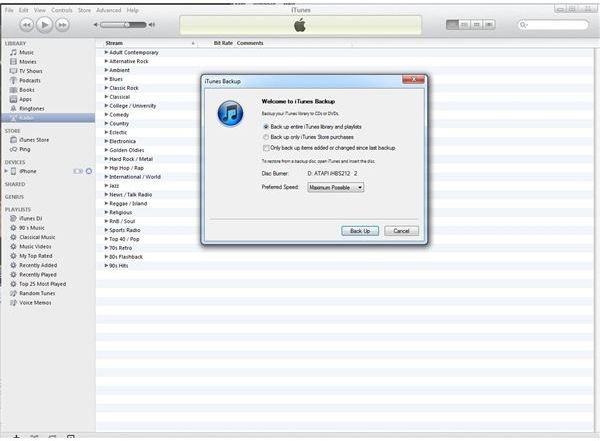
iTunes comes with a built-in backup function that lets you back up your library to CDs or DVDs. In addition to music, this process backs up all of your videos, applications, playlists, podcasts and more. The process is simple and automated because iTunes does all the work. When space runs out on one CD or DVD, you will get a notification to insert the next disc. In addition, you can choose to back up only your iTunes purchases or your entire library. If you have ever created a backup in the past, you also get the option to back up only the items that have been added or changed since the previous backup. To use the automated backup features, follow these steps:
- Select File and click Library. Select Back up to disc from the submenu.
- Select whether you want to back up your entire library or only iTunes purchases. Select the check box under these options if you are updating a previous backup.
- Click Back Up and insert your first disc.
Copying Your iTunes Music to an External Hard Drive or Flash Drive
If you don’t have a fast CD or DVD burner or if you don’t have enough discs to make a backup, you can use an external hard drive or flash drive to transfer iTunes music to your new computer. The process is straightforward for both Mac OS X and Windows.
Mac
- Go to your home folder in Finder and open the Music folder. Open the iTunes folder, right-click the iTunes Music folder and select Copy.
- Navigate to your external hard drive or flash drive in Finder and right-click an open area. Select Paste to copy your iTunes Music folder to the new location.
Windows
- Open the Documents folder in Windows 7 or My Documents in Windows XP. Open the Music or My Music and then open the iTunes folder. Right-click the iTunes Music folder and select Copy.
- Open your external hard drive or flash drive in Windows Explorer and right-click a blank area. Select Paste to copy the iTunes Music folder.
Restoring Your iTunes Music
After your music has been backed up to CDs, DVDs or an external hard drive, you’re ready to import your tunes on to your new computer. If you used the iTunes backup feature, all you have to do is insert the first disc from your backup discs. iTunes will recognize the disc and ask you if you want to restore your media. Click Restore when you get this notification, and iTunes will do the rest for you automatically.
If you backed up your songs to an external hard drive or flash drive, you can use the Add Folder to Library feature to import everything from your iTunes Music folder. Do the following to import your music back in to iTunes:
- Open the iTunes folder on your external hard drive or flash drive. Right-click and select Copy.
- Open the iTunes folder under Music if you use a Mac. Open the iTunes folder under Music or My Music if you use Windows. Right-click an open area and select Paste. This process can take some time, depending on the size of your collection.
- Open iTunes and click File followed by Add Folder to Library. Select your iTunes Music folder and click Select Folder. iTunes will import everything.


