Puppy Linux 4 users can take advantage of free WiFi service widely available in Internet cafes, restaurants, schools, libraries and other facilities following these easy steps.
The trademark term, “WiFi,” refers to any type of network or wireless local area network (WLAN) that is based on IEEE 802.11 standards. Connecting to a WLAN in a cafe, restaurant, library, school or other facility that uses this technology, can loosely be described as an Internet connection “WiFi style.”
Puppy Linux 4: Connecting Internet WiFi for the Complete Novice
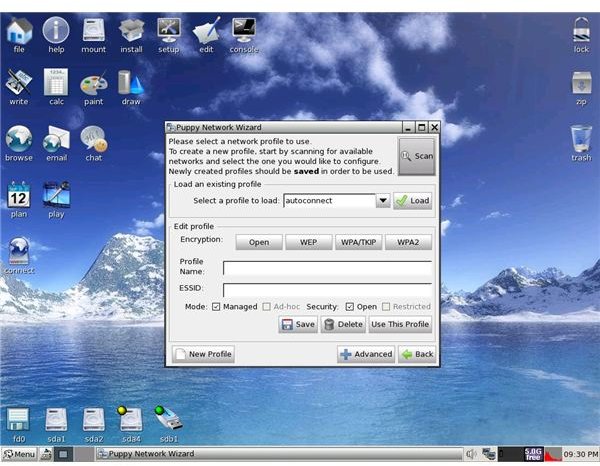
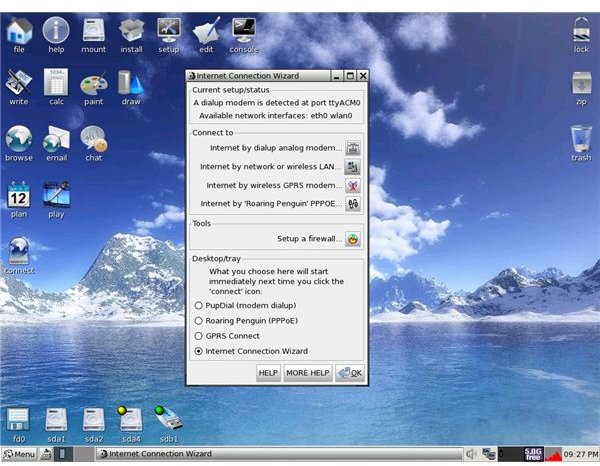
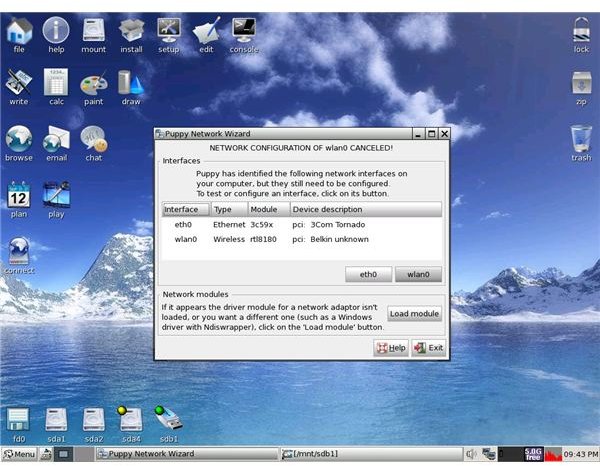
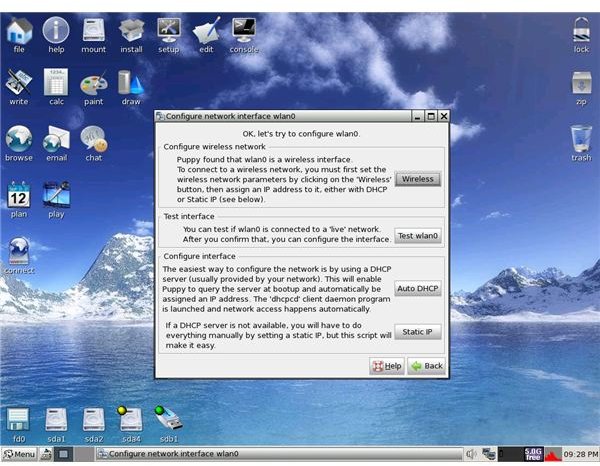
It goes without saying that the hardware you’ll need is a wireless network adapter which might be built-in. If not, you should be able to purchase one that you can use in a pcmcia slot. The desktop should display an icon that says “connect” on which you can click; remember, in Puppy you only click once to open something. If it doesn’t open the Internet connection wizard, right click and choose “Execute the Internet Connection Wizard.” Once open, choose “Internet by network or wireless LAN.” You’ll then need to choose the interface that will be used. An interface is a means and way of connecting to hardware or to a service; WiFi is a service. You can see in the screen shots below, if you click on them, that the interface I had to choose is the one provided by my Belkin card being used in a pcmcia slot. Unless you have more than one interface you can use to connect, you should see something like “wlan0.” Click on the “wlan0” button which might be next to an “eth0” button; don’t click on the button to load a module unless that’s really what you need to do. If your interface shows in the list, you shouldn’t need to deal with loading modules. Now you should be viewing a window titled, “OK, let’s try to configure wlan0.” There are four buttons along the right side that read: Wireless, Test wlan0, Auto DHCP, Static IP; I’ll explain what these mean as we progress. You’ll need to proceed by clicking on the first button, “Wireless.”
You should see the option to scan for available networks in the upper right hand corner. Leave the “autoconnect” option as the profile to load and a check mark in the boxes next to “managed” and “Open” unless you know you have reason to change these settings. Puppy Linux will actually begin scanning for networks and will report on what it found as you can see among the screen shots below. Here’s where things can get just a little tricky.
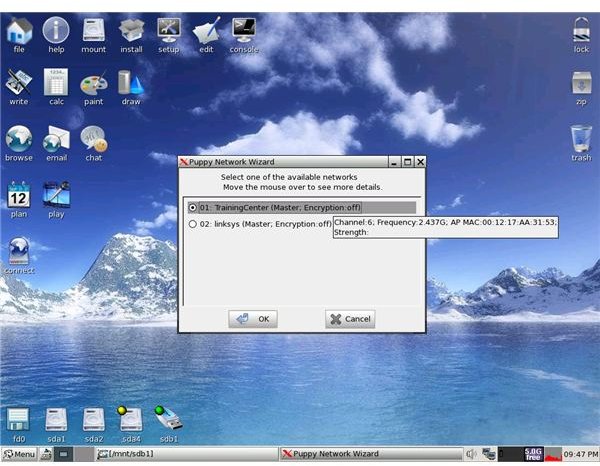
The report can display one or several network names. Two displayed for me: TrainingCenter (Master, Encryption off) and linksys (Master, Encryption off). Sometimes three have displayed. I had to choose “TrainingCenter” to achieve connectivity. You probably want to avoid names such as “linksys.” You can mouse over a network to get more information such as the frequency and MAC address; however, most people don’t need to know these things. Make sure you select the appropriate network (a black dot should appear in the circle) and click “ok.” You’ll be taken to another window that, again offers the opportunity to scan; you’ve already scanned once, you don’t need to scan again.
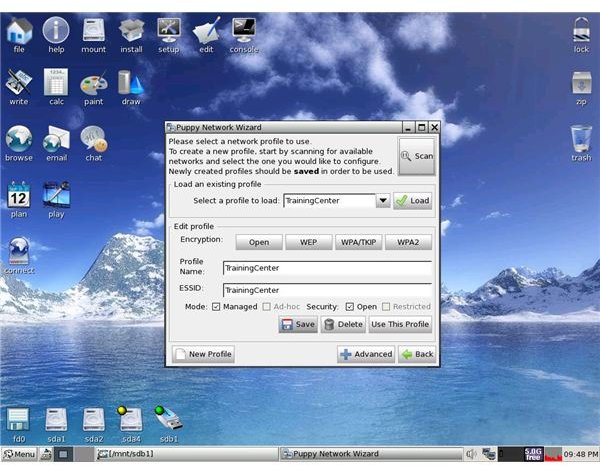
The profile to load should be the name of the network you selected, and that same name should appear as the profile name and ESSID. That name for me was “TrainingCenter” as shown in the screen shots below. If you only run Puppy Linux on the fly, there’s no need to save the profile. If, however, you’ve set up a pup save file, have done a frugal install or a full “traditional” install and will be regularly using a WiFi connection on your machine, I’d suggest saving the profile. The window will disappear only for about a second after you click “save.” Once it reappears, you’ll want to click “Use This Profile.” Although some people don’t test their wireless interface at this point, I always do by clicking on “Test Wlan0.”
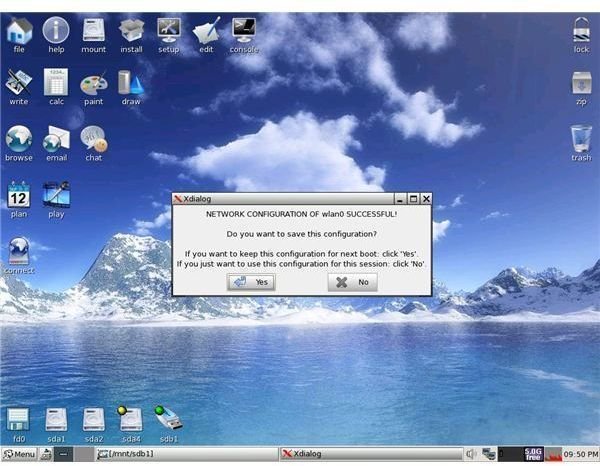
There’s no need to be alarmed when you read, “Unable to connect to a wireless network.” You’ll be advised to verify that one is available and that you’ve used the correct wireless parameters. Of course you can’t connect, you don’t have an internet protocol (IP) address at this point. You’re now at the point of choosing “Auto DHCP.” I don’t think you’ll ever need to choose “Static IP” because there probably isn’t a WiFi service out there available to the public that doesn’t use a DHCP server for the assignment of IP addresses. Puppy Linux will advise you that it is “Connecting to DHCP server…timeout 30 seconds.” Finally, you should see a success message. Simply click “yes” to save the configuration and then click “Done.” To disconnect, you only have to right click on the “connect” icon of the desktop and choose “Disconnect from ethernet/wireless networks.” To reconnect, you can right click again on the “connect” icon and choose “Autoconnect to ethernet/wireless networks.”