Trying out CentOS? By default, any Linux distribution offers a multitude of ways to change your networking and IP addressing. In CentOS, you can choose to do so using 3 different methods. In this article, we take a look at them.
IP Addressing
Before we get to changing the IP addresses of our CentOS boxes, it is imperative that we look at a simple guideline to setting IP addresses. While you can have different values than what I’m specifying here, they will generally be explicitly specified to you by your network administrator. Keeping all complex network-related information out of this article, if you are setting your IP address where the first octet (For an address 192.168.1.16, the first octet is 192) is between 1 and 126, then the netmask should be specified as 255.0.0.0. If you are setting your IP address where the first octet is between 128 and 191, then the netmask should be specified as 255.255.0.0. Anything starting from 192 will have the netmask address as 255.255.255.0
In most cases, you will be connecting this computer to a LAN, and the options you can choose for your IP address are within the following address schemes:
- 10.x.x.x (where x can be any number between 0 and 255, except for the last octet, where the highest number can be 254)
- 172.16.x.x (where x can be any number between 0 and 255, except for the last octet, where the highest number can be 254)
- 192.168.x.x (where x can be any number between 0 and 255, except for the last octet, where the highest number can be 254)
Once you’ve chosen your IP addressing scheme or have been given a set of details about your network configuration, you can proceed to the next section.
Commandline Method
If you want to change your networking configuration in CentOS, there are multiple ways to do it. Since all the configuration and settings are stored as text files in Linux, the quickest way is to simply type a couple of commands or edit the text files by hand. In this section, we’ll take a look at the commands and text files which hold the relevant information.
ifconfig: The ‘ifconfig’ command allows you to view and edit network configuration from the command-line. The basic usage of the command is as follows:
- ifconfig [network_card] [ip_address] [options] [changes]
- ifconfig eth0
- ifconfig eth0 192.168.1.37 netmask 255.255.255.0
You can choose to simply type the ‘ifconfig’ command to view the configuration of all detected network cards on your system. If you’d rather have the information of a specific network card, just append its name at the end of the command. Almost all wired connections will be named ethX, where X can be a number from 0 onwards. If you cannot find any network cards, make sure your kernel supports it, and if the drivers are compiled as a module, then load them by typing ‘modprobe <driver_name>’
The third command mentioned above will change the IP address of your network card ’eth0’ to 192.168.1.37 with a subnet mask of 255.255.255.0.
Editing Text Files
If you’d rather change the setting by editing a text file, fire up your favorite editor with the file “/etc/sysconfig/network-scripts/ifcfg-eth0”. Make sure to replace eth0 with the relevant network card. Inside the file, there should be a few settings, depending on what IP address configuration you are using. To make it use a static IP, make the file look like this:
- DEVICE=eth0
- BOOTPROTO=static [DHCP if you don’t want to bother with manual IP addressing]
- HWADDR=12:23:34:45:56:67 [Depends on your network card]
- IPADDR=192.168.3.55 [Decided by you or your network administrator]
- NETMASK=255.255.255.0 [Refer to first paragraph of this article]
- NETWORK=192.168.3.0 [Decided by you or your network administrator, based on your IP address and netmask configuration]
- ONBOOT=yes [Turn it off if you’d like to keep the network card inactive during bootup]
After saving and exiting the editor, just type “ifdown eth0 && ifup eth0” in the command-line to turn on your network card with the new IP configuration.
Graphical Method
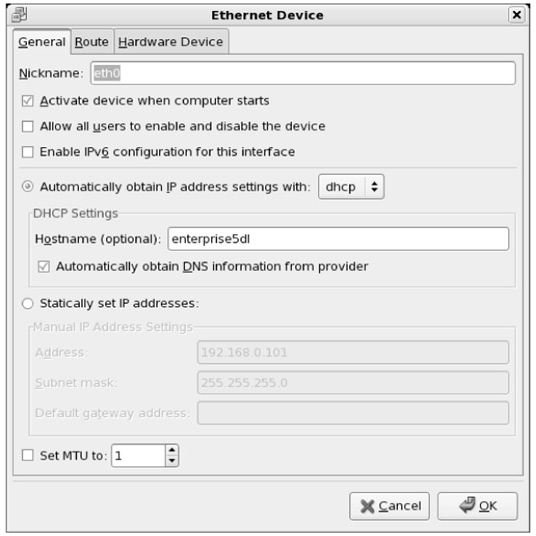
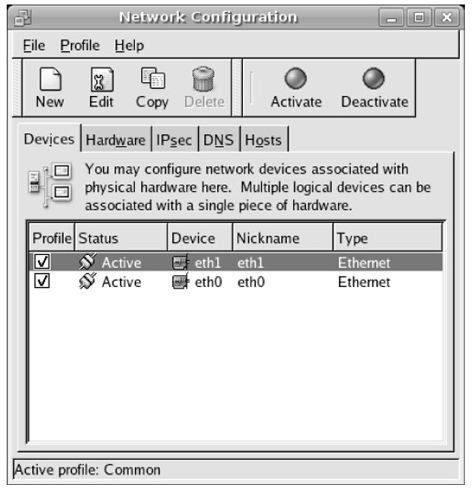
If you don’t want to work with the command line, there is a very simple method to change the IP configuration from the graphical interface itself. Just click on the overhead System menu, navigate to Administration and select Network. In the dialog box that opens, you should see all your network cards. From the list, select the network card you want to configure and click on the Edit button on top. In the resulting dialog box, you should see the relevant fields to enter your IP address configuration. Select “Statically set IP address” and set the relevant addresses yourself. Once done, click on OK. Then in the previous window, select your network card and click on Deactivate, then Activate to make the network card use the new IP address configuration
Graphical Method Images