Backing up your Ubuntu system is easy and it does not involve playing with complicated commands. Here is Back in Time, one of the easiest back up programs for Ubuntu.
Back up Concerns
I personally am confused with the back up programs’ different formats. There are many different file formats that back up programs use and they are closely tied to the software that created them. What if I want to use program X today and then program Y later? What if I want to recover something that I backed up using program X when I am using program Y? For that reason, I was using Conduit - a simple synchronization program to back up my data - but then I discovered Back in Time. Back in Time lets you back up my files and folders with ease. You can simply add directories which you want to be backed up and the program uses rsync to back up your files to the directory you specify.
With the help of the program, you can move back and forth in time with your files and folders in your present and past Ubuntu systems, going anywhere back in time with a simple click on the date or snapshot name you want to go to.
First Run and Configuration
After you install and run the program for the first time, you will be greeted with the options. You will make three decisions here:
- Which directories will be backed up
- Where the snapshots will be saved
- What will be the frequency of the back ups (manual, every hour, every week, every month)
The program will take snapshots of your system and with these snapshots, Back in Time will save the file/folder permissions and links. You can specify removable drives (such as your external USB disks) to save snapshots. The program labels your snapshots with the date and time they are taken and allows you to set labels for them. This gives you two possibilities to retrieve your data:
- Inside Back in Time select the snapshot label, which you will present you the directories you specified for back up at that time and presents you the option to retrieve them
- Go to your back up drive (say /media/usbdisk) and navigate to the directory where snapshots are saved and play with your files as you want (sometimes we want to see the files/folders individually and independently of any program and Back in Time lets you do that)
Snapshots & Scheduled Back-ups
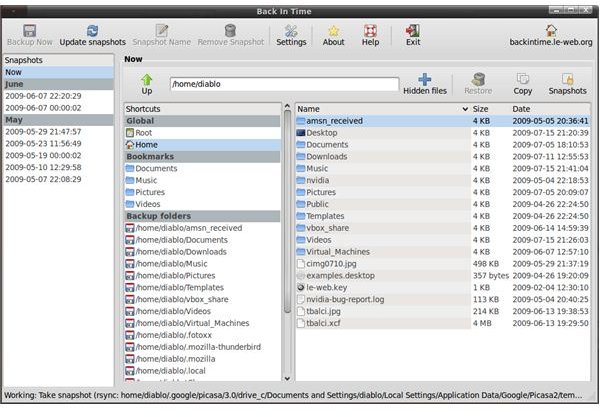
When you want to retrieve any file from a snapshot, simply select the file and click the “Restore” button. If a file/folder with the same name exists on your system -say Documents- it will be renamed to Documents.backup.
The snapshots are saved incrementally, meaning that once you set up and run Back in Time for the first time, all directories/files that you specified will be backed up. Then, with every snapshot, only the differences will be backed up instead of whole directories, saving you time and disk space.
To use the scheduled backups, cron is used, so make sure that it is running in your system (open up a terminal and issue ps -aux | grep cron).
How does it Work? With which Volumes? Do You Recommend It?
Back in Time is a graphical end to many Linux commands. To save snapshots and restore, it uses rsync. To make hard links, it uses cp. To check the differences, it uses diff and to schedule back ups it uses cron. The use of standard Linux commands makes Back in Time more powerful than the other programs that use their own set of commands.
As you might expect, the program also works with NTFS and FAT partitions, but to use it with NTFS volumes, you need to have a ntfs-3g driver installed on your system. I suggest you install the ntfs-3g before installing Back in Time.
I strongly recommend Back in Time for home users who want a simple way to back up their Ubuntu systems. The underlying commands and the abilities of the software are very powerful and error-free. You can install ntfs-3g and Back in Time from Synaptic, Aptitude or from the command line.


