Using legacy hardware? Have a slow PC with low space? Or just want to learn more about the Linux kernel? This guide is for you! Compiling custom kernels is not easy. But once you get the hang of it, the satisfaction you get from using a lean custom kernel tailored to your hardware is unmatchable.
The need for a customized Linux kernel
If you’re using your Linux install for web-browsing on a bone-stock off-the-shelf computer, chances are that you don’t need to delve into this area of kernel recompiles and custom kernels. On the other hand, if you’re trying out exotic or legacy hardware all the time, need to do some debugging, are very low on space, or simply want to peek under the shiny layers, a custom kernel is what you’re looking for.
These days, most consumer-oriented Linux distributions like Ubuntu, Mandriva, Fedora Core, SUSE/openSUSE make it very easy to upgrade your kernels. All you have to do is run the package manager and mark the kernel for an upgrade. But these packages are a one-size-fits-all solution. The same kernel that you’ve downloaded will most probably run on your neighbor’s computer which is running completely different hardware. While this makes it efficient for the companies/groups who manage your distribution, your kernel will now contain drivers and patches for a host of stuff which you will probably never use your computer for. More bloat equals more size, which can be a concern for all the people using netbooks, old computers, and incompatible laptops and so on.
The answer to this dilemma is to compile a customized kernel tailored to your specific hardware. While this will take a few minutes of your time, it can make your kernel very efficient and lean.
Downloading and unpacking the kernel source
The correct way to download the kernel source-code depends on how your specific distribution manages it. All distributions will have the kernel source-code as an installable package in their respective manager. For Ubuntu, it’s called linux-image, Fedora Core sticks to linux-<version.number>, whereas Gentoo calls it gentoo-sources-
The source code for the kernel will be stored in the folder /usr/src/linux/name_of_kernel_package-
Let’s say that you’re using Gentoo… The correct way to download and install the source-code package is to simply type “emerge gentoo-sources” in the command-line. The package manager will download and unpack the latest stable/unstable version of kernel sources depending on your preferences.
In Ubuntu, the correct way is to type the following commands:
sudo apt-get build-dep linux-image-$(uname -r)
sudo apt-get source linux-image-$(uname -r)
This will install and unpack the source-code of the kernel version that you’re currently running on your system.
If you’re looking to play around with a plain-vanilla kernel minus any patches supplied by the distro maintainers, you can get the latest kernel packages from kernel.org. The correct way to download and unpack it is by using the following commands:
cd /usr/src/linux
sudo wget https://kernel.org/pub/linux/kernel/v2.6/linux-2.6.28.7.tar.bz2
sudo tar -xvjf linux-2.6.28.7.tar.bz2
sudo ln -sf /usr/src/linux/linux-2.6.28.7 /usr/src/linux
cd /usr/src/linux
Whatever your distro, you should now have the kernel source-code stored in a folder inside /usr/src/linux, and ready for customization and compilation.
Customizing the kernel
Now that you have the kernel source-code unpacked, it’s time to make it leaner and meaner. To make sure that you don’t completely bork your kernel configuration, it’s recommended to edit your current kernel configuration rather than starting from scratch. Most distributions will keep a copy of that config file in the /boot folder, known as .config. You have to copy it to the kernel source code folder by typing the following (assuming that the config file is stored in /boot as .config)
cd /boot
sudo cp .config /usr/src/linux/.config
Since you’ve symlinked the /usr/src/linux folder to the kernel source-code folder, it will be pasted in the correct place.
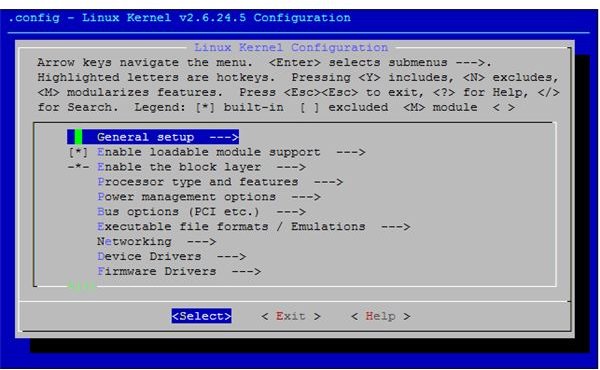
Make sure you’re in the source-code folder and type “make menuconfig” in the command-line. This will run a few scripts and present you with a menu full of customization options. Navigation is done by pressing the arrow keys, selection/deselection is done by pressing the space-bar, and the Tab key is used to move out of menus.
The different sections allow you to configure different areas of the kernel. Most of it is pretty self-explanatory; all you need is a good knowledge of what hardware you’re using since it can be irritating to compile a kernel which doesn’t have drivers for some of your hardware.
You will notice that in certain areas, pressing space-bar to switch on/off certain options will give you a third option - M. The * next to an item means that it will be compiled into the kernel. That will make the kernel just that little bit bigger, but give you peace of mind knowing that the feature is available as soon as the kernel is booted. The M sign, will compile the feature as a module.
When compiled as a module, the feature (device drivers, filesystems, etc) will be available as soon as you load the module after booting by typing “modprobe module_name”, or add it to the autoboot-module list specific to your distribution. This gives the kernel a lot of modularity. Suppose you need to boot the kernel on a very slow PC which only has one SATA disk running an ext3 filesystem. You can simply compile the SATA device driver and ext3 filesystem into the kernel and leave all the rest as modules. Thus, the kernel will consume significantly less memory than it would’ve, if you had compiled everything into it. Make sure to keep important stuff compiled into the kernel and leave the extra features as modules if you wish.
Compiling the custom kernel
Now that you’re hopefully done customizing the kernel to your heart’s content, it’s time to compile it. If you have any doubts about a certain option in the configuration, it’s safer to leave it in rather than deselect it and have a non-working kernel. Now, just exit the menuconfig and you’ll be back to the command-line.
Here, just type the following to compile the kernel, install the modules in the proper folder and finally copy the compiled kernel to the /boot folder.
sudo make && sudo make modules_install && sudo make install
The && sign will basically run one command after another, so you don’t need to wait for one step to finish before you type the next command. A kernel compile can take quite a bit of time depending on your computer’s configuration and the options you’ve bundled in.
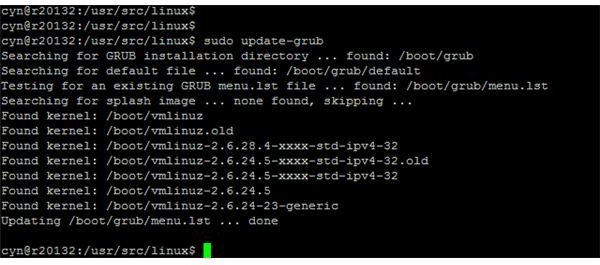
Updating the bootloader entry
Now that you’ve compiled the kernel and moved it to the /boot folder, it’s time to add an entry for it in the boot menu. This will allow you to switch between a known-working kernel and your new compiled kernel at bootup. So if you’ve made a mistake with the kernel configuration, you can simply reboot your machine, select an older working kernel and resume with whatever you want to do. Just type “sudo update-grub” in the command-line. This tool will scan your /boot folder for kernel images and present you with a choice of adding the newly compiled kernel in the menu.
Once done, you’re free to reboot your machine and select the newly-added entry in the boot menu. Good luck and Godspeed!


