If you do any Linux administration you know how important it is to backup not only data but entire (or portions of) disks. By backing up entire disks you can restore a machine from disaster. In this Bright Hub article you will learn how to backup with partimage.
What is partimage?
Partimage is a disk cloning utility for Linux that can save backups in many formats to locally attached storage or to network attached storage. The utility is a curses-based tool which means it is somewhere between a text-based and a gui-based utility. It is very easy to use and is very reliable. With Partimage you can backup single partitions or whole disks.
What you need
You will need:
- A working Linux installation
- Partimage installed
- A drive large enough to hold the backup (CD/DVD, Internal or External Drive, or a server with enough space to hold the backup)
That is it. To install Partimage you can go to your Add/Remove Software utility, search for “partimage”, select the results, and apply the changes.
Running Partimage
After Partimage is installed you will need to open up a terminal window and issue the command (as root) partimage. When you first start up Partimage you will see an error saying that Partimage needs to create the special device /dev/dm. Go ahead and allow this (if you do not, Partimage will not work). After the special device is created the main Partimage window will appear.
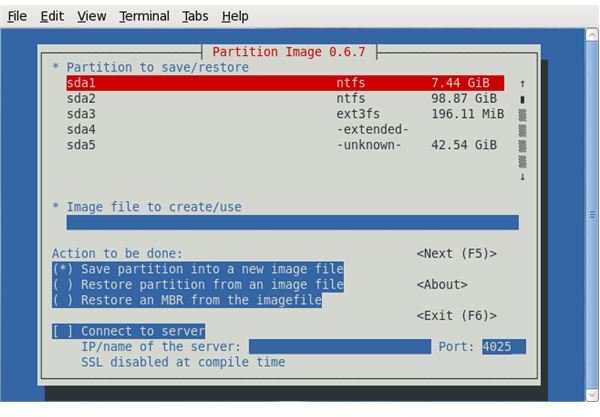
Main Window
Filling out the information
Take a look at the image above. There isn’t too much information to fill out, but all of the information is critical. What I am going to do is back up the ext3 partition on /dev/sda5 and I want to back it up to the ntfs partition on /dev/sda2. Here’s a problem, I am working in the Linux operating system which means the nfts partitions are not mounted. Because they are not mounted I can not currently save any data to them. What I have to do first is mount the ntfs.
Thus I will (as the root user) create a directory on /media called /media/windows. Once that is created I will mount the directory with mount /dev/sda2 /media/windows. Now we can move data to that partition.
Partimage filled out
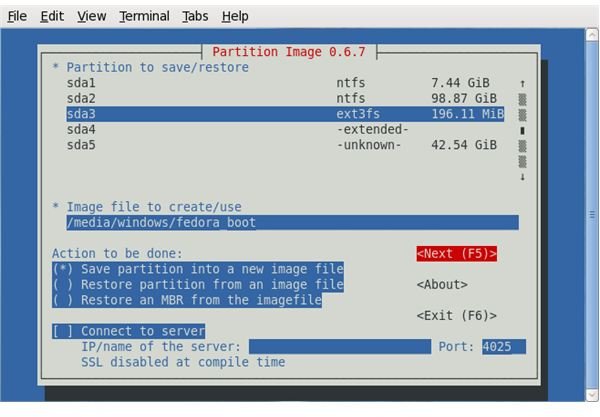
What we are doing
For this example we are going to back up the Linux boot partition (/dev/sda3) to /media/windows. The file name will be fedora_boot. As you fill out one piece of information you will tab to the next text area. Once all of the information is filled out tab to the text that says
To compress or not
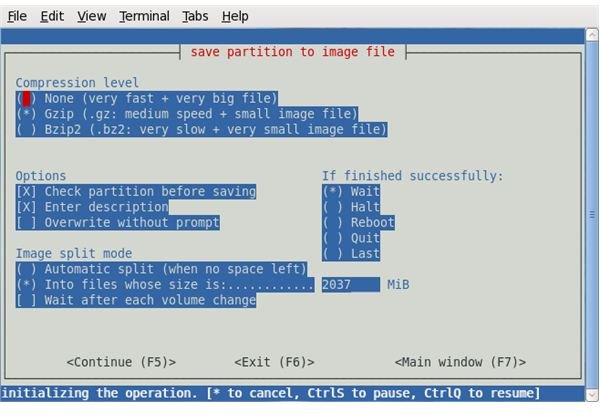
Final choices
The section you are looking at above wants to know if you want to compress your file? If your backup file is going to be large you might want to compress the file to save space. However, if you do compress the file the backup (and restore) will take much more time.
The rest of the options, you can leave as the default (unless your setup demands otherwise). Once you are finished, tab to Continue (or hit F5).
Name your partition?
The final step is to (optionally) give your partition a description. Once you do that you will get a final screen that gives you all of the information about your backup file. Click enter to start the process. When you are done with your backup you will get an “Operation Successful” message. Hit enter to close Partimage.
Your back up is now complete. Remember to remount your /boot partition. Congratulations.


