How to Share Printers and Files in Ubuntu and Windows 7
File and Printer Sharing with Ubuntu and Windows 7
One of the strengths of Linux is its ability to adapt to pretty much any situation in which it is used, and this quality has seen its popularity increase over the past few years as distributions such as Ubuntu have been used to create attractive user interfaces that newcomers to computing and old hands alike can feel comfortable with.
This has been so successful that more and more businesses are switching to open source solutions. Some however, have been put off by misconceptions about the ease with which tasks such as sharing printers and files across a mixed network might be executed.
While running an Ubuntu-only network of computers might be the ideal way around this, for most home users and businesses there will always be a need for a Windows computer. Therefore, there still may be a need to share data and perhaps print jobs across the home network from a Linux PC to a Windows PC.
How to Share a Windows Printer with Ubuntu
Sharing a Windows printer with an Ubuntu computer provides a massive advantage and will of course save money on the potential outlay on a second printer for the Ubuntu machine. This tutorial has been written using Windows 7 and Ubuntu 10.10.
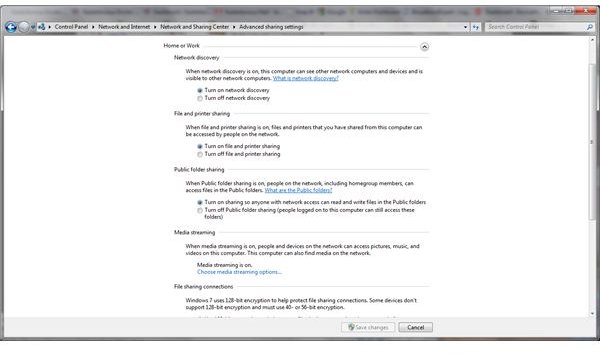
To get started with this, begin by clicking Start on your Windows 7 computer and searching for “network and sharing”. In the results you should spot Network and Sharing Center, so click on this to open and then in the left-hand pane select Change advanced sharing settings. In the new screen, expand your network type and select Turn on file and printer sharing.
Finish by clicking the Save changes button.
Next, switch to your Ubuntu computer and click the power button next to the clock, selecting System Settings > Hardware > Printing. Here you can add a new printer using the Add button, so expand Network Printer and select Find Network Printer. In the resulting search box, enter the name of the Windows 7 computer that your printer is attached to (you can find the name of the Windows 7 computer by hopping back over to it, opening Start, right-clicking Computer and selecting Properties (you should see the computer name listed).
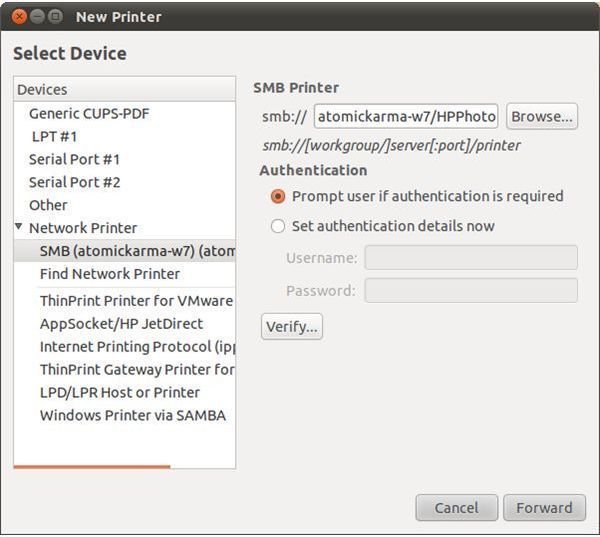
Ubuntu will then ask you to authenticate the connection to the Windows computer, which you must do by entering your username and password. After this, the printer should be displayed under Network Printer, and its name/path displayed under SMB Printer.
Click Forward to continue and then select the make and model of your printer, clicking Forward again until the done; you may get the option to print a test page, which you should do. You will then be able to view the printer in System > Administration > Printing, and print to it from any appropriate application!
If you experience any problems, try restarting both printer and Ubuntu computer.
Sharing Files Between Ubuntu and Windows
Printing from an Ubuntu device to a Windows-connected printer is, as you can see pretty straightforward.
However, while the process of setting up file-sharing might appear similarly easy to work through, bear in mind that you might encounter various problems and issues due to firewalls, permissions and related settings.
The best way to get around any of these problems is to setup file sharing with your Internet connection disabled and your Windows and Ubuntu firewalls switched off. When you re-enable your firewall with sharing setup, everything should work (or prompt you for responses).
As with the previous instructions for enabling printer sharing, you will need to open Network and Sharing Center > Change advanced sharing settings and select Turn on file and printer sharing before proceeding, remembering to click Save changes.
At this stage, switch back to your Ubuntu computer and select Accessories > Ubuntu Software Center, and then search for and Install “samba”. This will take a short time as the installer is around 20 MB. Once this is done, head to Power Settings > System Settings and then to System > Samba, and open Preferences > Server Settings. On the Basic tab enter the name of your Windows workgroup, and then click OK.
Next, use the Add button to enter the name of the local folder that you wish to share with Windows 7. This will typically be /home/[username]Documents; remember to give the share a name that you can easily recognize from your Windows computer and mark it as both Writable and Visible. After this, move to the Access tab and select which users you want to share with.
Click OK to finish, and the process is complete. After a restart on both your Windows and Ubuntu computers you should now be able to share files between the two devices across your local network!
References
Author’s own experience.
Screenshots provided by author.