It may be a foreign thought, but making your own Twisted Pair Patch and Crossover network cables is not as hard as it sounds. You’ll need one special tool and a few items from a store. From there, its just a matter of following a few easy directions.
Why Make Your Own Network Cables
Any person who has found themselves running to the store more than once to spend far too much money on a short little network cable that barely meets their needs has probably wished that they could find a less expensive, more convenient, and much more customizable solution. Even if you haven’t been in that situation, there could be a million and one reasons why you might want to know this information. For me, the need to make my own cables began when I realized if I wanted wired internet in my office that I was going to have to run an 80 foot cable from the router to my computer.
The fact of the matter is that cable making is extremely easy, and in the long run, it ends up being a lot cheaper than buying premade cables. A 6ft Cat 5e Twisted Pair cable usually runs around $15 from a computer store, but you can get 1000 feet in a spool for around $100. All you have to do is add connectors at the length of your choice and you’re good to go!
What You Need
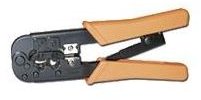
The special tool that we need is a little bit on the pricey side (around $50) if you get a high quality one. However, a $20-30 one will suffice in most situations. The tool is called a Crimping Tool, and is used to attach RJ-11 (phone jack) and RJ-45 (Ethernet jack) connectors to their respective cables. They come in varying qualities and prices.
This one includes crimps for RJ-45 and RJ-11, along with a cable stripper - $37.37
The next thing you are going to need is some cable. Category 5e cable can be purchased from most large
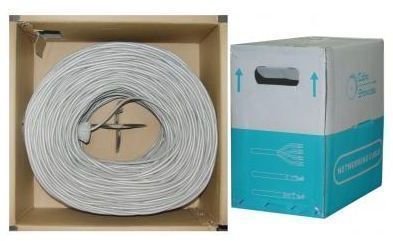
home improvement stores or online. Buying by the foot or yard costs a bit more than buying a 1000 foot spool, but its still cheaper than buying a premade cable. I payed around $35 for 120 feet.
You can get a 1000 foot spool here , for anywhere from 70-120 USD.
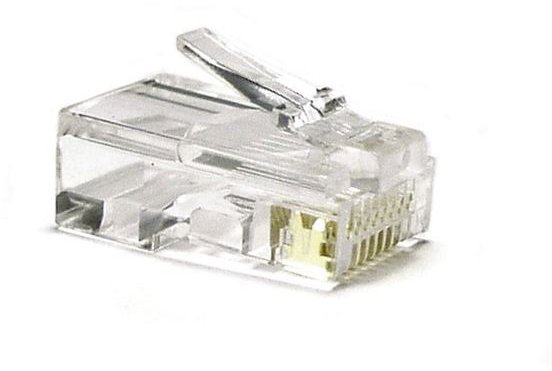
Lastly, you’re going to need a pack of RJ-45 connectors. These are really inexpensive as well, running around $7-10 for a pack of 50.
You can get them here for $6.99 for 50.
Wiring Schemes
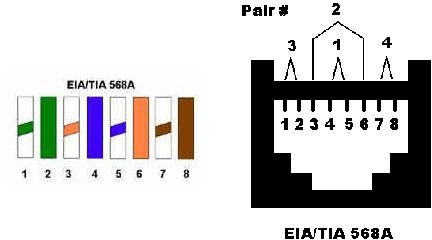
Now that you have all your materials, you can start making cables. It really isn’t too difficult, but first you need to know how to wire up the cables. There are 8 different color-coded wires inside a Cat 5e cable, and they’re predominantly arranged in two main wiring schemes, simply called A and B. The wiring schemes determine how the wires are inserted into the connectors. They’re pictured here, A on the left, and B on the right. (Image Credits )

Assembling the Cable
The first thing you need to do is remove the outer sleave from the Cat 5e. I usually just do this with a regular box-cutter, cutting away about one inch of the outer shielding. Next, you need to untwist all four pairs of wires, and straighten them the best you can. Arrange the wires into one of the above wiring schemes (B is most common, but A works just as well). You need to grip the wires so that they remain in order, side by side. You’ll have to trim off the tips so that they are even straight across, and only about 1/4-inch of colored wire is exposed above the jacket.
Gripping the wires in one hand, now comes the hard part. You need to fit the plastic connector over the wires, making sure that the tab side is facing away from you (assuming you’re holding the wires exactly as pictured above). Once you’re maneuvered the wires into place, ensure that they reach all the way to the bottom of the connector. To secure the connector, fit it into the slot on the crimping tool and squeeze the handle. This will cause the prongs to puncture the wire insulation and connect with the inner copper.
Repeat this on the other end of your cable. If you do both ends as A or both ends as B, you will create a standard Patch cable. If you do one end as A and the other as B, you will create a crossover cable. Have fun making cables out of the rest of your spool and selling them to friends! I know I did.


