
Are you looking for nice buttons to add to your website? In this tutorial, I will show you how to create silver plastic pill buttons with spirals for decoration. These buttons are created in Adobe Illustrator. You can see what the buttons look like in the image below.
Adobe Illustrator CS3 Silver Plastic Buttons
This tutorial will show you how to create Silver Plastic Pill buttons with Spirals. These buttons are real simple to create. You will need to download the Plastic Style Boxes file to use this tutorial. You can find that file here . You can also download the .ai file that I have added to work along with this tutorial. You can find the .ai file here .
After you have downloaded and installed the Plastic Style Boxes file, open Illustrator and create a new document to work on. We will come back to the file that you downloaded in a minute. Go ahead and select the rounded rectangle tool. Draw a rounded rectangle on your document. It should look like a pill. You can adjust the size of it by using the transform tool.
Opening the Plastic Style Boxes File
Now you can open the file that you downloaded. Go to the top of Illustrator and click Window > Graphic Style Libraries > Other Library. When the box opens, locate the file that you downloaded and unzipped. Click the .ai file and click the Open button on the box. The Plastic Style Boxes will open in your Illustrator window.
Applying the Plastic Style to the Button
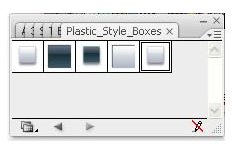
Next, you will need to apply the Light Plastic Variation style to the button. That is the last style in the box. So, click the button to select it and click the style to apply it. You do not need to mess with the stroke. There is no stroke applied to this button.
Adding the Spirals to the Button
The next step is to add the two spirals to the button. We will use the properties box to add the spiral. Grab the spiral tool and click the document. The Spiral Tool properties box will open. You will need to enter the following into the fields.
Radius - 10.2956 pt
Decay – 80
Segments – 10
Style – Top Choice
Click OK on the box to apply it and close it. Change the color stroke of the spiral to black. Then drag the spiral to your button. Copy the spiral and paste it to create the other spiral. Drag the spiral to the other end of the button.
Grouping the Objects and Creating More Buttons
Now you can group the objects together and create the other buttons that you need. Click the button, hold down the shift key and click the two spirals. Go to the top of Illustrator and click Object > Group. The objects are now one object. To copy the button, press CTRL C. To paste the button, press CTRL V. Press CTRL V to paste all of the buttons that you need.
After you have created your buttons, you can start adding the text to the buttons. Once you have finished, save the buttons and export them .
Image Credits & References
Buttons were designed and created by the author.
This post is part of the series: Adobe Illustrator CS3 Buttons
This series will show you how to create buttons in Adobe Illustrator.
- Introduction to Creating Web Buttons in Adobe Illustrator CS3
- Adobe Illustrator CS3 Buttons: Rose Faded Drop Shadow Button
- Applying a Chrome Effect to Web Buttons in Adobe Illustrator
- Adobe Illustrator CS3 Buttons: Pink Gradient Leaf Buttons
- Adobe Illustrator CS3 Buttons: Green Gradient Cross Buttons
- Creating Glass Buttons With Illustrator
- Adobe Illustrator CS3 Buttons: Pink and Silver Bullet Button
- Adobe Illustrators CS3 Buttons: Water Blue and Yellow Buttons
- Adobe Illustrator CS3 Buttons: Black and Silver Chrome Pill Button
- Creating Slanted Gold Web Buttons in Illustrator
- Adobe Illustrator CS3 Buttons: Blue Steel 3D Slanted Button
- Adobe Illustrator CS3 Buttons: Silver Plastic Pill Button with Spirals
- Adobe Illustrator CS3 Buttons: Silver Bullet Buttons


