
If you want to add some customization to your web site, try creating your own web buttons in Adobe Illustrator. This tutorial will show how to make the basic, but popular, pill button.
Illustrator Pill Buttons
This tutorial will show you how to create a black and silver chrome pill button using Adobe Illustrator CS3. The chrome pill button was created using the round rectangle tool, a gradient, and the line tool. This button is really simple to create. Open Adobe Illustrator CS3 and let it load. Create a new document to work on and then we will get started.
Drawing the Pill Button
First, we will need to draw the pill button. Grab the rounded rectangle tool from your toolbar and draw a pill shape. Draw it the size that you want the button to be. Drawing the button very wide will cause it to loose the pill shape look. So, try not to draw it too wide.
Applying the Gradient to the Pill Button
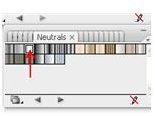
You will need to open the Neutrals Gradient box. If you do not know how, follow these steps. Go to the top of Illustrator and click Window > Swatch Libraries > Gradients > Neutrals. In the gradient box you will need to locate the Neutral 3 gradient. That is the third gradient in the box. Click your rectangle to select it and then click the gradient to apply it.
Set the border color of the pill button to black and change the stroke size to 2.
Creating the Black Lines
Next, we will create the black lines for the button. Grab the line tool from your toolbar. Set the color of the stroke to black and set the stroke size to 2. Start from the top of the pill button and draw a line down. Draw two lines. Move one line to the left side of the button and move the other line to the right side of the button. Refer to the finished button image to get a visual of where the lines need to be.
Turning Your Chrome Pill Button into One Graphic
Right now you have three different graphics, two lines and a button. You can group these together to make one graphic. Making one graphic will make it a lot easier to duplicate. Grab your black pointer from your toolbar. Hold your Shift key down and select the two lines and the button. Go to the top of the window and click Object > Group.
Duplicating More Buttons
To create more buttons, you will need to copy the original button and paste it. Click the button and press CTRL C on your keyboard. Click off of the button and press CTRL V to paste it. Continuing pressing CTRL V until you have all of the buttons that you need.
After you have created your buttons, you can add the text to them and then export them.
This post is part of the series: Adobe Illustrator CS3 Buttons
This series will show you how to create buttons in Adobe Illustrator.
- Introduction to Creating Web Buttons in Adobe Illustrator CS3
- Adobe Illustrator CS3 Buttons: Rose Faded Drop Shadow Button
- Applying a Chrome Effect to Web Buttons in Adobe Illustrator
- Adobe Illustrator CS3 Buttons: Pink Gradient Leaf Buttons
- Adobe Illustrator CS3 Buttons: Green Gradient Cross Buttons
- Creating Glass Buttons With Illustrator
- Adobe Illustrator CS3 Buttons: Pink and Silver Bullet Button
- Adobe Illustrators CS3 Buttons: Water Blue and Yellow Buttons
- Adobe Illustrator CS3 Buttons: Black and Silver Chrome Pill Button
- Creating Slanted Gold Web Buttons in Illustrator
- Adobe Illustrator CS3 Buttons: Blue Steel 3D Slanted Button
- Adobe Illustrator CS3 Buttons: Silver Plastic Pill Button with Spirals
- Adobe Illustrator CS3 Buttons: Silver Bullet Buttons


