
In this tutorial, you will learn how to create a pink and silver bullet button using Adobe Illustrator CS3. You can also use the same technique to choose other colors that match your web site’s theme.
Steps for Creating the Button
This tutorial will show you how to create a pink and silver bullet button. The button is silver and the bullet part of the button is pink. The button was created using a gradient. The bullet was created using a style. This button is simple to create and will make a nice menu for a website. Go ahead and load your Adobe Illustrator CS3 program. Then create a new document to work on.
Drawing the Button
First, you will need to draw the button. So, get the rectangle tool from the toolbar on the left side of Adobe Illustrator. Draw a rectangle on the document. You will need to draw the rectangle the size that you want the button to be, but you can go back and resize it later if you need too.
Applying the Gradient to the Button
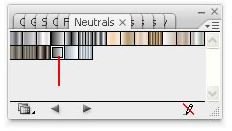
Next, we will apply the gradient to the button. Go to the top of your window and click Window > Swatch Libraries > Gradients > Neutrals. When the Neutrals box opens, you will need to find the Neutral 18 gradient. It is the third from the last gradient in the box. Click the rectangle and click the gradient to apply it. Change the stroke color of the button to # 562C59.
You will need to change the angle of the gradient. Make sure that the button is still clicked, then open your Gradient Box. Expand the gradient box and change the angle of the gradient to 90.
Creating the Bullet for the Button
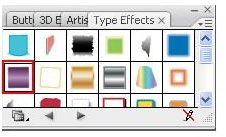
Next, we will create the bullet. Grab the rectangle again. Draw a small square on your button. This is the bullet part. Slide the square to the left side of the button. Next, you will need to open the Type Effects box. Go to the top of Adobe Illustrator CS3 and click Window > Graphics Libraries > Type Effects. When the box opens, locate the Jiggle style. Click the bullet that you just created and click the Jiggle style to apply it.
That is all for the Pink and Silver Bullet Button. Now you can group the two objects together and create your other buttons. To group them, select both of the objects. Go to the top of Illustrator and click Objects > Group. The two objects have now become one. You can also right click on the objects and click Group. You can copy the button and paste the other buttons that you need. After you have created your other buttons, you can start adding your text to the buttons.
This post is part of the series: Adobe Illustrator CS3 Buttons
This series will show you how to create buttons in Adobe Illustrator.
- Introduction to Creating Web Buttons in Adobe Illustrator CS3
- Adobe Illustrator CS3 Buttons: Rose Faded Drop Shadow Button
- Applying a Chrome Effect to Web Buttons in Adobe Illustrator
- Adobe Illustrator CS3 Buttons: Pink Gradient Leaf Buttons
- Adobe Illustrator CS3 Buttons: Green Gradient Cross Buttons
- Creating Glass Buttons With Illustrator
- Adobe Illustrator CS3 Buttons: Pink and Silver Bullet Button
- Adobe Illustrators CS3 Buttons: Water Blue and Yellow Buttons
- Adobe Illustrator CS3 Buttons: Black and Silver Chrome Pill Button
- Creating Slanted Gold Web Buttons in Illustrator
- Adobe Illustrator CS3 Buttons: Blue Steel 3D Slanted Button
- Adobe Illustrator CS3 Buttons: Silver Plastic Pill Button with Spirals
- Adobe Illustrator CS3 Buttons: Silver Bullet Buttons


