You have done it! Your PC is done, we just need to hook everything up to it and turn it on.
You’re done!!!
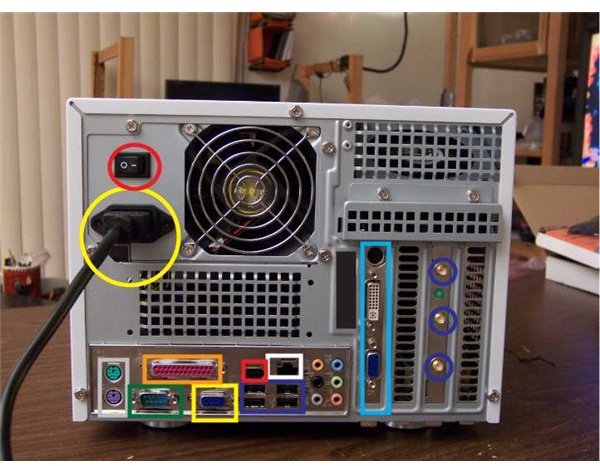
Congratulations: You put a PC together! All you need to do now is connect your peripherals and install the OS of your choice. The picture will help you make your connections. Obviously, the computer needs electricity. The yellow circle shows where one end of the power cord goes. The other end goes in to the wall… actually it should really go into a surge protector. You’ve spent how much time and money on this computer? Don’t leave it to the mercy of lightning and an aging power grid. Here is an article explaining how to choose a good surge protector for under 20 bucks . The red circle surrounds the switch you will need to flip to turn on the power supply. This won’t turn the computer on; it just allows the PC to turn on when the power button at the front is pressed.
Data wise, just about everything uses USB (in blue rectangle) now days. Your internet access likely uses the Ethernet port (white). Older
printers may use a parallel port (in orange) while old keyboards and mice use PS/2 ports (grey). The serial port (green) is also dated, but still has lots of industrial applications. Note that newer motherboards may not have all of these older connectors .
The VGA connector on the motherboard (yellow) is where you connect your monitor, unless you installed a graphics card (cyan, sorry running out of colours). Then you need to use its ports. If you have the option, the DVI-I connector in white plastic offers superior performance to the VGA one (in blue plastic) below it.
Hook up as many speakers and input devices to the audio connections (between the USB ports and graphics card) as you see fit. They are colour-coded: light blue for a line-in (e.g.: CD player); pink for Mic-In; lime for output to speakers or headphones; the other three are used for surround set ups. As you go from stereo to 2.1, 5.1 and 7.1: lime becomes front; orange for subwoofer; black for rear; and grey for sides.
Finally, if you are using a Wi-Fi card, screw on its antenna(e). The connectors are indicated by blue circles.
Fire It Up
Go ahead and turn on your computer. You can either start by poking around in your BIOS and customizing how you want things to work as far as boot orders and such, or just drop in your Operating System install disk for a less tailored but more streamlined approach. See this article for details on configuring a new system.
This post is part of the series: Building a PC
We show you how to build PC, step by step, with pictures.
- Building a PC: Open Your Case and Get to Work!
- Building a PC: Time to Install the Motherboard
- Building a PC: Installing a Core 2 CPU
- Building a PC: How to Install a Power Supply Unit
- Building a PC: Installing Memory
- Building a PC: Installing an Optical Device
- Building a PC: Installing a Hard Drive
- Building a PC: Installing Graphics and Other Expansion Cards
- Building a PC: Installing Fans
- Building a PC: Power Connections for the Motherboard and Fans
- Building a PC: Connecting the Hard Disk and Burner
- Building a PC: Connecting the Case’s Switches and Audio
- Building a PC: Connecting the Case’s Front Panel Ports – USB, Firewire, and eSATA
- Building a PC: Closing the Case
- Building a PC: Connecting Peripherals


