
Rollover buttons are most often created using CSS. With Adobe Dreamweaver, CSS is not needed. In this tutorial I will show you how to create rollover buttons in Dreamweaver without using CSS.
You can create rollover buttons in Dreamweaver without using CSS Styles. If you are not familiar with CSS and you want to create rollover buttons, this is the best way for you to create them. It is easy and quick to do it this way. The downside is you have to create each rollover button. This tutorial will show you how to create a rollover button in Dreamweaver without using CSS.

You will need two buttons to use for this tutorial. I created two buttons really quickly for you to use. To the left you will find the two buttons. It is two graphics, so, you will have to save each one to your computer. Click the graphic to open it in a new window, then right click and click Save As. Save it to a file or destination on your computer. Do the same for the other button. Name the first button, button1. Name the second button, button2.
Creating a New Rollover Button
Create a new html document to work on and save it as your test document. Then go to the top of your Dreamweaver program and click Insert > Image Objects > Rollover Image. The box that opens is where you will enter the information for the rollover button. So, let’s take a look at this box.
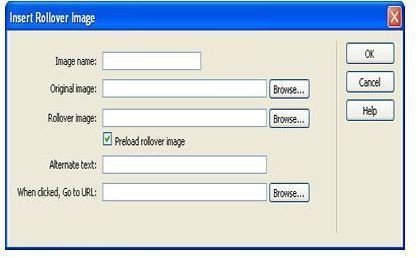
Image Name – In the first field, you can give your image a name. This is not required, you can leave it as Image 1 if you want too.
Original Image & Rollover Image – These two fields are where you will insert the file for the buttons. At the end of the Original Image field, you will see the browse button. Click that button and locate Button1 that you saved and open it. Do the same for the Rollover Image field. This time you will select Button2.
Alternate Text – This is the text that appears when you mouse over the button. You can leave this field blank or you can type the name of the button in this field.
When Clicked; Go To URL – This is where you enter the link for the button. This is where you will be directed when you click the button. So, enter your link in this field.
Now you can click the OK button. Your button rollover button is now created. Go to the top of Dreamweaver and click File > Save or press CTRL S on your keyboard. Now you can preview your rollover button in a browser. Go to the top of the program and click File > Preview in Browser > and select the browser of your choice. Place your mouse over the button to see the rollover.
Now you can create other buttons if you want to. Just repeat the steps above. You can also use the buttons of your choice to create these rollover buttons.
This post is part of the series: Dreamweaver Tutorials
This collection of articles is aimed at providing education about the software program Dreamweaver.
- Beginner’s Guide to Creating and Saving an HTML Document in Dreamweaver
- Dreamweaver Tutorial: Tips for Link Management
- Creating a New CSS Text Style in Dreamweaver
- Creating a Jump Menu in Dreamweaver
- Create a Photo Album for Your Website in Dreamweaver
- Dreamweaver Tutorial: Mapping and Linking Images
- Use CSS Styles to Create Solid Color Rollover Buttons in Dreamweaver
- Incorporating Flash Buttons Into Your Dreamweaver Designs
- Creating a Rollover Button in Dreamweaver Without Using CSS
- Dreamweaver Tutorial: Creating and Inserting Flash Text into Your Document
- Dreamweaver Tutorial: Inserting and Editing a Horizontal Line
- How to Modify Your Page Properties in Dreamweaver
- Adding Guestbook to Your Site Using Dreamweaver
- Applying Pop Up Messages to Links In Dreamweaver
- A Guide to Understanding the Properties Panel in Dreamweaver
- Create a Tab Menu in Dreamweaver
- Creating a List Menu in Dreamweaver
- How to Create HTML Email with Dreamweaver


