Flash text is a great way to attract the attention of website visitors. With Adobe Dreamweaver, creating this text is easy. In this tutorial I will show you how to create Flash Text in Dreamweaver. I will also show you how to insert the flash text into your Dreamweaver document.
This tutorial will show you how to create and insert flash text into your document. Flash text is text that changes colors when it is hovered over. You have probably seen this on many websites. When you place your mouse over text, the text changes color. That is created using flash text and that is what I am going to show you in this tutorial. You will need to create a html document to work on and save it. Then we will get started.
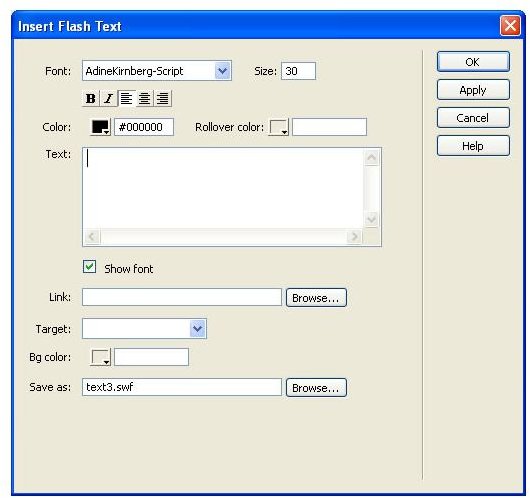
Go to the top of your window and click Insert > Media > Flash Text. The Flash Text properties box will open and you will see all of the different options. Let’s walk through the options.
The first section of the box is the font options. This is where you change the font style, size, color and rollover color. The rollover color is the color that the text will be when you mouse over it. Go ahead and change the options in the first section.
The next section is the text section. This is where you will enter the text that you want displayed. This is your flash text. Type what you want in this box. It can be a word or two or you can type paragraphs. Whatever you want to enter in the text box is ok.
The next section is the link section. You can turn the flash text into a link if you want too. To turn it into a link, enter the link in the link field. Then choose your target. This is how the link will open.
The next field is the background color. You can choose a background color for your text if you want to or you can leave it as it is. To select a color, click the box and click the color of your choice.
When you are finished with your text, click the Apply button. Then click the OK button to close the box. Your flash text will appear on your Dreamweaver Document. To view the flash text, you can preview it in a browser or you can view it right in your Adobe Dreamweaver program. To view it in your Dreamweaver program, click the Play button in the properties panel at the bottom. Then place your mouse over the text. To view it in the browser, click File > Preview in Browser > and select your browser.
This post is part of the series: Dreamweaver Tutorials
This collection of articles is aimed at providing education about the software program Dreamweaver.
- Beginner’s Guide to Creating and Saving an HTML Document in Dreamweaver
- Dreamweaver Tutorial: Tips for Link Management
- Creating a New CSS Text Style in Dreamweaver
- Creating a Jump Menu in Dreamweaver
- Create a Photo Album for Your Website in Dreamweaver
- Dreamweaver Tutorial: Mapping and Linking Images
- Use CSS Styles to Create Solid Color Rollover Buttons in Dreamweaver
- Incorporating Flash Buttons Into Your Dreamweaver Designs
- Creating a Rollover Button in Dreamweaver Without Using CSS
- Dreamweaver Tutorial: Creating and Inserting Flash Text into Your Document
- Dreamweaver Tutorial: Inserting and Editing a Horizontal Line
- How to Modify Your Page Properties in Dreamweaver
- Adding Guestbook to Your Site Using Dreamweaver
- Applying Pop Up Messages to Links In Dreamweaver
- A Guide to Understanding the Properties Panel in Dreamweaver
- Create a Tab Menu in Dreamweaver
- Creating a List Menu in Dreamweaver
- How to Create HTML Email with Dreamweaver


