If you are just starting out with CSS and would like to create your own CSS text styles in Dreamweaver, read this guide. This guide will show you how to create CSS text styles for your website in Dreamweaver.
CSS Styles are very popular among web designers. Knowing CSS will help you go a long way in web design. It makes applying styles a lot easier. This tutorial is going to show you how to create a new CSS Text Style in Dreamweaver. I will walk you step by step through creating this CSS style. Go ahead and open your Dreamweaver program and create a new HTML document to use for this tutorial. You will need to save this document in order to create the style, so save the document as test.html.
Creating a New CSS Text Style in Dreamweaver
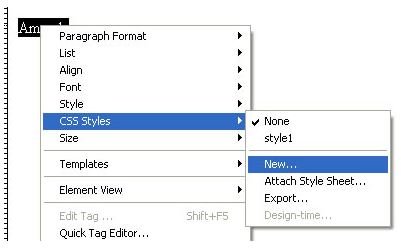
Type some text on your document. Highlight the text and right click on it. A menu will drop down. In the menu, locate the CSS Styles link. Place your mouse over the link and another menu will open. Click the New link in the menu. Now you will be seeing the box below.
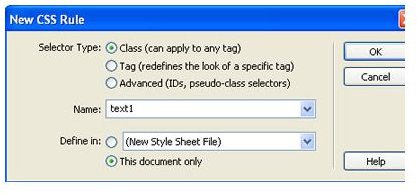
In the New Style Box, you will need to tick the Class field. Then you will need to enter a name for the new style. I used text1 for the name of my new style. You can name it what you want. Once you start creating different CSS Styles you will need to give the styles unique names, but since this is practice, give it any name. Then tick the This Document Only field at the bottom of the box. Once you have all of that, click the OK button.
Creating the Rules for the New Style
Now we will go over setting the rules for the new CSS Text Style that we are creating. You should be seeing the Rules box now. On the left side of the box, you will see a panel with a list of options. Make sure that the Type option is clicked. The options in the right side of the box are the options that you will apply to the text style.
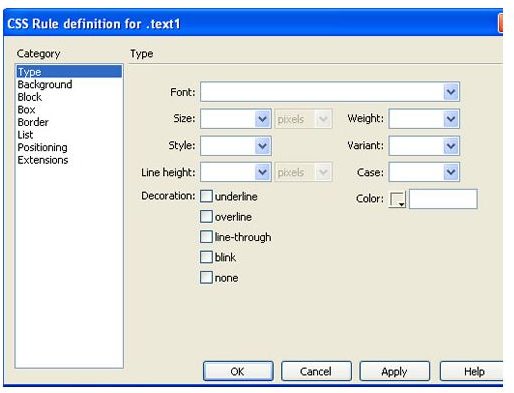
All of the options in this box are pretty self explanatory. You will need to select your font style, size, color, and your decoration. All of the other stuff can be left alone. After you have made your selections, click the Apply button and then the OK button. The box will now close.
Applying the New Style to Other Text
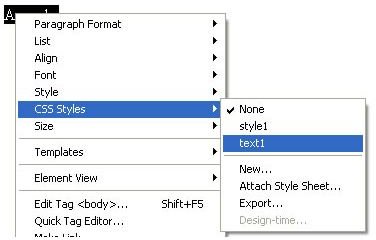
You can now apply the new style to other text. Type more text on your document. Highlight the text and right click on it. When the menu drops down, click CSS Styles > and the name of the style that you just created. That will apply the text style that you just created to the text that you just typed.
You can create as many text styles as you want. Remember, when you start creating a lot of text styles, you will need to give them unique names to be able to quickly apply them to certain text.
This post is part of the series: Dreamweaver Tutorials
This collection of articles is aimed at providing education about the software program Dreamweaver.
- Beginner’s Guide to Creating and Saving an HTML Document in Dreamweaver
- Dreamweaver Tutorial: Tips for Link Management
- Creating a New CSS Text Style in Dreamweaver
- Creating a Jump Menu in Dreamweaver
- Create a Photo Album for Your Website in Dreamweaver
- Dreamweaver Tutorial: Mapping and Linking Images
- Use CSS Styles to Create Solid Color Rollover Buttons in Dreamweaver
- Incorporating Flash Buttons Into Your Dreamweaver Designs
- Creating a Rollover Button in Dreamweaver Without Using CSS
- Dreamweaver Tutorial: Creating and Inserting Flash Text into Your Document
- Dreamweaver Tutorial: Inserting and Editing a Horizontal Line
- How to Modify Your Page Properties in Dreamweaver
- Adding Guestbook to Your Site Using Dreamweaver
- Applying Pop Up Messages to Links In Dreamweaver
- A Guide to Understanding the Properties Panel in Dreamweaver
- Create a Tab Menu in Dreamweaver
- Creating a List Menu in Dreamweaver
- How to Create HTML Email with Dreamweaver


