In Dreamweaver, you have the option of creating photo albums. These are HTML photo albums and only take a little time to make. If you are creating a website in Dreamweaver and want to create your own photo album, continue reading this tutorial.
Creating a Photo Album for your website is a lot easier than you may think. This tutorial will show you just how easy it is. You will need to open Dreamweaver and create a new document to work on. Save the document as an html file. You can create a test.html file just for this tutorial, then you can go back and create a real document.
Creating a New Folder with Photos to Use
The first thing that you will need to do is create a new folder. Name this folder DW Album. You can create the folder anywhere on your computer. Copy about 15 to 20 photos and paste it in the new folder. This is the folder that we will be pulling the photos from to create the album in Dreamweaver.
Creating a Photo Album in Dreamweaver
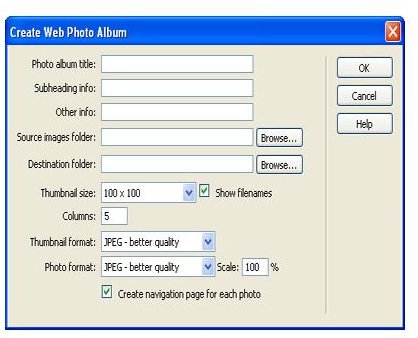
Now we can start the process of creating the new album. Go to the top of your Dreamweaver window and click Commands > Create Web Photo Album. After you click the Create Web Photo Album option a box will appear. In the box, you will see a lot of options. Don’t be overwhelmed by all of these options. I will walk you through each step.
Setting Up the Options for your Web Album
Photo Album Title – You will need to enter a title for your album in this field.
Sub-Heading Info – This is the information that will be displayed beneath the title of the photo album.
Other Info – You can leave this field blank.
Sources Image Folder – Click the Browse button at the end of this field. When the box opens, locate the folder with the photos that you created at the beginning of this tutorial. Double click the folder and click the Select button.
Destination Folder – This is the folder that the web album will be saved in. Click the Browse button, when the box opens, click the tab at the top of the box to create a new folder. Name the folder Web Album. Double click the folder and click the Select button.
Thumbnail Size – This is the size that your thumbnails will be in the gallery. You can drop the box down and select the size that you want.
Columns – This is the number of columns that you will have in your album.
The next two boxes are the format boxes. The JPEG format should be selected, leave it as a jpeg unless you are using GIFs. Then change it to GIFs. Click OK on the box to create the album. The thumbnails will be created. After they are created, click the OK button on the box that pops up. You will now see your album on the page that you created.

This post is part of the series: Dreamweaver Tutorials
This collection of articles is aimed at providing education about the software program Dreamweaver.
- Beginner’s Guide to Creating and Saving an HTML Document in Dreamweaver
- Dreamweaver Tutorial: Tips for Link Management
- Creating a New CSS Text Style in Dreamweaver
- Creating a Jump Menu in Dreamweaver
- Create a Photo Album for Your Website in Dreamweaver
- Dreamweaver Tutorial: Mapping and Linking Images
- Use CSS Styles to Create Solid Color Rollover Buttons in Dreamweaver
- Incorporating Flash Buttons Into Your Dreamweaver Designs
- Creating a Rollover Button in Dreamweaver Without Using CSS
- Dreamweaver Tutorial: Creating and Inserting Flash Text into Your Document
- Dreamweaver Tutorial: Inserting and Editing a Horizontal Line
- How to Modify Your Page Properties in Dreamweaver
- Adding Guestbook to Your Site Using Dreamweaver
- Applying Pop Up Messages to Links In Dreamweaver
- A Guide to Understanding the Properties Panel in Dreamweaver
- Create a Tab Menu in Dreamweaver
- Creating a List Menu in Dreamweaver
- How to Create HTML Email with Dreamweaver


