Come and see as we put our screwdrivers to work and begin the hands-on crafting of our little bundle of joy.
Are You Ready?
Have you read the instructions for your products? Do you have a well lit space to work so you can see what you’re doing and a couple bowls so you won’t lose the screws you remove? Do you have a screwdriver (a couple Phillips and flat head bits will do)? Did you inspect the case for damage? Have you grounded yourself to prevent static damage to your computer?
If you answered yes to all of those…
Opening a Case
This is usually pretty straight forward on just about any case. Many cases make the process incredibly easy by using latches or buttons that allow a panel to be opened; this would be explained in the instructions for your case. Case selection and different types of cases are explained in these articles.
More traditionally, one removes a few screws and the panel or several sides of the case can then be slid towards the rear and removed.
Some cases will have hinges and the panel will swing clear instead of coming off completely. Enthusiast-type cases will often use thumbscrews instead of the Phillips ones so that people who open their case a lot can do it without getting out a screw driver. Note that you can replace the normal screws holding your case’s panels on with thumbscrews (in different colours for under 2 bucks a ten pack at newegg ) if you will be working in there often.
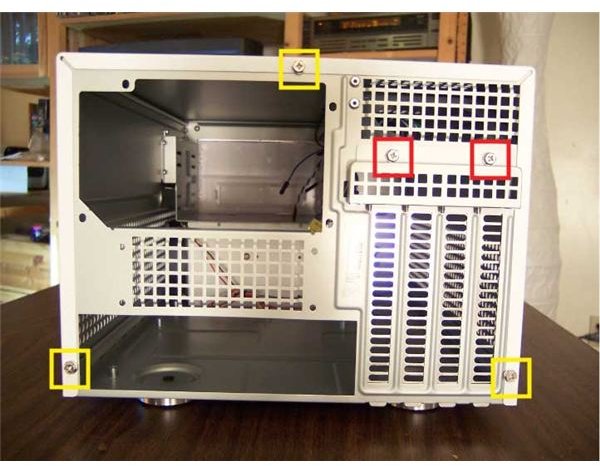
These screws are generally along one or more edges of the rear side of the case. They have yellow squares around them in the first picture. Remove them, put them in one of your bowls, and slide the panel off.
Many manufacturers will place bags of screws and other small items inside the case. Since this is also the point at which you can see everything inside the case more clearly than you ever will again, and if there is something wrong you would rather know sooner than later, now is a good time to inspect the case for damage and make sure nothing the manual says should be there is missing. Pull the front panel connectors (the wires coming from the front of the case for things like USB outlets and the power switch and light) out of the way as best you can so you have more room to work.
You can also clear some space in your work area and protect your shiny new case panels by placing them, outside-down, on something soft. Depending on where you are working, a couch, bed, upholstered chair, clean out of the way carpet and so on can all work. This will protect the flanges on their insides and the finish on the outside. Damaging a tab or rail on the side panel can make it impossible to get it back on the case, so it is worth getting these out of the way.
Removing Brackets and Braces
Many cases have a bracing bar or fan bracket. These provide strength to the case or allow you to put fans in critical locations. They do have to be removed to make room for you to work inside the computer, though.
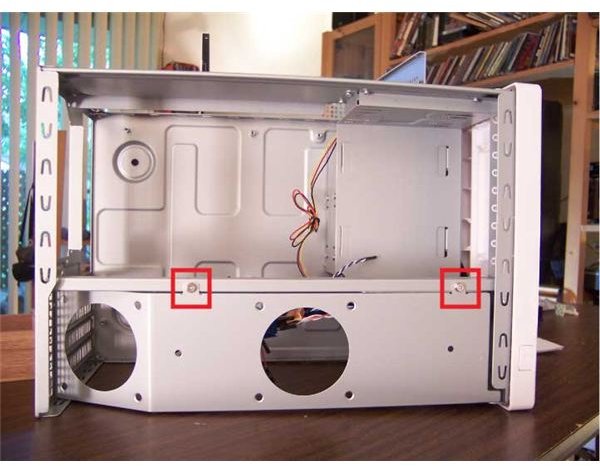
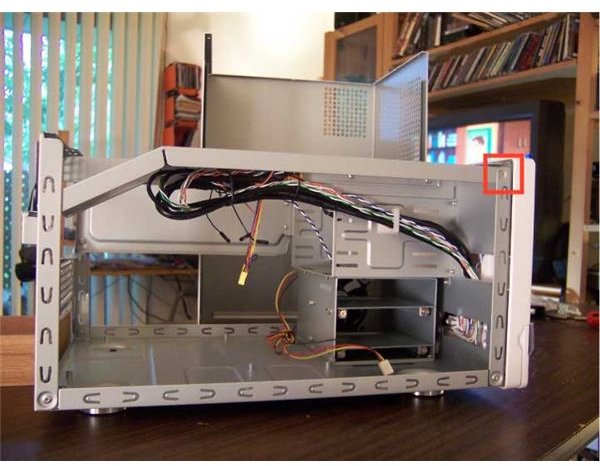
The fan bracket on the Silverstone Sugo SG02-F pictured is connected to a small cage that covers the screws holding in the expansion cards. This allows the case to be about ¾” shorter than it would be if it were long enough to swallow the cards completely. We remove the screws (indicated by red squares in all pictures) from the back and inside and put them in the bowl with the other screws. They are all case screws (except one, shown in the third picture); the kind used to hold panels on and brackets and cages in place. We will use these for most of the assembly, and tell you if another type of screw is needed. For instance, you probably noticed that one of the screws holding that bracket in was different. You can leave it with the other case screws but we need to use it again in the same spot when we put the bracket back on, and it won’t fit where the case screws do, so don’t grab it without paying attention. Most of the required screws will be included with the case, though some other components may include screws for use in their own installation.
Don’t leave the brackets, cages, and anything else you won’t need until you are almost done lying around; like with exterior panels, damaging a flange can make them fit wonky or even catawampus, depending on your choice of English dialect.
The Next Move
Depending on the size of your computer, you may have a choice of in what order you complete the next few steps. In many Small Form Factor (SFF) and smaller tower cases the motherboard and possibly CPU must be installed before the power supply as the last will block access to the former two. That is the how things go with the Sugo and the order in which the articles are presented. You should head to the next article if your case also requires installing the motherboard first.
If you have a larger case, it is often better to install the power supply before the motherboard, as this eliminates the chance of dropping the heavy power supply on a more delicate component. If you are doing it that way, go to the article on installing a power supply and then head back to the motherboard article.
This post is part of the series: Building a PC
We show you how to build PC, step by step, with pictures.
- Building a PC: Open Your Case and Get to Work!
- Building a PC: Time to Install the Motherboard
- Building a PC: Installing a Core 2 CPU
- Building a PC: How to Install a Power Supply Unit
- Building a PC: Installing Memory
- Building a PC: Installing an Optical Device
- Building a PC: Installing a Hard Drive
- Building a PC: Installing Graphics and Other Expansion Cards
- Building a PC: Installing Fans
- Building a PC: Power Connections for the Motherboard and Fans
- Building a PC: Connecting the Hard Disk and Burner
- Building a PC: Connecting the Case’s Switches and Audio
- Building a PC: Connecting the Case’s Front Panel Ports – USB, Firewire, and eSATA
- Building a PC: Closing the Case
- Building a PC: Connecting Peripherals


