
Expansion card installation is pretty straightforward, which is good: it is the most frequently performed upgrade, in addition to being an important step of a PC build.
Where Do These Things Go?
Though the procedure for installing different kinds of expansion cards is largely identical, we need to make sure the cards are going in the
right slots. Unless you are using some pretty dated equipment, your graphics card will have a Peripheral Component Interconnect Express (PCI-E) connection, as will your motherboard. The process is almost identical if you are using the older AGP (Accelerated Graphics Port) interface, though.
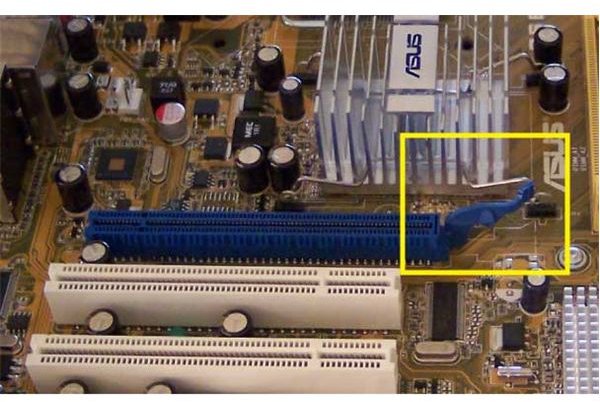
On our ASUS P5E-VM DO motherboard, the PCI-E slot is in the yellow rectangle as pictured. Note that one picture is of the empty motherboard from earlier on, and the other shows the graphics card already installed. Refer to your motherboard manual to identify the correct slot, or slots. A motherboard able to run multiple graphics cards may have several PCI-E slots that seem identical, but offer different bandwidths. Its manual will tell you which to use.
Some cards will use smaller PCI-E slots (blue rectangle) than the graphics card (graphics cards send a lot of data back and forth to and from the motherboard so they need the big slots). Others will use PCI slots, which are slowly being replaced by PCI-E, but still going strong. Most current motherboards have a couple or few of each kind for a balance of future-proofing and backwards compatibility.
The Wi-Fi card we are adding to our PC uses a PCI slot. We could use either of the two on our motherboard. Using the one (in the red rectangle) further from the graphics card slot gives us more room to work, and more room for air to get to said card. Graphics cards can be pretty warm, though the nVidia GeForce 8400 GS from eVGA we’re using is on the modest side.
How Do They Go Where They Go?
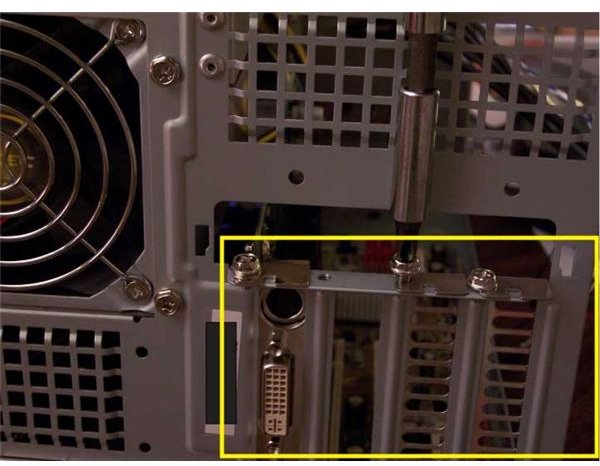
Before you can insert the card, you have to remove the bracket next to the slot from the case. Our picture shows, from left to right in the yellow rectangle, the graphics card in its bracket, a slot with the bracket removed (for illustration only), and the removal of the bracket where we will put the Wi-Fi card. Just unscrew the bracket and slide the gold connectors at the bottom of the card downwards into the slot. Screw the card in using the screw that was, until recently, holding the bracket in place. Keep brackets, extra screws, cables, etc. in one of the boxes you will have stacks of lying around if you are building a PC. You never know when you will need one of these things for an upgrade or repair.
There are only two differences between graphics card installation and installing any other expansion card. The close up picture of the PCI-E slot shows the retention clip in a yellow rectangle. Pull this out of the way (away from the card) while you insert the graphics card. This makes it easier and avoids problems when getting the card in; though in theory the angle of the little nub should allow the clip to slide out of the way and back into place by itself.
The other difference is that some more powerful graphics cards require more power than the motherboard can supply thorough the
slot, and these must be connected directly to the power supply with 6 or 8-pin connectors. Refer to the manual for your graphics card to determine if you need to and how to make extra power connections. Other cards might need other connections as well, such as hooking up audio inputs and outputs from the front of the case to a sound card. Like the rest of the wiring work encountered when building a PC, it is best to leave it for the end so that the cables aren’t getting in your way while you work. The good news is, we are just about to start wiring!
Look at How Far We’ve Gotten!
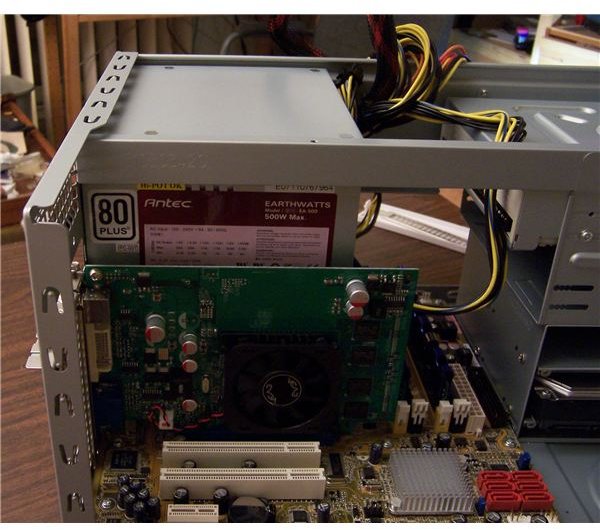
Take a look at the picture of the inside of the case. Starting from the graphics card we just put in and going clock wise, we have: the power supply; optical drive; hard drive; and memory. The motherboard is across the bottom, and the CPU along with its fan is hidden behind the graphics card.
We are going to install an extra fan in the case; if you have an extra fan to install, come to the next article with us. If you aren’t adding any fans, skip that article; because you are ready to connect your power supply to the other PC components.
This post is part of the series: Building a PC
We show you how to build PC, step by step, with pictures.
- Building a PC: Open Your Case and Get to Work!
- Building a PC: Time to Install the Motherboard
- Building a PC: Installing a Core 2 CPU
- Building a PC: How to Install a Power Supply Unit
- Building a PC: Installing Memory
- Building a PC: Installing an Optical Device
- Building a PC: Installing a Hard Drive
- Building a PC: Installing Graphics and Other Expansion Cards
- Building a PC: Installing Fans
- Building a PC: Power Connections for the Motherboard and Fans
- Building a PC: Connecting the Hard Disk and Burner
- Building a PC: Connecting the Case’s Switches and Audio
- Building a PC: Connecting the Case’s Front Panel Ports – USB, Firewire, and eSATA
- Building a PC: Closing the Case
- Building a PC: Connecting Peripherals


