Install a Case Fan and Choosing a Direction for Air Flow - Building a Computer Series

Whar She Blows?
If you are worried about how cramped things are inside of your PC, an extra fan or two can really help move some air around. Getting the best out of these takes a little bit of thought, however; cases and components already have fans. You need to know how these work before you can decide where the extra ones will go.
A desktop almost universally takes air in through the front and exhausts it through the rear. Our Silverstone SUGO SG02-F also does this:
there is one intake fan included with the case near the front which draws air in over the hard drives; and the power supply fan blows hot air rearwards. Considering all the stuff we’re jamming into this little case, that isn’t all that much air flow to go around. We will be adding an exhaust fan (using the bracket pictured below) in the upper rear, above the expansion cards. This will help draw warm air leaving the hard drive cage and air heated by the cards out of the PC.
In our picture to the right, we see the three important features to installing a fan, other than size: obviously if you are installing a fan in an 80mm bracket, it should be an 80mm fan. Use the screws that came with the fan. These are very different from the other screws we’ve been using; they actually cut threads in the plastic of the fan’s frame as they turn. You can find everything you need to know about choosing a computer case fan here.
All fans will have two arrows somewhere along the edge of the frame. These can be hard to see with the fan sitting in your hand; let alone in a picture, so I added yellow arrows over them in the picture. One arrow indicates the direction in which the fan spins. The other one is very important; it tells you which way the wind is blowing – literally. Use the second arrow to figure out which way the fan should face, depending on whether you want it to intake or exhaust.
Positive and Negative Pressure
Where you can (the small case we are working in limits our options), it is better to have more being sucked in than blown out. This doesn’t cool quite as effectively, but, by raising the air pressure in the case, you make a little bit of air leak out thorough the cracks between your cases panels, drives and vents. That means dust will be concentrated around your fans, and be less determined to find its way in through every gap in your case. This is even more effective if your case or fans have dust filters.
Blowing out more than you suck in drops the case’s air pressure, and this is a slightly more efficient cooling set up in a cleanroom. But in a normal environment, it sucks a tiny bit. Literally, it draws a bit of air through the cracks in the case, which makes for more dusty areas when your cleaning your PC.
Power Mad
The above picture also shows the fan’s power connector. The most basic type of fan runs on two wires. These can either be connected directly to a power supply or the motherboard. You can use a motherboard connection with three pins with a two wire fan: the fan connector pictured is actually meant to fit over three pins, but it only uses two of them. The third wire, if present, is used to report the fans rotational speed (RPM) back to the motherboard. Fans with four wires, like the one on the CPU cooler we installed, use the fourth wire to control how fast they spin. This reduces noise when the computer isn’t working that hard.
You can use adapters - some fans come with them - to connect one type of fan to a different power source. Just be aware that the functionality of the fan is limited to the lower of the number of wires or pins, e.g.: a 3-wire fan with a 2-pin connection will not report its speed; neither will a 3-wire fan on a 2-pin connector.
In Goes the Fan
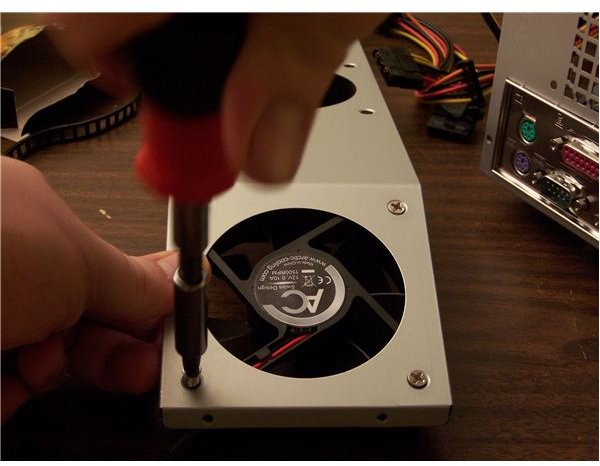
Though which way the fan is facing is important, its rotational orientation doesn’t matter. The fan blades spin anyways, so there really isn’t an up or down. In the picture of the bracket and fan at left, for instance, the fan looks upside down. This doesn’t change how the fan works. Turn the fan so that the power wire has enough slack to reach the power connector you are using. In our case, we want to run the wire along the back to the bottom, then across to where the power connector is on the motherboard. Therefore, the fan has the power wire pointing to the rear.
Now we just screw in each corner. Remember to use the right screws. Since we are using a removable bracket for this fan, we would need to get the bracket back in before we could say we are done. The problem is that the bracket would make it difficult if not impossible to do a few more things we still need to do, so we’re going to wait on that.
We also need to hook up that power connector before we can say the fan installation is complete. As you are probably tired of hearing me say: we wait to hook everything up until the end so that the wires don’t get in the way while we work. Good news: not only are we going to start connecting the power cables in the next article; but that means we have reached the beginning of the end!
This post is part of the series: Building a PC
We show you how to build PC, step by step, with pictures.
- Building a PC: Open Your Case and Get to Work!
- Building a PC: Time to Install the Motherboard
- Building a PC: Installing a Core 2 CPU
- Building a PC: How to Install a Power Supply Unit
- Building a PC: Installing Memory
- Building a PC: Installing an Optical Device
- Building a PC: Installing a Hard Drive
- Building a PC: Installing Graphics and Other Expansion Cards
- Building a PC: Installing Fans
- Building a PC: Power Connections for the Motherboard and Fans
- Building a PC: Connecting the Hard Disk and Burner
- Building a PC: Connecting the Case’s Switches and Audio
- Building a PC: Connecting the Case’s Front Panel Ports – USB, Firewire, and eSATA
- Building a PC: Closing the Case
- Building a PC: Connecting Peripherals