
Google Page Creator isn’t as complicated as some web-design programs. But it can be difficult if you don’t know what you’re doing. This article from “Google Powered: Productivity with Online Tools” will help you quickly learn how to navigate the program.
Navigating Page Creator
To get started with Google Page Creator, you need to have a Google account . With your Google account user name and password, log onto the Google Page Creator web site at https://www.pages.google.com . You’ll be take to a welcome page that includes some basic information about the capabilities of Google Page Creator.
In the top-right corner of the page is a link that reads, I’m ready to create my pages. If you click this link you are taken to the bottom of the page where you’re prompted to read the user agreement, agree to it, and then click another button (which appears when you agree to the user agreement). This one reads I’m ready to create my pages.
Do actually read through the user agreement. It’s an important and legally binding document, so you want to understand it when you agree to it. When you’re finsihed, click the I’m ready to create my new pages link and you are taken to the Google Page Creator Edit page.
The Edit Page is where you bein creating your first web site. After that, each time you log into Google Page Creator you’re taken to a page-manager area from which you’ll navigate to the other capabilities of Google Page Creator.
When the Edit Page appears, you are automatically taken to a blank template. The navigation tools are in the boarders around the template, as shown in Figure 1.
Across the top of the page are the management, publishing, and layout links. If you click the Back to Page Manager link, the page you’re working on will be saved and you’re taken to the Page Manager, shown in Figure 2.
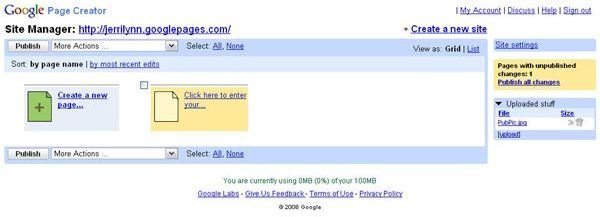
On the Page Manager, you have some options for working with pages that you’ve already created. The first thing you’ll notice on this page is the web link next to the Page Manager title. This is the link to your page, and if you click the lnk, you are taken to a preview of your site.
Beneath that title is a Publish button and a drop-down menu. The Publish button is used to publish your site to the web.
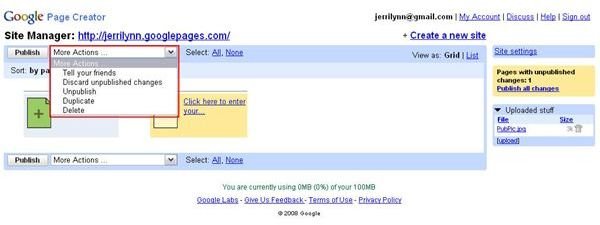
The drop-down menu, shown in Figure 3, contains action commands:
- Tell your friends: Place a check mark in the box next to the page that you want to share with your fiends and then click this option. An email window appears that you can use to send an information to your friends.
- Discard any unpublished changes: Place a checkmark next to the page you want to change, and then click this link to remove any changes that you’ve made to the site since the last time it was published.
- Unpublish: Unpublished the selected web site.
- Duplicate: Duplicates the selected web site.
- Delete: Deletes the selected web site from both your web site list and from the web if you’ve published it previously.
[This article is excerpted from Google Powered: Productivity with Online Tools by Jerri L. Ledford (ISBN: 978-0470109656, Wiley , Jan. 2007).]
This post is part of the series: Create Your Own Web Page Using Google Page Creator
Google Page Creator is an easy to use, web-based web page creation and editing software. Pages created using Google Page Creator can then be published in the Google Pages Community. Learn how to use Google Page Creator to start building your own web pages in no time with this article series.
- Navigating Google Page Creator
- Google Page Creator: Creating a Web Site
- Google Page Creator: Choosing a Layout
- Google Page Creator: Adding Pages
- Google Page Creator: Changing and Editing Links
- Google Page Creator: Working with Text
- Google Page Creator: Adding Color and Effects
- Google Page Creator: Adding Graphics to Your Web Site
- Google Page Creator: Publishing Your Site
- Google Page Creator: Unpublishing Your Web Site


