The Place command in Adobe PageMaker is a handy way to import text and images. If you have a lot of text, you can type it into Word or another word processor program, and then “place” or import it into your PageMaker document. Similarly, you can import graphics from other programs. Here’s how.
How to Import a Text File Using the “Place” Command
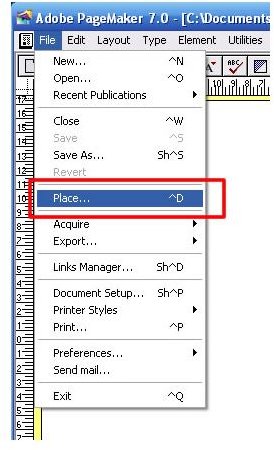
- Open the File menu, and then select Place… from the drop-down menu. This opens the Place dialog box.
- Scroll to the folder that your text file is in and double click to open it. Locate and double click on the file that you want to place.
- Click on the Open button. Your cursor will change to a loaded text icon. Position your cursor at the spot on your document where you want to import the text file.
- Click on the spot on the document where you want to import your desired text. Your text will flow downwards to import as much of the text as will fit into your column, text block or page.
- Edit and format your text as needed.
Quick Tip
You can import your text or graphic directly into a new text box. When the cursor changes to a loaded icon in Step #3, click and drag the mouse in a downward, diagonal direction. This will create a text box. Once you release the mouse, your imported file will be placed into this text box.
.

Importing Large Amounts of Text
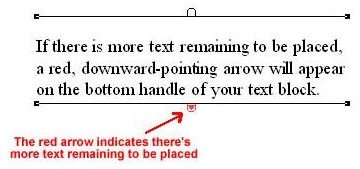
If you have a large amount of text from Microsof Word or another source, it may not fit into the column or page that you place it in. When the amount of text you place overruns your column or page, a red, downward-pointing arrow will appear on the bottom handle of your text block, unless you select Autoflow.
Flowing Text in Your Document
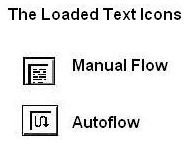
There are two methods you can use to place an external text file into a PageMaker document:
- Manual Flow - Lets you manually place the remaining text into another column or page
- Autoflow - Lets your text flow automatically into the next column or successive pages.
Manual Flow
- Click on the red arrow to continue placing text. The cursor will change back to a loaded text icon.
- Position the loaded text icon at another spot on your document, and click. Once again, the text will flow to the bottom of the column, text block or page.
- Repeat this step until you have placed all your text. When all the text has been placed, the bottom handle will be empty.
Autoflow
-
Open the Layout menu from the menu bar.
Advertisement -
Select the Autoflow command from the drop-down menu. The loaded text icon will change to have a curved arrow rather than little horizontal lines.
-
Click on a spot on the document to place your text. The text will be placed automatically, flowing from one column or page to the next. PageMaker will add more pages as needed.
Advertisement
Avoid Text Formatting Before Importing
If you intend to place a text file into a PageMaker document, it is generally best to use as little or no formatting. Microsoft Word contains a ton of formatting so it’s best to copy the text into Notepad or Wordpad before importing it. Once you have imported the text into your document, you can then format, edit and otherwise manipulate the text in PageMaker.
This post is part of the series: PageMaker 7.0 Basics
This series of Adobe PageMaker tutorials provides step-by-step instructions on using PageMaker to create professional, high-quality publications such as newsletters, brochures, reports, pamphlets, newsletters and other publications.
- PageMaker 7.0 Basics: Workspace, Toolbox & Rulers
- PageMaker 7.0 Basics: Creating a New Document
- PageMaker 7.0 Basics: Saving Your Documents
- PageMaker Basics 7.0: Printing a PageMaker Document
- Working with Text in Adobe PageMaker
- PageMaker 7.0 Basics: Using the Pointer Tool
- PageMaker 7.0 Basics: How to Use the Control Palette
- Tutorial for Importing Text and Word Documents with the Place Command in PageMaker 7.0


