Getting creative with light can lead to more interesting photos.
Lighting tricks simple to fancy
Photography is all about understanding and working with light . Finding creative ways to use light can help you make better photos and help set your images apart from the typical amateur’s work.
In this article we’ll take a look at “tricks” photographers use to improve the quality of light in their shots. Some of these are simple and cheap (or no cost at all), while some call for great effort and the expense of additional equipment and tools to modify light. Whenever I can though, I’ll try to show you a DIY alternative to achieve a similar effect.
Whole books have been written on understanding and using light. This article can’t cover everything, but what it can do is provide you with a few simple ways to improve your images.
Let’s break this down into two categories: manipulating available light to your advantage and using artificial lighting to improve your images.

Manipulating available light
One of the most basic lighting tricks in photography is choosing the right time of day for the light to be in your favor, since the quality of light when the sun is low in the sky is so much better than it is at midday. It also provides directional lighting , meaning you can orient the camera and your subject to take full advantage of the light’s directionality.
Another idea is to use reflectors to bounce some light into shadow areas of the photograph. While pros use expensive, high-end reflectors such as the California Sun Bounce or Westcott offerings, photographers on a budget can achieve similar results with homemade DIY alternatives. Reflective car windshield sun blockers or sheets of styrofoam from flat panel TV boxes can make for great reflectors. They’re not as durable or collapsible as the pro units, but the ersatz reflectors will still redirect the light just fine. Mirrors also make great reflectors, especially since they don’t absorb much light, instead redirecting just about all of it where you point it.
Don’t have anything you can use as a reflector? Maybe your environment has provided you with one. How about using the light reflected by the side of a glass or light colored wall exposed to the sun. You can also check out How to Make a Rigid Reflector for Under $30 for an affordable and easy-to-follow tutorial.
If you’re indoors, you can take advantage of the light that comes from a window. Window lighting can make for superb portraits and provide beautiful, dramatic lighting. Just position your subject at a right angle to the light and position her face as desired (usually to split the face between light and shadow and meter off the portion of her face lit by the window light).
Artificial light
Using artificial light sources can significantly improve the quality and drama of your photographs. One of the most basic lighting tricks in photography is to angle the flash up towards the ceiling or back to the wall and ceiling behind the photographer. “Bounce” lighting causes the light from your flash to spread out (softening it) and hit the wall or ceiling and bounce back (softening it even more) before hitting your subject. While bouncing the light from a flash does weaken its strength, the added softness produces a much nicer image, plus gives an added bonus of reducing the risk of red eye .
Another trick is to bounce your flash while turning it into a bare bulb light, usually via a light modifier such as the Stofen Omni Bounce or a homemade version of the same thing. The advantage to light from a bare bulb is that it spreads in every direction and bounces off many surfaces. The result is very even lighting that cleans up shadows in every direction. This is even a useful technique with studio lighting . You can remove the lights’ reflectors and point them at the ceiling and create a very soft, even lighting.
For pro photographers, wireless off-camera strobes are the tools of choice to provide either studio quality lighting or heightened drama. Creative amateurs on a budget can do almost as well with lamps or work lights, particularly since digital cameras can white balance for unusual light sources.
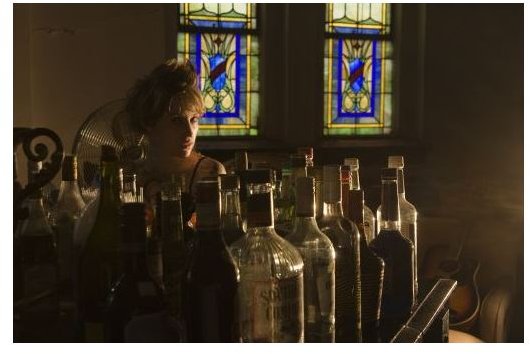
Side lighting can produce striking images such as the illustration of Randi and the bar set up shown on the previous page of this article. While this was done with one off-camera flash positioned to the right of the model, it could have been just as easily done with a table lamp or work light set off to the side.
Painting with light is yet another lighting trick that offers interesting results. This can be done with almost any light source from a portable flash unit to a flashlight or even a candle. The idea is to set your camera up for a long exposure (multiple seconds) and then paint the scene with light (either through multiple pops of the flash unit or by moving your flash light to illuminate various parts of the scene). This is a fun and creative way of playing with light that only needs a camera that can keep its shutter open a long time , a stable surface to operate the camera from, some darkness and a light source.


