
These advanced tips will take your photography skills above basic photography levels. Learn how and why to use white balance and other pre- and post-processing tips to achieve extraordinary effects.
Advanced Photography
Learning the basics in photography is the first step to capturing and creating captivating images. Knowing how to use your equipment, basic lighting skills and color theory is necessary before you move into more advanced photography and imaging. Once you have mastered the basics in photography, it is time to add advanced tips in photography to your toolbox. Photography is a two-part process: capturing the image and processing the image. Both parts require skill and creativity to achieve great results.
White Balance - How to Achieve Great Color
Unwanted color casts can make a photograph flat, seem off balance or simply appear visually unappealing. Many digital photographers use the automatic camera settings for white balance. These are just a starting point at best. White balance is a powerful tool that can transform a decent picture into great photograph. You can adjust white balance at the shooting location, in post-processing or both.
Various elements affect how the camera adjusts for white balance . The lighting conditions are the biggest factor in white balance. Shooting in tungsten, fluorescent, halogen, LED or natural lighting conditions cast hues that affect how the white balance sensor reads the light. If the lighting conditions are mixed, post-processing white balance will be necessary. For natural lighting conditions, the time of day will determine what type of color cast appears in the photograph. Camera type also affects the automatic white balance. Each camera model has different settings and ways of interpreting color casts, which will affect how the final image appears.
For natural lighting conditions, you can use filters to adjust for time-of-day hues. Early morning colors under a clear blue sky cast a bluish cast, which produces more bluish images. You can offset this using a warming filter on the lens. Another way to correct for the bluish cast is in post-processing. You can also correct warm afternoon colors using a cool color filter . Most digital cameras have adjustments to tune the white balance on the scene without using filters, as well. Adjust the white balance for a warmer or cooler tone depending on the lighting conditions.
Figure one was shot using the automatic white balance set to neutral at sunset. The sun cast a yellow-orange cast on the sky and buildings. Figure two shows the color cast neutralized in post-processing. The image is now correct with a proper white balance. Figure three shows how a soft warming tone is added in post-processing to mimic the warmth of the evening sunset. While some images look best with an accurate color balance, some images (such as sunsets) look best showing a warmer color to create a mood in your image.


Advanced Portrait Tips
-
Portraits are one of the most popular types of photography. Professional photographers shoot to portray the identity of the subject. You can achieve this in a variety of ways: headshots for expressions, body shots for physical attributes or social status and environmental posed portraits to capture personality, profession or mood.
Advertisement -
It is important to establish a rapport with the subject to achieve a natural and relaxed look. Next, choose a type of lighting to reflect the mood of the portrait. To emphasize lines of character, use steep lighting falling onto the subject at an angle. To tone down unwanted facial features, use soft diffused light. Studio lighting provides the best control over the quality of light, but if you shoot the portrait outdoors, shade provides softer lighting conditions than direct sun does.
-
Use a portrait lens with a focal length between 85mm and 105mm to reduce distortions that wide angle or telephoto lenses cause. Colored gels over your fill light can provide a nice effect and create a mood. Another way to create a mood is by choosing a background that compliments the subject.
Advertisement -
Composition is another important element in portraits. Tight crops emphasize expression or emotion, placing the subject using the rule of thirds is esthetically pleasing and varying the angle of shooting can create dimension and mood. Don’t be afraid to take chances and try different shooting angles and poses. Looking for new angles that reveal something about the subject creates some amazing portraits.
-
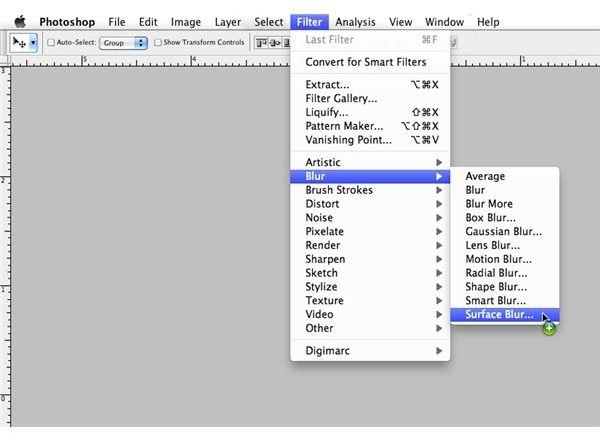
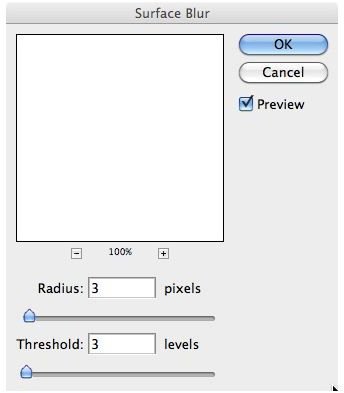
Adding a light surface blur in post-processing using Adobe Photoshop adds a slight soft-focus effect . This gives a polished look to the final image. This works best for studio portraits for which you desire a soft or professional look. Choose Filter>Blur>Surface Blur from the main toolbar window. (Figure 1) In the window that opens, choose 3 for the Radius and 3 for the Threshold settings. (Figure 2) If you desire a stronger surface blur, move the sliders until you reach the desired look. Click OK and your portrait is finished.
Advertisement
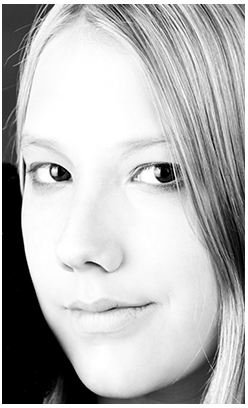
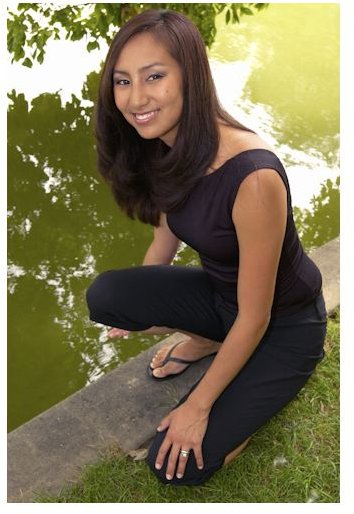
Portrait Composition


Night Photography Tips
Shooting at dusk or night can create some magical pictures. Professionals commonly refer to this time as the magic light time. Shooting in low light levels requires a high ISO setting that causes extreme noise in the final image. Several settings can help minimize this effect.
- Manual - Always shoot on manual when shooting night pictures.
- Long Exposure Compensation - Set the camera for long exposure compensation, which will reduce noise.
- High ISO Compensation - Set the camera for High Exposure compensation, which will also reduce noise.
- Tripod - Always use a tripod and not a monopod for night exposures.
- Post-Processing NR - You can also reduce noise post-processing.
- ISO - ISO settings can vary. It will depend upon how long an exposure you desire. Shorter exposures capture more subtle light effects while longer exposures will flare lighting add a surreal effect.
- Take a stopwatch or counter with you. Low-light settings require longer exposures.