In this guide to we explain how borders work in, Microsoft Word and show you how to get more free borders.
In this detailed guide, I will explain how you can use borders in your Word documents in order to visually improve their look and make them more presentable. You can also use borders in order to differentiate your Word documents from the scores of other documents out there. Borders can also be used to personalize your documents and give them a distinctive touch.
In this tutorial, I will show you how to use borders for Word documents and how you can go about downloading borders for Microsoft Word and use them in your documents.
The steps I describe will be in Microsoft Word 2007 , but they will be almost similar in Microsoft Word 2010 as well.
Borders for Microsoft Word Documents
There are basically three types of borders in Microsoft Word documents.
The first is the Page Border . You can use a border for the whole page or document using this option.
The second is element borders. Using this option, you can apply borders to the elements located inside the pages, like paragraphs, text, lines, images etc.
The third option is table borders . You can select borders for the cells of a table or the whole table in Microsoft Word.
For most purposes, you will be using only the page and element borders. You can also use element borders for tables.
Page Borders
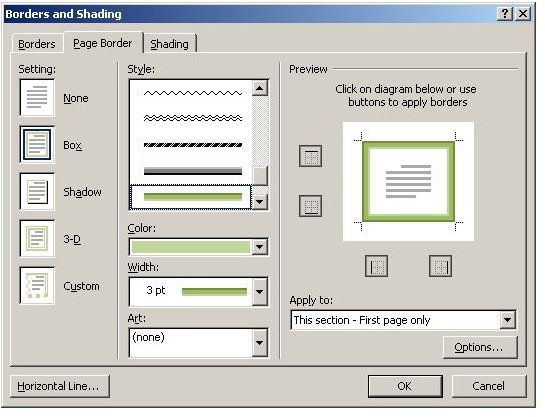
To insert borders into your Word document, open the document in Microsoft Word. Then click on the Page Layout tab and select the Page Borders option.
In the Borders and Shading options box, select the Page Border tab and select the border you wish to insert into the document. You can select the setting type you want: None, Box, Shadow, 3D, Custom depending on what you want. Try different combinations so that you know what each looks like.
Next, select the Style you want to display in your borders. There are various styles, such as plain lines, dotted lines, shaded borders etc. from which you can choose. You can also select the color and the width of the border you are inserting. For the best effect, keep the color subtle but do contrast it a bit with the page text. Also, make sure to keep the width sufficient so that the border is discernible.
Next comes the Art selection. You can choose to select various art designs from which to create the border. All of them are appealing, but I would personally prefer not using them, especially in business documents.
Once you have selected all the parameters like style, setting, art, color and width, you can see the preview of the border on the right.
You can click on the four buttons: Right, Left, Top and Bottom to add/remove the border on those sides. After that step is done, you can select which sections of the page or pages you want to apply the border to Whole document, This section only, First page only and All except First page.
You can also click on the Horizontal Line button on the left, if you want to insert just a horizontal line instead of a border. In the Options button, you can select the margins of the border, either from the text or from the page edges and Preview the border layout.
Once you are done with all the settings, just click OK and the page borders will be inserted automatically.
This is how you can insert page borders. In the next step, I will explain about element borders.
Element Borders
Using element borders is very similar to using page borders . Instead of selecting the page, just select any element - image, table, paragraph you want to insert the border for and select Page Layout > Page Borders. Now go to the Borders tab instead of the Page borders tab.
Again, select the setting, style, color and width as you would with the page borders. Note that you cannot select art for element borders.

After you are done with your selection, select whether you want to apply the border to the text, the paragraph, the image or the table. This will depend on which element you have selected. Once this is done, click on OK to insert the border in the selected element.
Downloading Free Borders for Microsoft Word Documents
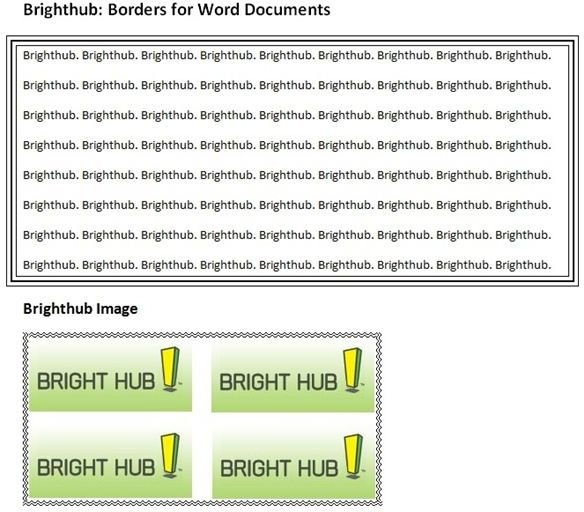
There are quite a few ways using which you can download and insert borders into your Word documents. Most of the borders available online are in the image formats like JPEG or the WMF format.
Microsoft Office Online is a great resource to download borders.
I will show you a trick using which you can insert them as borders in your Word documents.
For example, consider this border file: MC900026861.WMF
Just download it and save it to your desktop.
Now open a new Word document, go to the Page Layout tab and select Watermark > Custom Watermark.
Select the Picture Watermark radio button and click on select Picture. Browse to the border file we downloaded earlier on the desktop and select it. Now the scale will need to be adjusted according to each border.
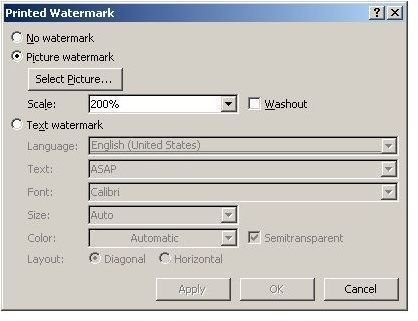
In this particular case, I have experimented and deduced that the perfect scale is 200%. Therefore, I just enter the scale as 200%.
Remove the tick from the Washout checkbox if you want a dark border. Click on OK to see your new border.
You may need to adjust the margins a bit or indent the text depending on your border.
Sources for Downloading Free Borders for Microsoft Word
You can use any image for your Microsoft Word borders using the method I have shown above.
Here are a few good sources:
https://office.microsoft.com/en-us/images/results.aspx?qu=borders


