Interested in trying the the Windows 7 beta version on your Vista PC? Vista includes a “Shrink Tool” that can re-size your Vista partition to make room for Windows 7. This can get complicated, but in this detailed step-by-step guide we cover shrinking the Vista partition and installing Windows 7.
Obtain the Beta Version
First, you’ll need to have downloaded a Windows 7 beta version and have obtained an activation code for it. As this was written, the starting point for the official download was here:
https://www.microsoft.com/windows/windows-7/default.aspx
The beta is available in both 32-bit and 64-bit versions. Which to install? It’s always safe to install the same version as your previously installed Vista. To find out, right-click “Computer” and select “Properties.” The dialog will show you both the name of your processor and the operating system type.
You may wish to upgrade to the 64-bit version if you have a capable processor. If you’re not sure that your CPU can handle a 64-bit OS, search Google with a phrase like “Is Intel Duo 2 Core 64-bit?” (It is, as is the AMD 64x2 dual-core processor.) The main advantage of the 64-bit version is that it can use all of 4 GB of RAM.
Create the Bootable Install DVD
Once you’ve decided on the version to download, you’ll need to burn the image (.iso file) to DVD. You can do this with Nero ROM or Roxio if you have it. If not, an excellent free alternative is ImgBurn .
Backup Your Hard Drive
I strongly suggest that you back up your computer before doing this! With the price of external hard drive media having fallen steeply in the last few years, making whole disk backups is more available and reasonable than before. And, if you have Vista Ultimate, Enterprise, or Business, the Vista Backup Center already offers whole-disk backups .
If you have one of the Home versions of Vista, you’ll need a third-party application to provide a full-disk backup. Acronis True Image Home 2009 (reviewed here ) can do so admirably.
Shrinking an Existing Partition
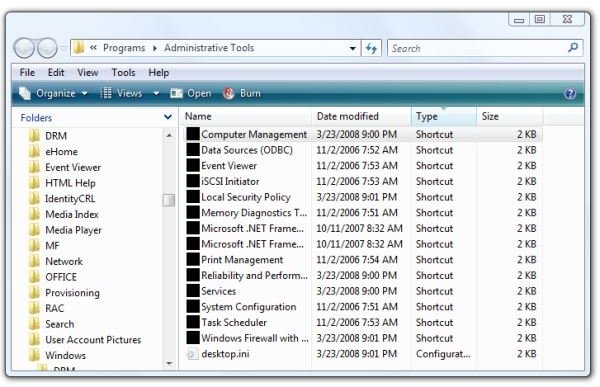
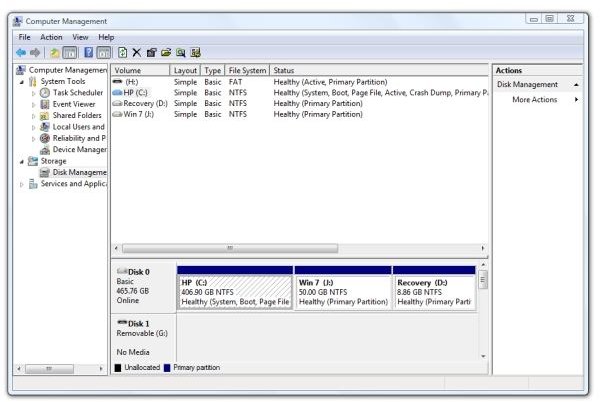
Once you have your hard drive backed up, you can create the free space for Windows 7. To do this, press the Windows key and type in “Administrative Tools.” Then press Enter. (Or, alternatively, go to Control Panel, System and Maintenance, and select Administrative Tools in the list.) Then click “Computer Management” and clear the prompt if you have User Access Control (UAC) active on your PC. You should then see this dialog. (Click the image to enlarge.)
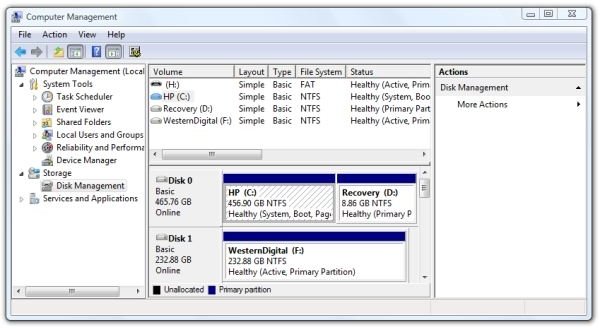
In the Computer Management dialog, click “Disk Management” in the left-hand pane.
The current system requirements for Windows 7 include a 1 Ghz CPU, 1 GB of RAM, and 16 GB of drive space. If you are planning on extensively testing Windows 7, running an antivirus program, and installing and testing some applications, I suggest that you make your partition somewhat larger, based on how much space you can afford to give up – don’t cut into needed and already used space.
My 500GB hard drive has a small (apprx. 7 GB) “Recovery” partition and a 456.9 GB C partition. (The partitions don’t actually add up to 500 GB because of different conventions on how big a GB actually is .) Clicking “Computer” shows me that I have 227 GB free space. I plan to shrink that by 50 GB for the new partition. In this case, it’s slightly complicated by the Recovery partition on the hard drive. I don’t want to change or lose this, so I may have to alter the drive letter assignments. It’s also possible that I’ll have to repair the master boot record (MBR) before the PC will allow me to boot back into Vista.
I have a real Vista installation disk that I’m holding in reserve – just in case I need it.
Unexpected Results from the Shrink Tool
And here we run into the first problem. The Shrink tool is not offering to free enough space. Despite having 227 GB free space on the drive…

… the Shrink Tool is only offering …
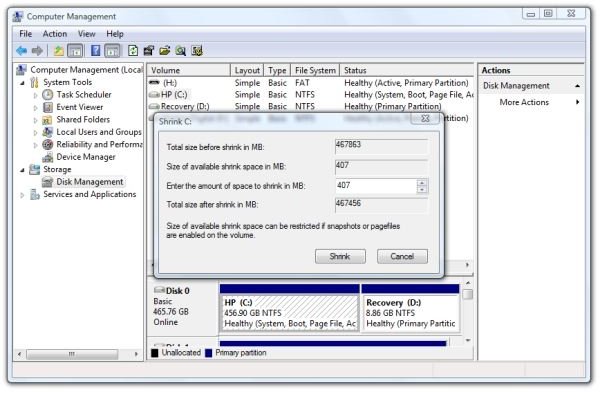
… 407 MB, which is far less than the 50 GB that I want. The dialog says, “Size of available shrink space can be restricted if snapshots or page files are enabled on the volume.”
“Volume Snapshot Service” is what powers “Previous Versions” and “Restore Points” in Vista. Of course it’s enabled. Page files are virtual memory, which allows Windows to use some hard drive space as a memory swap file, and it too, of course, is enabled.
When you look at this, you may even find that Vista shows zero shrink space. This means that files have been written near or at the end of the partition, preventing any shrinkage.
In either case, a smaller offer than we wanted, or no offer at all, the next step is to find out how the files are arranged on the hard drive.
Next: Visualizing the Drive Space, Cleaning the Hard Drive, and Disabling Some Vista Services
Using Auslogic to Visualize the Drive Space
A freeware application called Auslogic Defragmenter can do this for us. (You can find a Bright Hub review of Auslogic here .)
Ater its first run, Auslogic exposed the problem. Look at the following image.
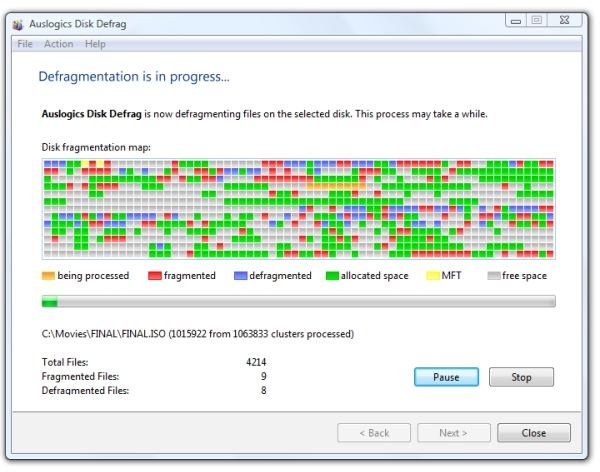
Files are spread out all over the hard drive, including at the end where the free space needs to be.
And here is a decision point. If the legend tells you that system files or the file allocation table (MFT) are written at the end of the drive space, disabling the page file and volume snapshots will not help. Auslogic and other freeware defragmenters will not move system files or the MFT. You’ll need to skip ahead to the third page and find the PerfectDisk 2008 section. (PerfectDisk can move the MFT and system files.)
Conversely, if Auslogic shows some free space at the end of the partition, it’s worth trying what the Shrink tool suggested.
If you have reached this point and have discovered that you have the same problem, I do not suggest that you continue unless you have created a full hard drive backup using one of the tools previously suggested. Also, if you do not understand any of the following steps, stop now and find somebody who is more computer literate (a teenager in the house?) to help you with this.
Mistakes in this process could actually make your PC unbootable, so please read, understand fully what’s involved, and be careful. You have been warned!
Cleaning the Hard Drive
Still with us?
Actually, the page file and Volume Snapshot Service can be deleted. To delete the page file (and hibernation files if you’re using a laptop), the easiest method is to first use Vista’s “Disk Cleanup” feature.
Press the Windows key and enter “Disk Cleanup.” Then you’ll see this dialog.
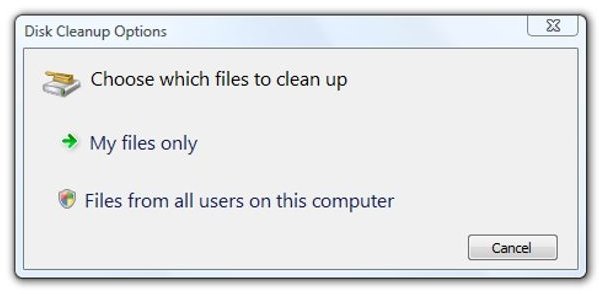
Select “Files for all users on this PC” and clear the UAC prompt. Next select the drive you’re working with, which is probably your C: drive.
After running the scan, the “Disk Cleanup” dialog will appear. This lists each item you can remove. Selecting an item changes the description at the bottom.
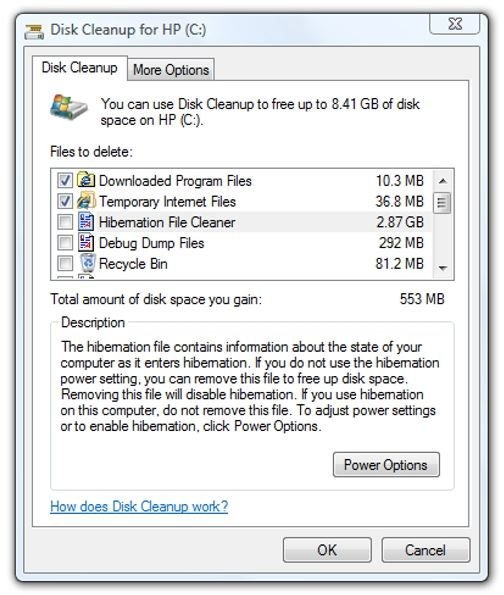
I see that the largest things in the list are hibernation at 2.87 GB and temporary files at 4.31 GB.Vista integrates hibernation as a backup for the low-power sleep function, so it’s good to have enabled. Note that if you’re using a laptop, you should disable hibernation before electing to delete the hibernation file. (Click the “Power Options” button to access these settings.)
I elected to delete downloaded program files, temporary Internet files, hibernation files, and Recycle Bin contents.
Next, under the More Options tab and under “System Restore and Shadow Copies,” click the “Clean Up” button. The next dialog will ask you if you want to delete all the restore points except the most recent. If your PC has been running well, I suggest you select Delete here. Then click “OK” and confirm the action to make the cleanup wizard proceed.
How’d it go? The C: drive now has 236 GB free. That sounds about right.
Disabling System Restore and the Page File
Now we want to temporarily turn off System Restore. Right-click “Computer” and select “Properties.” In the System dialog, click “System protection” and clear the UAC prompt. Under “Automatic restore points,” uncheck the C: drive, select “Turn System Restore Off” in the popup dialog, and then click OK.
In the same System dialog (right-click Computer, Properties, then System Properties) under the Advanced tab, click the Settings button under “Performance.” Then click the “Advanced” tab and note and record the already allocated memory. Here’s it’s showing 3241 MB for all drives.
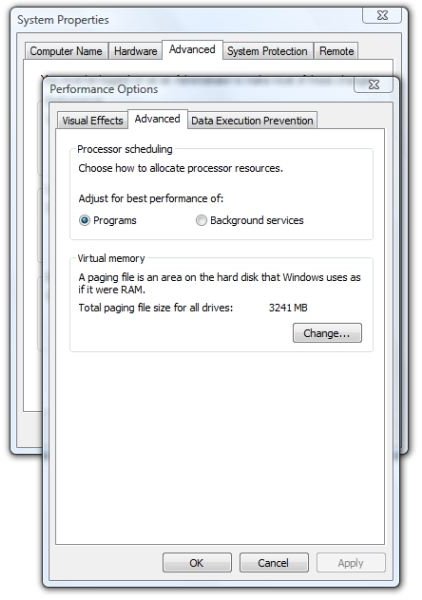
Then click the “Change” button under “Virtual Memory.” Uncheck “Automatically manage paging file for all drives” and then click “No paging file.”
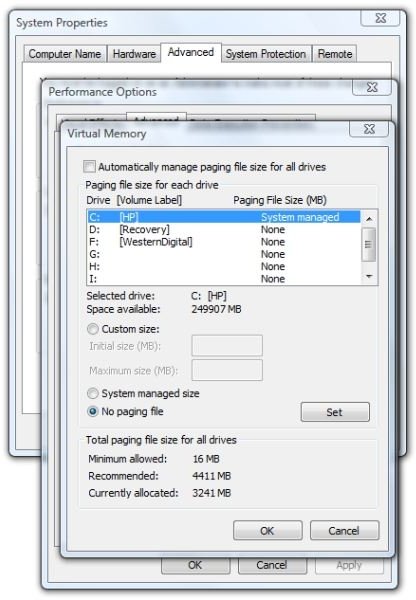
Then click OK, and the system will advise you that a restart is needed.
By the way, don’t be surprised if your system responds differently or sluggishly at restart. Unless the PC is maxed out on memory, the absence of the paging file may be felt when you start a few applications.
After cleaning the hard drive, deleting the page file, and turning off the volume snapshot service, it’s time time to go back to the Shrink tool area (enter System, then Computer Management, and click Disk Management in the left-hand pane), and see what the Shrink tool is now offering.
If it’s still not enough, it’s certainly worth running Auslogic again, but we found that Auslogic can be somewhat indiscriminate about where it places the unfragmented files. That’s also why we made it a practice to check the Shrink tool before running Auslogic again.
And this gets us to another branch point. If you now find that you have adequate free space, skip ahead to the Creating and Formatting the Partition section on the next page. If you still need to free up more space, proceed to the Perfect Disk 2008 section, which comes next.
Next: Using PerfectDisk 2008 to Move the MFT and System Files Inboard and Creating and Formatting the New Partition
Perfect Disk 2008
Perfect Disk 2008 is a commercial application produced by Raxco Software, Inc. It has the ability to run a defragmentation at reboot, and this can move system files and the file allocation table. A thirty-day trial of Perfect Disk is available by registering your email address and name at their website.
Here’s what the hard drive looked like after running Perfect Disk once inside Windows and once at reboot.
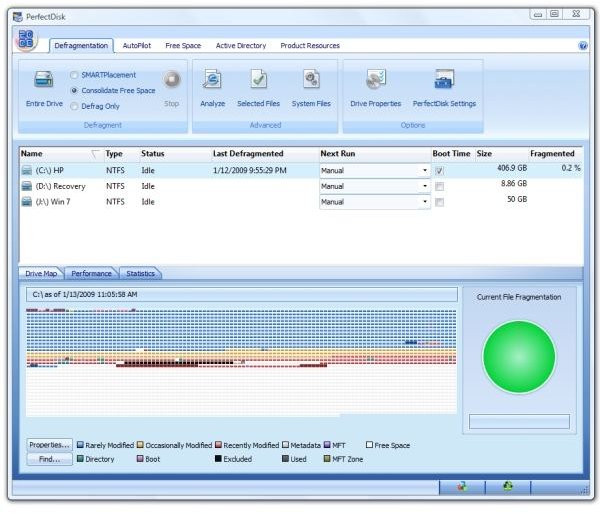
The Shrink tool then offered me the full 236 GB as shrink space.
At this point, I was quite pleased with PerfectDisk. I wasn’t as pleased with Vista’s Active Directory Service, however. It is only concerned about where a few system files are placed and leaves the hard drive otherwise disorganized. Putting the MFT in the denser, linear outer area of the drive platters may make sense for reading, but it also makes it impossible for shrinking.
To save you some time, here’s how I suggest you proceed with PerfectDisk. First, run the application, click your C: drive, and then click the “Analyze” button at the top. After the analysis run is complete, click “SmartPlacement” at top left, and then click “Entire Drive” to start the defragmentation pass. This will take some time, so you may want to plan it for idle time or take a bike ride or do some cross-country skiing (seasonally dependent) while it completes.
Perfect Disk ran for a hour and thirty minutes on the first defrag of my 500 GB hard drive.
About using Perfect Disk to get a better shrink of a hard drive, Raxco has some specific advice : (1) Turn off System Restore, (2) run a “SmartPlacement” or “Consolidate Free Space” defragmentation, (3) perform a boot time defrag, (4) shrink drive, (5) repeat steps two to four until the drive won’t shrink anymore.
Perfect Disk has a nice, complicated explanation in the Help file about using the Vista Group Policy editor and an “Active Directory Group Policy Object” to set up rules for active directory management. It takes a while to understand that none of this is needed for a single-user PC. Instead, start from the Defragmentation panel (main screen) and click “Perfect Disk Settings.” Under the “General” heading, select “Let PerfectDisk manage all the layout.ini files (Windows XP/Vista only).” Also, if you’d like to prevent Perfect Disk from running some background services that, in my opinion, are not that useful, you can also select “Close button behavior – Exit PerfectDisk 2008.” Then click “OK” to close the dialog.
Back on the main screen, click the selection box under the “Boot time” column for Drive C:
And that’s it. When you reboot the PC, PerfectDisk will run at restart and move the system files and MFT sections inboard on the partition.
I only had to run through this loop once. The result was as in the image above, and I had plenty of space to create my new partition for Windows 7.
PerfectDisk Professional 2008 - $39.99
Creating and Formatting the Partition
After everything that was involved in getting to this point, actually creating and formatting the partition is sort of anticlimactic. Right-click the new free space and select “New Simple Volume.” This will start up the “New Simple Volume Wizard.” Name your new volume if you wish, and click OK. The wizard will then close, and you’ll wonder what is going on. Vista formats the new drive in the background, and, based on the size of the new partition, can take some time to complete. Look at the computer management window and you’ll see the word “Formatting” and a percentage of completion while the format is in progress.
When this finishes, you’ll be ready to reboot the PC and start from the Windows 7 DVD. Note that you may need to go into your computer’s BIOS setup to change the boot order so that the CD/DVD drive comes before the hard drive. Also, there may be an option to set up a key for boot selection. This is a good precaution in case anything goes wrong and prevents you from booting back into Vista.
And here’s the new partition - 50 GB creatively named “Win 7.”
Next: Fixing What We Broke in Vista, Installing Windows 7, Dual Booting, Installation Notes, and our Conclusions
Fixing Up Vista
Before installing Windows 7, we want to re-enable Vista features that we turned off. Based on what you had to do to get here, some or all of these may apply.
Enable Hibernation – Vista will remind you at startup that hibernation is not enabled. The easiest way to re-enable hibernation is to start an elevated command prompt (go to Start, All Programs, Accessories, right-click Command Prompt, and select “Run as administrator.” Then type in
powercfg /hibernate on
Then type “exit.”
Enable Paging – Right-click Computer and select Properties. Click Advanced System Settings and clear the UAC prompt. Under Performance, click Settings. Under the Advanced tab and under Virtual Memory, click the Change button. Select “Automatically manage paging file size for all drives.” Then click OK. Click OK again to close the Performance Options dialog.
Enable Restore Points – Back in System Properties, click the System Protection tab. Click the check mark beside the C: drive and then click Apply.
Startup and Recovery – While you have the System Properties dialog open, under the Advanced tab and Startup and Recovery, click the Settings button. Check “Time to display list of operating systems” and set it for twenty to thirty seconds.
Installing Windows 7 Beta
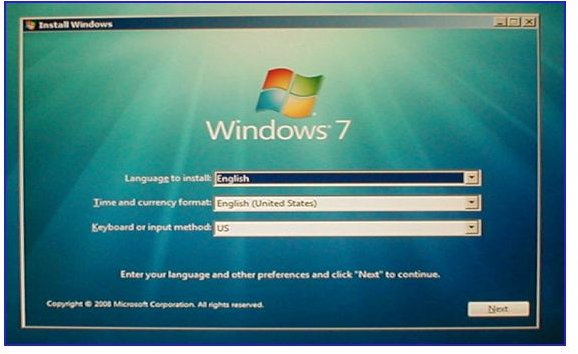
Now we have arrived. It’s time to put the Windows 7 installation DVD in the drive and restart the computer. Be watchful for a message like “Press any key to start from DVD or CD…”
Here’s what the first install screen looks like.
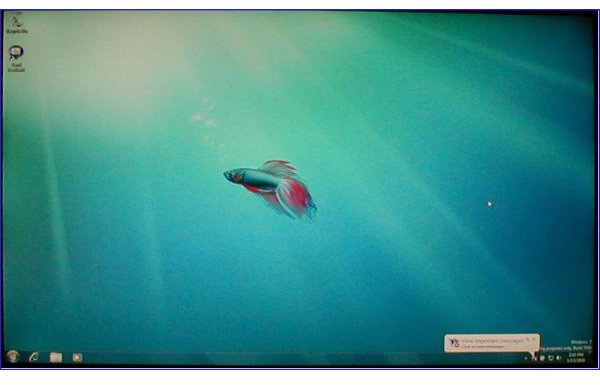
And here’s Windows 7.
Some Installation Notes
Windows 7 beta does not give you a lot of notification about when to remove the DVD. When you see the message that Windows 7 is preparing to restart, it’s safe to remove the DVD.
The next restart will go automatically go back to the Windows 7 installation to complete.
During the setup process, Windows 7 will want to know in which “group” to place the main Internet connection. If you select “Home” and have a wireless radio (Wi-Fi), it will then give you a group password. This automates connections somewhat, but only to other PCs running the Windows 7 beta.
Windows 7 will soon inform you that your computer is insecure. Click the link in that dialog to open Windows Explorer and go to the Security page at Microsoft. At the bottom of the page you’ll find links to antivirus trials by Symantec, AVG, and Kaspersky. (I selected Kaspersky.)
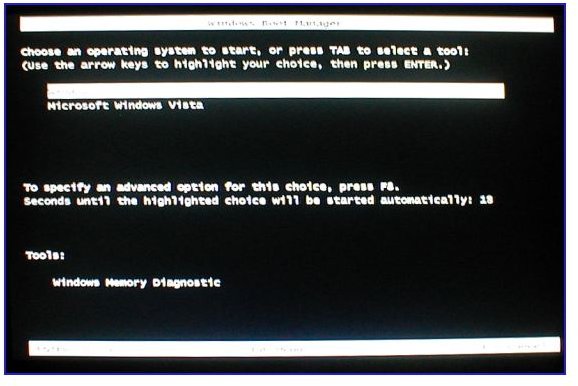
After the first restart, your PC should display this boot menu.
Conclusion
And there you have it – how to dual boot Windows Vista and Windows 7. Hopefully it won’t be quite so adventuresome for you as it was for me. In case it was, though, I hope you found this article helpful. Thank you for reading it, and thank you for visiting Bright Hub.


