Apple TV is a very specific video format, and here is a tutorial for Apple Compressor on how to compress for this platform.
Presenting … Apple TV
Apple TV remains a fairly marginal format that has not hit the mainstream, but for those who use it there is a commitment to it because of its unique benefits. Apple TV actually operates in a similar way to many of the Apple portable devices in that it can take on media files like a hard drive, but very specified to viewing. Since Apple TV is part of the “Apple family” Final Cut Studio makes special allowances for it with Compressor that it would not give to a device of its stature if it was not made by Apple. For those who are using Apple TV, Compressor includes built-in settings so that you can compress videos for that format. Here is an easy tutorial on how to use Apple Compressor to compress videos for playback on Apple TV.
Apple TV Video Compression Process
It is up to you whether you want to export from Final Cut Pro as a QuickTime file and then open that QuickTime file in Compressor, or just Send to Compressor directly from Final Cut Pro . If this is just a freestanding video that you have downloaded or captured then you are just going to want to open that video file in Apple Compressor right off the bat.
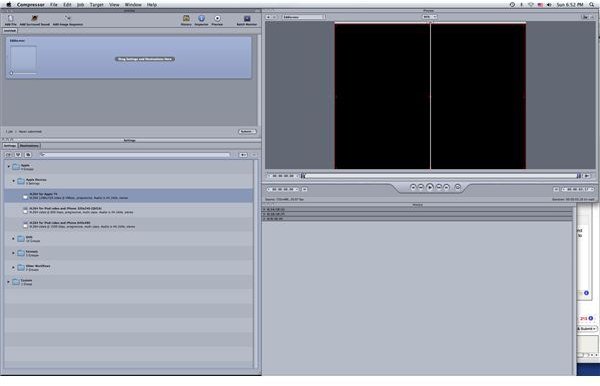
Go down to the Settings pane and select the Apple folder. Go to Apple Devices, which will be the top option above DVD. In here the top option will be H.264 for Apple TV, which is right above H.264 for iPod Video and iPhone 320 x 240 (QVCA). This format is a standard H.264 that will be specified for Apple TV, and it is listed in its details as “H.264 1280 x 720 Video @ 5Mbps, progressive, Audio is 44.1 kHz, stereo.” This indicates that all settings that should be optimum for Apple TV will be included in this video codec. Drag and Drop H.264 for Apple TV up into the project pane above where it says “Drag Settings and Destinations Here.”
Make sure to go up to Target and select Destination, which will then take you to a menu where you can select destinations in your computer or attached digital storage devices. This is the destination where your compressed video will go when Compressor has completed it. Just hit the Submit button in that window and the video compression process will begin, and it will spit out a single file in the same way that a QuickTime compression would for upload to YouTube or Vimeo .
From here it is up to you how you want to employ the file onto Apple TV, but you can likely just transfer it onto a digital storage medium and then plug it into your Apple TV.
This post is part of the series: Compression Types in Apple Compressor
Here is a series of Apple Compressor tutorials looking at different video compression and video codec types.


