
If you’re just starting out with Adobe products, you’ve probably started to work with Photoshop layers. A little confused? No worries! This article will sort everything out for you. This guide will explain how to use layers as well as how to make mock 3D text with layers alone.
Photoshop Layers Are Like… Sandwiches?
Yes! Layers are actually akin to building a sandwich. I know that sounds strange, but let me explain. Just like a sandwich comprises layers of bread, veggies, cheese, and meat, Photoshop documents can be comprised of different elements arranged in layers. For example, a project within Photoshop might have separate background, text, and graphic layers. This allows you to quickly rearrange, duplicate, delete, and manipulate your design with ease.
Adding, Duplicating, and Deleting Layers
Adding layers is really simple. To add a layer, simply click on the “New Layer” button. The button looks like this. (highlighted in red)
When adding a new layer, it automatically adds it above whatever layer you were working with before. However, by clicking and dragging the layer, you can move it as far up or down the list of layers you want.
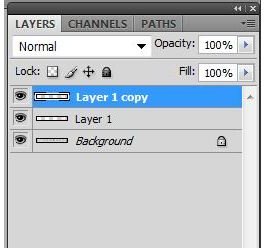
Duplicating your layer is as easy as clicking and dragging the layer onto the “New Layer” button. This is a handy tip if you have a graphic you would like to use more than once within a project. The new layer will have the same name as your old layer, but will be followed by “copy.”
Deleting your layer is also an extremely easy process. Simply click the layer you don’t want to work with anymore and press the trashcan icon at the bottom of your layer window. It looks like this.

Using Layers to Create 3D Text
Here I’ve created the text I want to use. Go for a single, bold color rather than anything patterned or with a gradient to start off with, it makes it much easier until you get the hang of this process.

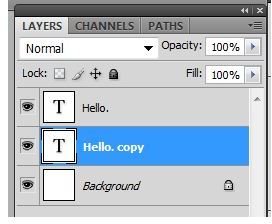
Now, duplicate your layer and change the color oh-so-slightly to a shade a bit darker than before.

Move your darker layer under your original text layer by clicking and dragging it downward.
Select your move tool , and click on your duplicated layer. Press the right arrow key on your keyboard once, and then press the down arrow key on your keyboard once.

Duplicate your duplicated layer, and once again press the right arrow key on your keyboard once, and then press the down arrow key on your keyboard once. Afterward, duplicate the layer you just worked with, and carefully nudge it over one pixel both right and down. Continue this process about ten times in total.

When completed, your text effect should look like this!

Look how easy that was! You created 3D text without any plug ins, artistic techniques, or expensive third party programs.
Image Credits
All images were created - and all screen shots were taken by - Amber Neely, and are intended for educational purposes only.


