In this tutorial, I will show you how to use Adobe Illustrator’s Shape tool. This tutorial is going to show you how to select the shape tool, draw the shape, change the color, add a border, and more.
Illustrator Shape Tool
This tutorial will show you how to use the Shape Tool in Adobe Illustrator. This is the next tutorial in the Adobe Illustrator series. You should already know how to create new documents if you are following these tutorials in order. If you aren’t but know how, go ahead and create a new document to work on.
Locating and Selecting Your Shape Tool in Illustrator
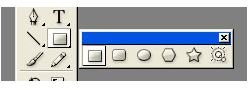
In the main toolbar on the left you will see a rectangle with a small arrow in the bottom right corner. That is your shape tool. You can open the shape tool so that it is a box of its own. To do that, click the rectangle and hold it until the menu expands. When the menu expands, you will see an arrow at the end of the menu. Still holding your mouse down, run the mouse to the end of the menu and let go when you have reached the arrow. Your shape tools will now be in a box of their own. See the image below. Your shapes should look the same.
Drawing Shapes in Illustrator
Let’s start off with the basic shapes. Select the rectangle and draw a rectangle on your document. You can also draw a square on your document using the rectangle tool. Now select your circle tool and draw a circle on your document. To draw a perfect circle, hold your Shift key down while drawing. You can also draw a rounded rectangle or square by using the rounded rectangle tool. That is the second shape in your shape box. Select it and draw a shape on your document.
So, that covers the first three shapes in the shape toolbox. The next shape is the polygon shape. Select the shape and draw it on your document. Go ahead and select the star shape and draw it on your document. Now you should have all of the shapes on your document. Next, we will modify the shapes.
Adding Colors and Borders to Shapes
Adding Color to the Shapes
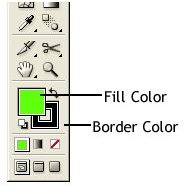
To change the color of the shape, double click the color fill box in the toolbar on the left. When the box opens, select the color that you want to use. To change the stroke color, double click the bottom color box in the toolbar. Select the color that you want to use when the box opens and then click OK.
Changing the Border Size of a Shape
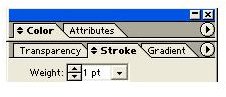
Next, I will show you how to change the border size of the shapes. Click a shape and locate your stroke box. It should be somewhere on the right side of your screen. If you cannot find it, go to the top of your window and click Window > Stroke. Changing the size in the stroke box will change the size of the shape border.
Modifying Shapes in Illustrator
Modifying the Shape using the Direct Selection Tool
You can change the shape by using the Direct Selection Tool (white arrow). Grab the Direct Selection Tool, hold down Shift and click
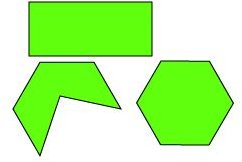
one of the blue dots on one of your shapes. You will notice the blue point turned into white point. You can grab the point with your mouse and move it. That will create odd shapes. Continue doing this until you create a shape that you are going for.
That’s how you use the shape tool in Adobe Illustrator. To learn more about Adobe Illustrator, look for the other tutorials in this series.
Image Credits
All screenshots were taken by the author for educational purposes only.


