Ever have a photograph that you knew would make a beautiful black and white picture? This article will teach you how to use Adobe Photoshop CS3 to convert your photos from color to black and white in a matter of minutes.
Most digital cameras have built in features that will allow a photographer to shoot in black and white instead of color, and the camera does the conversion automatically. However, most photographers prefer to shoot everything in color and convert the photos to black and white later in Adobe Photoshop.
One reason for this is that Adobe Photoshop CS3 gives you much more control over the shading in your black and white conversion. Also, if you use the camera’s black and white feature, that is it – the photo is black and white. If you shoot everything in color, then you can always turn any of your favorites into black and white shots. Photoshop makes this process easy!
Black and White Feature
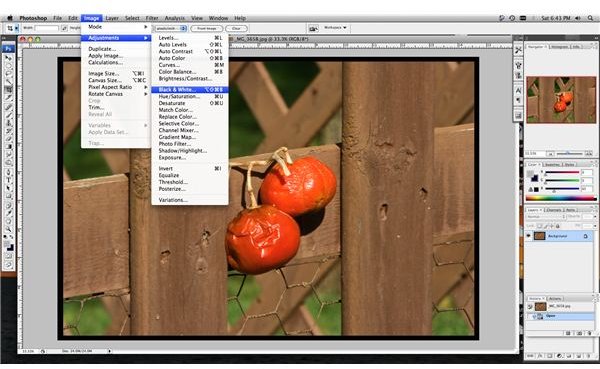
First, open the photo that you want to convert to black and white. Our example above is a picture of a few tomatoes that were past their prime and all alone. Once the picture is open, go to Image, then Adjustments, and then down to Black and White. In the past, you would have had to use the monochrome feature in the channel mixer to convert to black and white (which you still can do), but the Black and White adjustment gives you much more control over the colors and shades in the photo, as shown below.
Conversion and Tint
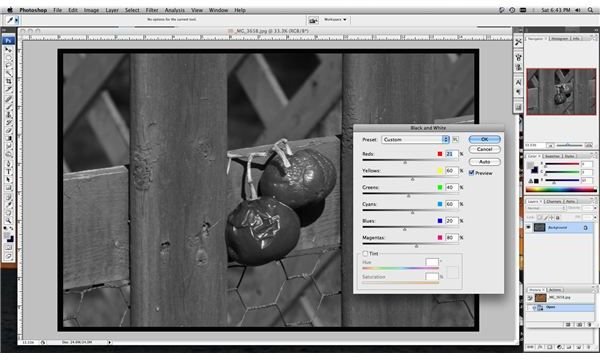
Slide around the color bars to get your black and white photo to look exactly how you want it to look. The red and yellow sliders seem to make the biggest differences, although that obviously will depend on the colors in the photograph. Once you are satisfied with the balance you’ve found, click OK. It’s as simple as that.
You’ll notice that on the bottom of the Black and White box, there is a checkbox that says Tint. If you check that box, you can add a hue into the monochrome photo. You can pick the color by moving the Hue slider, and you can choose how strong that color comes through in your picture by adjusting the Saturation slider. Again, be sure to click OK to apply the changes to your photograph.
With the Black and White tool in Photoshop CS3, your control over the color and tint of your pictures is absolute. It’s a quick process and certainly much smarter than switching settings on a camera to get those antique, black and white photos.
This post is part of the series: Learning Photoshop - Lessons for Photographers
These articles are part of a series of tutorials in Adobe Photoshop, geared specifically for the digital photographer. These articles will include how-to lessons, tricks of the trade, and useful shortcuts. Learn to utilize the world’s most advanced, powerful photo editing software.
- How to Crop a Digital Photo Using Adobe Photoshop
- How to Convert Your Photos to Black and White in Photoshop CS3
- How to Remove Red Eye Using Adobe Photoshop CS3
- How to Remove Blemishes using Photoshop CS3 & CS4
- How to Make a Web Photo Gallery Using Photoshop CS3 & CS4
- How to Convert RAW to JPEG Using Photoshop CS3 & CS4


