Manual photography should not be one of those settings on your camera that you fear. In fact, once you understand aperture, shutter speed, and ISO, the setting becomes quite inviting. Learn some manual photography basics in this article and get the confidence needed to switch out of that “P” mode.
Introduction
When looking down at your camera you switch the dial to the comfortable Auto or Program modes . You say to yourself that you don’t understand how to use the “Av” or “Tv” settings let alone the dreaded “M”. Just to further convince yourself you say, “In any case, the P stands for professional!” Does any of this sound familiar? If so this article is for you. Throughout this article I will describe to you the three main concepts of photography, aperture, shutter speed, and ISO to the point where you should feel confident switching to the “Av”, “Tv”, or even the full “M” modes on your camera. I will describe the consequences on the image when changing one or more of these three and why you may want to choose to change one over another. Finally, I will describe to you some situations where it is advantageous (or even necessary!) to flip that switch to “M” and not use Auto mode , “P”, or even “Av” and “Tv” modes. The first step to understanding manual photography basics is to thoroughly understand the concept behind the photographic triad: Aperture, Shutter Speed, and ISO .
Aperture
Photography is entirely dependent on light. Light, reflecting off objects, coming into our cameras is what allows us to make images. So if you are letting light into your camera to hit your sensor or film, it is only natural that the size of the hole you are letting the light through play a critical factor in the exposure of an image. Aperture is essentially just that, the size of the hole through which the light is allowed to enter the camera. The bigger the hole, the more light that is let in and vice versa. This also means that, for a given “perfect exposure ”, the bigger the hole, the less time the hole needs to be open to allow enough light to enter to make that perfect exposure. Similarly, if you have a smaller hole, there is a longer period of time necessary to attain that “perfect exposure”. Keeping the size of the hole fixed and allowing a shutter speed to vary like this is the concept of the “Av” or “Aperture Priority Mode ”. The aperture of a camera is most often given by what is known as a F number. This is just a way of annotating the size of the hole. The smaller the F number (F/4, F/2, F/1, …) the wider open the aperture. A large F number (F/16, F32, …) means the hole is stopped down and really small. So, a wide open aperture (small F number) is the best way to go at all times then right? Of course not! There is obviously a tradeoff that needs to happen here. What happens is that the smaller the F number (wider open aperture) the more that the depth of field is reduced (less of the image will be in focus towards or away from your subject). This is one of the tradeoffs that you need to make in photography. You have to ask yourself if you want a razor sharp image throughout (and have to deal with less light coming in), if you want to maximize the amount of light coming in (and sacrifice depth of field), or somewhere in the middle ground.
Shutter Speed
As previously mentioned, photography is entirely dependent on light. Therefore, the amount of time that you leave your aperture open for (shutter speed ) is obviously going to have a significant effect on the exposure of your image. Without insulting your intelligence, it makes sense for us to say that keeping everything else constant, a longer shutter speed (keeping the aperture open for a longer period of time) will let in more light than a shorter shutter speed. Similarly to the aperture argument, for a perfect exposure, a longer shutter speed means you can stop down your aperture (make the hole smaller) and therefore getting a greater depth of field. For a shorter shutter speed, you would have to use a larger F number to attain the same “perfect exposure”. This is the concept behind “Tv” or “Shutter Priority ” mode. Just like with the aperture trade off there is a trade off when varying the shutter speed as well. The longer the shutter speed, the more likely a moving subject or a hand held shot is to be blurry from the motion (motion blur may also be your intent ). Whether or not an image needs to be frozen stiff in motion (maybe a bird in flight ) or if a blur is acceptable or preferred (maybe a waterfall image ) you need to decide what shutter speed is to be used.

ISO
Photography is entirely dependent on light (are you starting to notice a key point here yet?). So the level to which your sensor or film is sensitive to the incoming light is obviously going to affect the exposure of you image. Without getting into the technical details about ISO , it is the point to which your sensor or film is affected by the light hitting it. The higher the number (ISO 1600, 3200, etc.) the more sensitive it is and the lower the number (100, 200, etc.) the less sensitive it is. Increasing the ISO (either with a different roll of film or changing a setting on your camera) is the equivalent of giving yourself some more light (I know this isn’t technically accurate but it gets the point across). This “extra light” can be transferred into a shorter (faster) shutter speed or a smaller aperture (or both). Sometimes, in low light situations , you MUST bump up your ISO in order to make the shot in the way you were intending it. Some cameras can do this “bumping up” automatically through the use of Auto ISO (like the Nikon D-3 ). But, alas, as with aperture and shutter speed there is a tradeoff to increasing your ISO to the max. Although digital cameras these days are getting better, increasing the ISO increases image noise significantly in the higher ranges. Again, you have to make the tradeoff between acceptable noise and making the shot that you wanted.
Bringing it all Together
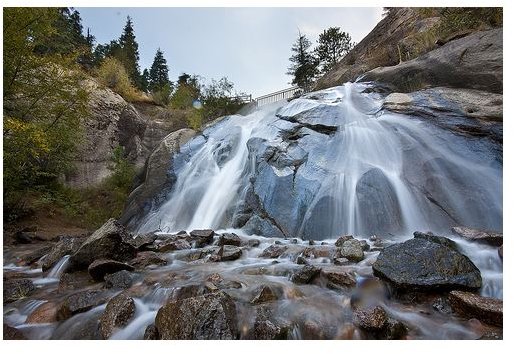
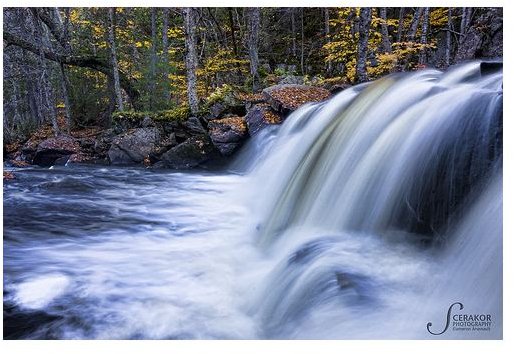
In order to bring it together, let’s take the scene of a waterfall as an example. Working in “Auto” or “P” modes you would walk up, frame your shot, take a picture and walk away. The internal computer of the camera decides for you what is important to make a technically perfect exposure. For all intents and purposes, it will be well exposed too. Now flip the camera to “M” and go through your thought process. For a landscape photograph , you will probably want the most of the image in focus as possible, therefore you choose a high F number. In order to get a silky water look , you want a longer shutter speed, so you choose about 1 second. Finally, you know that in order to attain a long shutter speed like this you need to put in the lowest ISO possible. You check the exposure meter to make sure you still get the “perfect exposure”, and you snap off the picture! This time you have the control. You may just have to play with the triad a bit to get the perfect exposure by evaluating the limitations of each. In the example of our waterfall picture, if you check the exposure meter and you see that the image is going to be overexposed you know you have to change something. You are already using the lowest ISO, so that has to stay the same. The priority in this case will be to get the silky smooth water effect so we’ll keep that the same. So, by elimination, we know we can stop down the aperture as much as possible to limit the amount of light hitting the sensor! By shooting manual, you have the power to choose what is important in your images.
When to use Manual Photography
Despite the fact that you have the most control over you image using manual photography, it is not always the most efficient way to shoot. Quite often I find that choosing either aperture priority or shutter priority to be much better alternatives. That being said, I will finish by giving you a few examples where (and why) using these manual photography basics is without question the best way to take the image.
- Panorama photography : By using the “M” mode on your camera for panoramas, you guarantee that each frame you take to merge later has the same great exposure. Using any other mode you risk having your in camera meter change the exposure on you when panning the camera.
- Constellation Photography , Satellite Photography , and Astrophotography in general lend themselves well to manual photography. In most of these cases a long exposure is critical. You will often choose the shutter speed to be 30+ seconds, the aperture to be fairly wide open**,** and depending on the subject a low (e.g. for star trails ) or high (e.g. constellations) ISO.
- As described above, waterfalls.
- In constant light or when using flash: If you are shooting a subject over a period of time in constant light or are using flash and you have found the proper “perfect exposure”, flip to “M”. This way you keep the perfect exposure and you don’t have to worry about the in camera computer guessing depending on your digital camera’s metering modes .
- Studio Portraiture : For similar reasons to number 4, a constant exposure is desired.
These examples really are just the tip of the iceberg. Feel free to give your own examples in the comment section below.
Conclusion
In this article I have given you the manual photography basics necessary to get over your fear of the dreaded “M”. By know you should know that the key to photography is light. The aperture is just the hole size from which we let light through and by varying this size we vary the depth of field. Longer shutter speeds let in more light and blur backgrounds and shorter shutter speeds stop motion in its tracks. Varying the ISO varies the film or sensor’s sensitivity while trading the possibility of noise. By finding the balance of your needs in these three options, you are for once in total and utter control your image.


