This article is aimed at (beginner) photographers who have just purchased a Nikon D5000 DSLR camera and would like a fast-track course on how to use the Nikon D5000.
Nikon D5000 Digital Camera Basics Tutorial
This Nikon DSLR tutorial describes how to use the various modes available within the Nikon D5000 camera to click photographs, how to shoot video using the D5000 and how to review photos and videos.
Before you start using the camera, some basics need to be in place. The battery needs to be charged (takes about 90 minutes for a full charge) and you need a suitable memory card. I normally carry a spare battery fully charged and an additional 8 GB memory card whenever I go on a photo shoot.
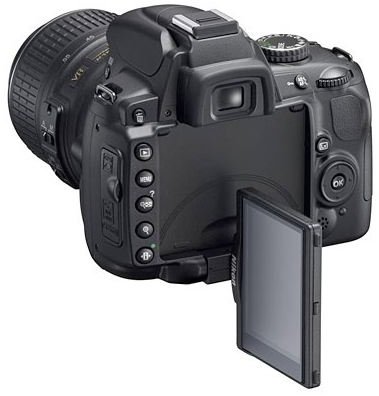
Fitting the lens onto the camera body
This can be accomplished by aligning the index dot on the lens with the index dot on the camera and rotating it counter-clockwise until you hear an audible click. In order to remove the lens, depress the lens release button and rotate the lens clockwise.
How to Use the Nikon D5000
Clicking photographs on the camera is easy and is almost as simple as a point-and-shoot camera. One can use either the Viewfinder or the LiveView mode to take photographs. Depress the shutter button halfway to focus and fully to click.
The mode dial of the camera has a variety of options which can be used under different conditions as follows:
Full Auto Mode - This can be used by default whenever you’re unsure of what settings to use and is the ideal mode for beginners.
Full Auto No Flash Mode - This can be used in settings where you want to capture the ambient lighting and don’t want to use flash. The Nikon D5000 camera takes care of everything else.
Portrait, Landscape, Kids, Sports, Macro (Close-Up) and Night Portrait modes are all self-explanatory.
A wide variety of other scene modes are present such as Silhouette, High Key, Low Key, Beach / Snow, Food, etc. which can be accessed by selecting Scene on the mode dial and rotating the command dial.

Aside from these modes, the P, S, A and M Modes are available. They represent:
- P - Programmed Auto (camera controls aperture and shutter speed to adjust exposure, rest are under your control)
- S - Shutter Priority Mode
- A - Aperture Priority Mode
- M - Manual Mode
To begin with, one can use the Auto mode and the various scene modes as per the situation. As you get more accustomed to the camera and your knowledge of photography increases you can make use of the P, S, A and M modes where you have more control over the photo to achieve better and more creative results.
Shooting HD Movies
Shooting HD movies is very simple with the Nikon D5000. In order to shoot movies, perform the following actions:
-
Focus on the subject using the auto-focus by half-clicking the shutter button (This ensures a crisp picture as against a blurry picture).
-
Switch to LiveView mode to take a movie.
Advertisement -
Click on the OK button to start recording. Once you’re done shooting, click on the OK button to stop recording.
Note 1: Remember that movies are always shot in landscape orientation. Movies which are shot in Portrait orientation either require significant editing / post-processing or else end up as worthless videos.
Note 2: Unlike still photos (which can use the flash), movies require the scene to be reasonably lit. Hence it becomes difficult to shoot movies in situations with very low light.
Reviewing Photos and In-Camera Editing
Photos can be reviewed by clicking the Playback button which is present on the back panel. Unwanted photos can be erased by clicking the delete button twice.
While reviewing photos, you may find that certain photos will look better in sepia or monochrome or require editing such as red-eye correction, cropping , etc.
Movies can be played back while reviewing by clicking on the OK button to start and stop playback.
For in-camera editing, click on Menu and then navigate to the Retouch menu. Alternatively, while a photo is being displayed full frame, click on OK to display the retouch menu. Retouching saves a copy of the photo and leaves the original untouched.
Some of the commonly used retouching features are:
Red-Eye Correction: Can be used to remove red-eye from a photo.

Trim: Used to create a cropped copy of a photo.
Monochrome: Converts photos to black and white, sepia and cyanotype.
Filter Effects: Can be used to intensify reds / blues / greens or else add the effect of a skylight / soft / starburst filter.
FishEye: Can be used to add a fish-eye effect.
Some of the other features in the retouch menu are Image Overlay, Small Picture, NEF (RAW) Processing, Straighten, Color Balance and Perspective Control.
These retouch options present within the camera can help perform the common editing tasks and can reduce the amount of post-processing required on the computer.


