This article describes how to stretch a picture without distorting it so as to retain the appearance of the image in its original form. The concept of aspect ratio is explained, and stretching the photo (in both pixel and percentage terms) using re-sampling to retain image quality is explained here.
Introduction to Image Resizing / Stretching Images
Image resizing / stretching images are some of the most commonly performed functions on images, especially if you’re like me and have many photos and love to share them with friends, you often have to resize the image accordingly.
Sometimes if there is an image which you need printed on a big poster or something similar and you wish to blow up an image to a large size then you need to stretch it. However, while stretching an image like this, or while resizing an image as indicated above, care needs to be taken to ensure that the image does not get distorted and does not deteriorate in quality significantly.
The two key things to keep in mind are:
Aspect Ratio: Aspect ratio is the ratio of the horizontal to the vertical dimensions of the image. Some of the commonly used aspect ratios are 1:1 (120mm, Medium Format), 3:2 (35mm Film Camera), 4:3 (Digital Cameras, DSLR’s) and 16:9 (HDTV, Widescreen )
Resampling: In digital imaging, resampling refers to the process of resizing an image / changing the resolution by the addition or removal of pixels.
How to Stretch a Photo using Adobe Photoshop
The following tutorial explains how to stretch a photo without distorting it using Adobe Photoshop. If you are new to Photoshop then please read this Adobe Photoshop CS3 Tutorial for Beginners .
-
Open the image in Adobe Photoshop.
-
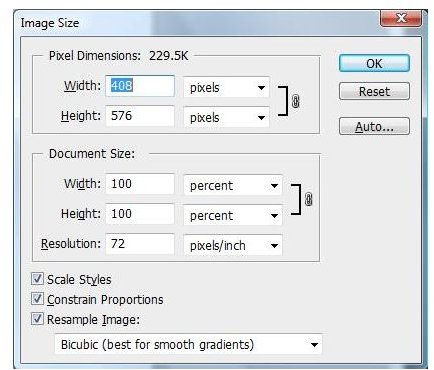
Open the Image –> Image Size Menu (Alt + Ctrl +I).
Advertisement -
Modify the Image size by changing the number of pixels.
-
Use Constrain Proportions check box to retain same aspect ratio (and prevent distortion).
Advertisement -
Use Resample Image check box to resample the image for resizing (prevents quality degradation).
- Click Ok and your done.
Note: Resizing using percentage terms may be easier. Change the dropdown to “Percentage” and to make it half the current size use 50% (or 200% for twice the current size)
How to Resize a Photo using IrfanView
Follow this simple tutorial to learn how to stretch a photo or resize it without distortion using IrfanView.
IrfanView is a free picture browser which can be obtained from IrfanView.Com
Refer this review of Irfanview for more information about it.
-
Open IrfanView.
-
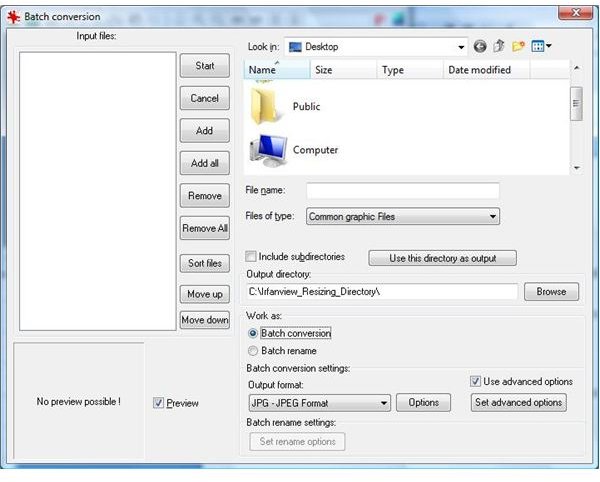
Open the Batch Conversion / Rename Window (B).
Advertisement -
Navigate to the folder with the images and click on Add or Add All as required.
-
Select a suitable output directory.
Advertisement -
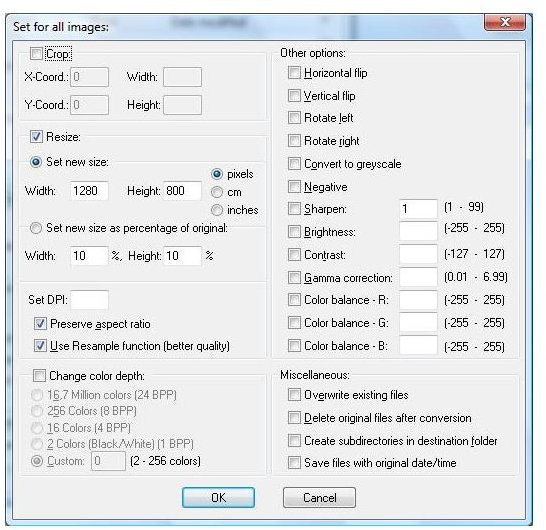
Click on Advanced Options. Type the new size in either pixel or percentage terms as explained earlier.
-
Make sure Preserve Aspect Ratio and Use Resample Function are selected.
-
Click on Start to begin the process.
Advertisement
Note: IrfanView is especially useful for batch processing - resizing an entire folder of images, etc.
Resizing / Stretching Photos using Microsoft Office Picture Manager
This guide shows how to stretch a photo using Microsoft Office Picture Manager .
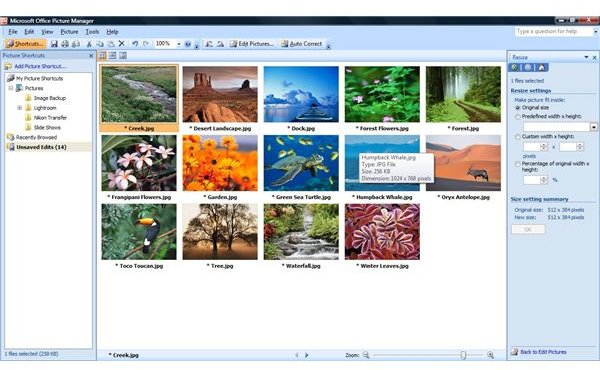
- Open Microsoft Office Picture Manager.
-
Open the folder with the images.
-
Go to Picture > Resize. The Resize options are visible on the right.
-
Choose the new size from the drop down menu in either pixel terms or enter a specific size in percentage terms.
-
Click on Ok to begin the process.
-
Save the files which are generated. They will be displayed under Unsaved Edits.
From the above 3 tutorials it can be seen that the steps involved are similar across photo editing software and can be performed with ease with other software too. Just remember to preserve the aspect ratio (to prevent distortion) and use image resampling (to preserve quality).


