From equipment needed and exposure recommendations to lighting and photo editing tips, learn how to make your product photos look like they were done by a pro!
What You Need for Product Photography (Besides the Camera)
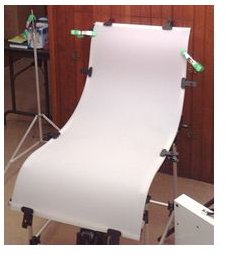
To shoot product photography, the first thing you need is a light table on which to do it. The simplest way to do this is to buy a simple light table, sometimes called a shooting table, online. Prices range from about $100, which is what mine cost, to about as much as you happen to have in your bank account. I recommend a less expensive version because, with a few exceptions, they really all do the same thing. You can also build a light table with a sheet of translucent material, like Plexiglas, on a wood or PVC frame.
Mine came in many pieces, shipped from overseas, and I had to follow a non-verbal cryptic diagram to figure it all out. After about an hour it was put together, but I would guess it might have been easier to engineer my own instead of figuring out someone else’s design.
Product Photography Lighting
Lighting is tricky but not overly difficult. You want light from above and below. The light above should be bright enough to adequately illuminate the subject. The light below should be bright enough to make the background an even white, or close to it, as well as eliminate shadowing. If one or the other of the lights is too bright it will wash out the image. There really isn’t a scientific method or instrument for this. As much as great photography benefits from a scientific process and approach, sometimes you just have to try things and figure it all out with your eyes. After all, you are the one with the vision.
If you are using adjustable studio lights, you have a relatively easy task. My Alien Bees lights are adjustable but if I were using non-adjustable ones my method of controlling light intensity would be moving the lights closer and further away. Not very scientific at all. Basically, you have to eyeball it, with the assistance of your camera’s histogram . Feel it out and write down what works because you will likely want to do this again and want to spend more time shooting and less time trying to figure out how to set everything up.
Exposure Recommendations
My general guidelines for product photography are to set the camera to manual mode and put the shutter speed to 1/125 and the ISO to 100. The f-stop will end up being about 11-16, which is just fine for what I shoot. Depending on your equipment and desire for depth of field , your settings may be a little different. That’s okay. Have fun experimenting. This is an educational process.
The above procedure is how you set the exposure. Before shooting, set your white balance so you can have as close to a white background as possible. Once you do that, you are ready to shoot your product. Put your product on the flexible plastic background, about in the middle of where your light underneath shines. Shoot your photo and make adjustments until you have the photo you want.
Editing Your Images
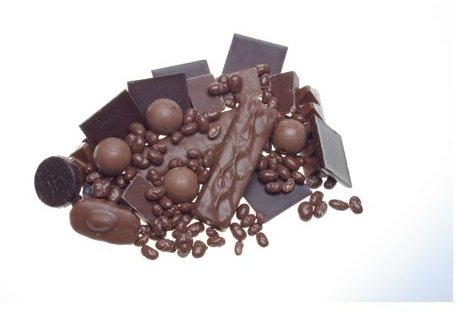
Next, you will want to adjust the photo on your computer so you can make the background completely white. Load the photo into Photoshop or another photo editing program and use the Magic Wand tool to select the background – not the item that is the main subject. The Magic Wand has tolerance settings that make it more or less sensitive, so you may need to adjust these a bit. I photograph candy and chocolate at work. Yes, I have the best job ever. See the photo on the right – the background is already pretty white but it has some imperfections, most noticeably the large dark corner in the bottom right (click on image to enlarge).
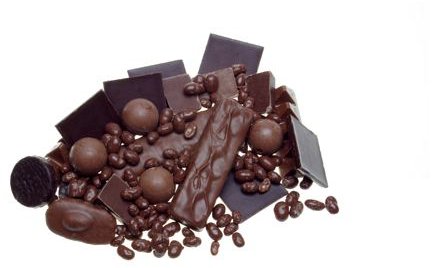
Once you have selected the background to your satisfaction, use the paintbrush tool to paint the whole image white. The Magic Wand tool prevents anything but what is selected from being painted over, so don’t worry about being too careful with the edges. You can also go back after this process and touch up some edges that got skipped. In the end, the photo is as I wanted it, with a completely white background.


