Although many digital cameras have a red-eye removal feature, oftentimes the option is forgotten by the photographer or inconvenient to use. Luckily, if that great photo of your sister has eyes that resemble something you saw in a horror movie, there’s good news - it’s an easy fix!
Like many tricks in Photoshop CS3 , there are a few different ways to fix red eye. In this article, we will explore two different ways to fix red eye in photos and get those beautiful eye colors back.
If you’re interested in learning what causes red eye in the first place, and how to avoid it, please click here .
Using the Red Eye Tool
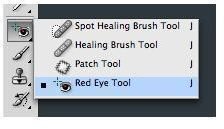
The easiest way to fix red eye in a photo is to use the Red Eye Tool. As shown below, choose the Red Eye tool from the toolbox or use the keyboard shortcut CTRL + Shift + J until the Red Eye Tool is selected. For Mac users, the shortcut is Command + Shift + J.
Next, you simply drag a small square around the eye, specifically around the part that is red. Try not to get the box too far outside of the red area. Once it is selected, just hit Enter. As if it is magic, in most cases the red will disappear and switch the eye color to a dark color.
For some people, this will suffice as it gets rid of the red eye. If you are like me, that is usually not good enough. Not only do I not want the red eye effect, I also want the actual color of the person’s eyes. For that, we need to use the Channel Mixer.
Using the Channel Mixer
Each photo file is composed of three main channels - red, green, and blue. One your picture is open, it is worthwhile to try and understand why the eyes are red in the picture. If you click on the Channels tab in the channels palette, you will see each individual channel as well as the RGB channel, which is the combination of them all.
Take a minute to examine the eyes in each of the channels. In the green and blue channels, they will look normal. In the red channel, however, the eye color will look distorted and different from the other channels. Therefore, we will need to adjust this channel.
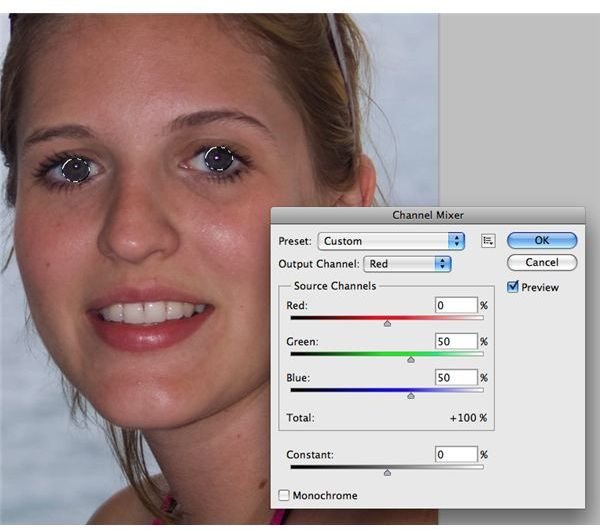
First, use the Elliptical Marquee Tool (Shortcut M) to make circles around the red spots in both eyes. After you have selected the first eye, hold down Shift and select the second eye. You might notice that a little + sign appears next to the tool. That means that you’re selecting something in addition to what you have already chosen.
With the red eyes selected, go to the menu and choose Image, Adjustments, and then the Channel Mixer. You’ll probably see Red at 100 percent. What you want to do is change the red channel to 0 percent, and change the green and blue channels to 50 percent each. You can mess around with the percentages a bit, but usually taking the colors equally from the other two channels works well.
Click OK to apply the channel adjustment, and the eyes should change to a natural color. The eyes will still be selected, so use the keyboard shortcut, Command + D, to deselect the eyes.
This channel mixer adjustment can also be done on a separate layer for non-destructive editing as well. Photoshop CS3 has shortcut icons for creating different layers conveniently placed on the right hand side of the screen.
This post is part of the series: Learning Photoshop - Lessons for Photographers
These articles are part of a series of tutorials in Adobe Photoshop, geared specifically for the digital photographer. These articles will include how-to lessons, tricks of the trade, and useful shortcuts. Learn to utilize the world’s most advanced, powerful photo editing software.
- How to Crop a Digital Photo Using Adobe Photoshop
- How to Convert Your Photos to Black and White in Photoshop CS3
- How to Remove Red Eye Using Adobe Photoshop CS3
- How to Remove Blemishes using Photoshop CS3 & CS4
- How to Make a Web Photo Gallery Using Photoshop CS3 & CS4
- How to Convert RAW to JPEG Using Photoshop CS3 & CS4


