“Through the Viewfinder,” or TtV, photography is a fun way to combine analog and digital photography. Shooting with a digital camera gives the advantages of digital photography, but using an old camera as a filter adds an appealing grungy, old-fashioned look.
What is TtV Photography?
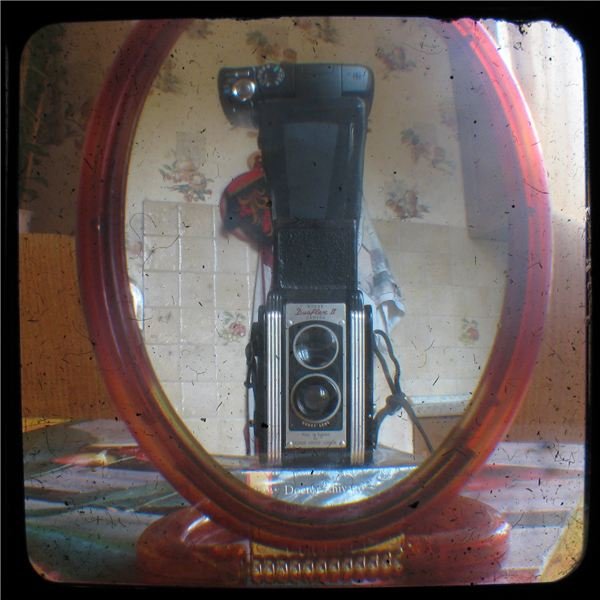
TtV–or Through the Viewfinder–photography is a technique for making images in which pictures are shot with one camera through the viewfinder of a second camera. Usually, the camera being shot through (the “bottom camera”) is a vintage TLR (twin-lens reflex), though any camera with a large viewfinder can be used. Cameras with a waist-level viewfinder, whether single- or twin-lens, are the most popular bottom cameras for TtV.
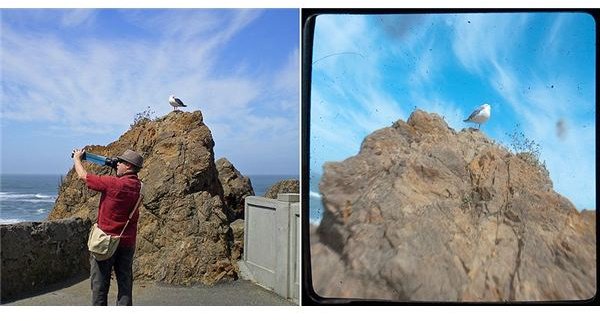
The camera being shot with (the “top camera”), is usually a digital camera, but TtV can also be done with two analog cameras. DSLRs (digital single-lens reflex cameras) are the most popular top cameras, but even a point-and-shoot can make a satisfactory image, at least for first experiments with the technique.
Why Would Anyone Shoot Through the Viewfinder?
Shooting TtV has a similar appeal to shooting with toy cameras --it’s fun, and the images that result can have interesting flaws that add to the image. TtV images often have a lot of noise from dust and scratches on the bottom camera’s viewfinder and peculiar, subtle distortions from the thick glass which give them a gritty, old-fashioned look. A similar look can be imitated (or “faked”) with digital processing , but it never quite looks as good as true TtV photography.
Aside from the fun factor (which is what drives a lot of DIY projects in many areas) and the appeal of the look of the images, TtV photography is a relatively easy and inexpensive way to put old cameras back into active use. It often seems a shame when a nice old camera is relegated to the curio shelf, and TtV can give it a new life without having to purchase increasingly expensive film or retrofitting for an available film format if the camera used a format no longer on the market.
Problems and Issues of TtV
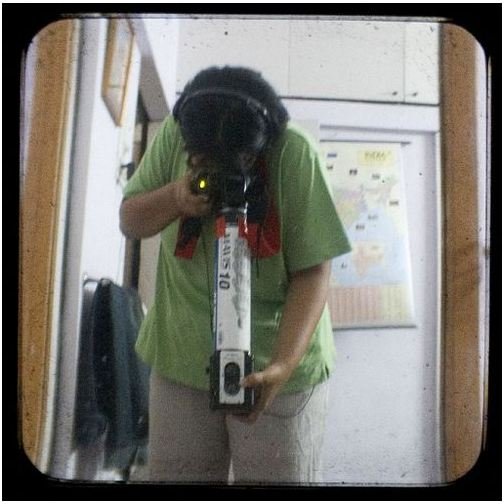
While TtV photography is not particularly difficult, especially if you already know your way around cameras, it does have its own particular issues. One thing you may notice if you simply start shooting with two cameras and nothing else is glare and reflections in the image from extraneous light hitting the bottom camera’s viewfinder. The way to avoid this is to build a “contraption” to connect the two cameras and block out light. This can be as simple as taping black construction paper between the two, or as elaborate as building a specially-fitted box. Have a look at some of the sites in the references, below, to see different ways that people have solved this problem.
Another difficulty that can arise is getting the top camera to focus on the image and not on the glass surface of the viewfinder. A bit of trial and error, and paying attention to your focus is usually all it takes to deal with this. At worst, you might have to switch off your auto-focus and focus the image manually (it’s best to avoid that if you can, though, as manually focusing a digital camera is finicky).
To Process or Not To Process?
The image on a glass viewfinder is backwards compared to the original scene. It may take some getting used to when framing your image, because you’ll have to shift the camera in the opposite direction to what it looks like you should. This also means that the resulting images will be backwards. Some fans of the technique like to leave their images as-shot, while others prefer to flip the images so they match the actual scene, especially when there is text.
There are also processing issues to think about. Many TtV enthusiasts prefer to do little more than cropping (because the top camera takes a rectangular image, but waist-level viewfinders are square) and straightening. Others like to correct the color or exaggerate any color oddities (depending on the desired result). Still other photographers like to convert to black and white or sepia to punch up the old-fashioned look. Other possibilities include fake cross-processing (such as using the Photoshop “Urban Acid” action), or other image filters and actions in your favorite image-processing software.
A Very Basic How-To
What you need:
- camera with waist-level viewfinder
- camera with which to take images (usually digital)
- contraption to connect the two
You’ll probably have the best success using a macro lens or macro/close-up setting on the top camera, though some photographers have had success with close-up filters or even macro-zoom lenses. First determine the best distance to have between your two cameras. Do this by seeing how close you can get with the top camera and still focus on the bottom camera’s viewfinder. You want to viewfinder to occupy as much of the frame as possible, but make sure you get the whole viewfinder in the image.
Measure that distance and construct a rig to connect the two cameras. If you just want to dabble, you can start out by blocking the light with heavy black construction paper, but if you like the technique, you might want to build something more permanent. Have a look at some of the links in the references below to see how others have done it.
Once you’ve got a “contraption” it’s just a matter of using it to connect the two cameras, framing up some interesting images, and shooting away. If you like the results, there’s an active TtV community online, including a blog, a Flickr group, and more. You’ll find links to explore below.
References
- Morris, Russ. " Through the Viewfinder: A Tutorial." 2008. Online at http://www.russmorris.com/ttv/index.html
- Cisney, Jenny. “Through the Viewfinder Photography.” Kodak: A Thousand Words blog, 2006. Online at http://1000words.kodak.com/thousandwords/post/?id=273519
- Photojojo. " Resurrect Your Vintage Camera, Digital Style." Photojojo newsletter, 2008. Online at http://content.photojojo.com/photojojo-original/through-the-viewfinder/
- DaniGirl. " TtV Contraption v2.0 " Postcards from the Mothership blog, 2010. Online at http://danigirl.ca/blog/2010/05/11/ttv-contraption-v2-0/
- Image 1 Credit: Through the Viewfinder Photography by Seriykotik (Own work) [CC0 ], via Wikimedia Commons .
- DaniGirl. “What the heck is TtV photography anyway, and why would you bother?” Postcards from the Mothership blog, 2009. Online at http://danigirl.ca/blog/2009/10/08/what-the-heck-is-ttv-photography-anyway-and-why-would-you-bother/
- Through the Viewfinder Flickr group online at http://www.flickr.com/groups/throughtheviewfinder/
- Through the Viewfinder blog. Online at http://ttvblog.wordpress.com/
- Image 3 Credit: TtV Rig by Meghana Kulkarni (own collection) [CC-BY-3.0 ], via Wikimedia Commons .
- Image 2 Credit: TtV Setup by Paxsimius (Own work) [CC-BY-SA-3.0 ], via Wikimedia Commons .


